BMW E36 Blog

Fixing BMW E36 Odometer LCD . . . DIY!

28th August 2008

Fixing BMW E36 Odometer LCD . . . DIY!


This DIY (Do It Yourself) is a contribution from David Mc. I’ve found it on the Bimmerfest forum and I asked David for permission to publish the DIY on the BMW E36 Blog. He was so kind to allow me to republish it here. The procedure shows how the odometer LCD can be fixed. I’ve written previously about how to fix the BMW E36 odometer backlight, but this is how to fix the LCD, not the light, so pay attention to the difference.

Disclaimer: Use this info at your own risk!! I’m not responsible if this didn’t work for you :-).

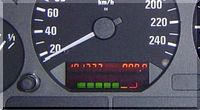
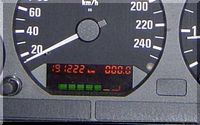
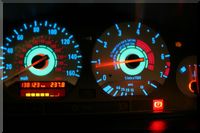
This is the problem – only the top half of the odometer and trip meter is displayed. It is a backlit LCD device but the two blubs illuminate the odometer and service indicator respectively.

Since only the top half of the odometer is displayed the problem is obviously with the LCD and not the bulbs. Commonly this is an intermittent but annoying problem.

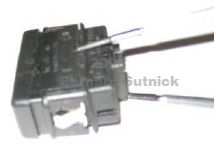
Begin by removing the cluster – the first step is to disconnect the battery, then undo the two torx screws on top of the housing and use a credit card to loosen and wiggle the cluster out of the dash. As soon as it is clear, reach behind the cluster and undo the three electrical connectors by first depressing the tabs then sliding the retainer up until the connector is released.

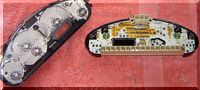
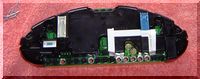
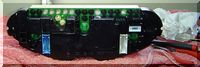
Make sure that you face your work surface with a towel to avoid scratching the cluster, then after removing the five torx screws from the back of the rear housing, carefully separate the gauges from the SI board.

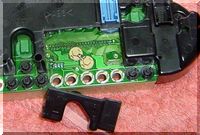
Mark out the area of interest – I used white tape and then cut carefully with a piece of hacksaw blade. You could use a Dremel or even a hobby knife heated with a torch for this job.

There is a fair bit of clearance between the cover and the board but I would suggest extreme caution as you cut down the side of the housing toward the board as there are a couple of tracks that run across the board at this point and a slip here could cause big problems.

I worked carefully and completed the cut within about half an hour using a hacksaw blade – my modelling saw would have made life much easier if only I could remember what I did with it.

After removing the cut section carefully dress the edges of the cut area with a small file to remove burrs, then use a small paint brush and low pressure compressed air to clean the debris from the board.

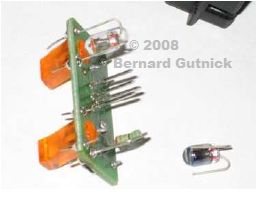
Notice that there are also couple of little gold colored torx screws which secure the SI LCD to the board. Check that they are snug but do not over-tighten them. The idea is to make sure that all the electrical connections are firm, not to cause fractures in the board by over-tightening the components.

I used a hot pencil tipped soldering iron to reflow all of the SI board pins, then carefully replaced the cut cover section using 5 minute epoxy. Apply the epoxy carefully to the cut edges of the housing. Then once its back in place use a rag soaked with turpentine to remove the excess.

All that was left was to install the cluster back into the car, reconnect the connectors, battery and re-enter the radio code and it was up and running!

A heck of a lot cheaper than a new or even a used cluster and I didn’t have to worry about recoding or it displaying incorrect mileage.


Are you looking for more do it yourself procedures (DIY) ? I recommend the Bentley BMW 3 series service manual for you. I got it and I think it’s a gold mine for us -BMW E36 Owners-. If you didn’t grab your copy yet, get it right now! I’m sure you’ll find this book worth every penny you’ve paid for. Get the Bentley BMW 3 series service manual

BMW E36 Blog: The ultimate BMW E36 information source.


Want to receive exciting tips & information about BMW E36 cars? Enter your Email:-


posted in Do It Yourself, Electrical, Tips & Tricks, Uncategorized | 3 Comments

24th August 2008

Repairing BMW E36 A/M Gearbox Light . . . DIY!


This DIY (Do It Yourself) is for you BMW E36 owners with automatic gearbox. It was contributed by Bernard Gutnick (thanks Bernard). The procedure shows in very simple steps how you can fix the light inside your A/M gearbox switch. I think this same procedure can be used to replace the bulb inside your window switches as well, but I’m not sure if it’s the same bulb. Have fun…

Disclaimer: Use this info at your own risk!! I’m not responsible if this didn’t work for you :-).

If the A light bulb is burned out due to constantly being on, you can replace it rather than spending $70 on a new switch.

1. Gently pry up the window/window lock/window button carefully from the top with a tiny screwdriver.

2. Put hand in and push AM button up until it pops up. Disconnect yellow connector.

3. Put small screwdriver in switch and gently pry up the two side clips. Leave in screwdriver and do same for other side.

4. Light and switch unit can be removed. Gently pull up circuit board.

5. You’ll see the black burned out bulb ( A or M or both ).

6. Now the tricky part. You have to cut the bulb out but only one at a time. Replace it with a Radio Shack RS 272-1092 12vt Micro lamp

7. It’s important to try to get the wires to be the same length as the original and with the lamp in the same position. Take your time. When soldering, only put on a very small drop as it has to fit back into the black housing. 1/16 inch of solder is enough. Use pliers to protect the bulb. Try to get the wire length and shape to be equal to the other one.

8. When you are done, carefully put the wire into the slots of the black housing, and put the cover back on.

9. Reconnect yellow connector. Light will appear when car is started. Congratulations! You just saved $68 in 30 minutes!!

Note: the car will still work with the switch removed. I think it defaults to Automatic, but I am not certain.


Are you looking for more do it yourself procedures (DIY) ? I recommend the Bentley BMW 3 series service manual for you. I got it and I think it’s a gold mine for us -BMW E36 Owners-. If you didn’t grab your copy yet, get it right now! I’m sure you’ll find this book worth every penny you’ve paid for. Get the Bentley BMW 3 series service manual

BMW E36 Blog: The ultimate BMW E36 information source.


Want to receive exciting tips & information about BMW E36 cars? Enter your Email:-


posted in Do It Yourself, Electrical, Technical Info, Tips & Tricks, Uncategorized | 3 Comments

14th August 2008

BMW E36 Carbon Fiber Hood


Hi Guys,

I’ve found some photos of carbon fiber hoods that fit perfectly in the BMW E36 cars. So, I thought I should share this with you and see if you like it or not? I think the carbon fiber hoods will look great on black BMW E36 cars, and maybe white cars too, but I’m not sure about the rest especially if they’re not painted. For painted ones, I didn’t see any examples yet to judge, but I think it will look cool too. Pay special attention to the vents. They would look awesome with some side air vents. What do you think?

Take a look at the photos and let’s hear your opinions…


BMW E36 Blog: The ultimate E36 information source.

Want to receive exciting tips & information about BMW E36 cars? Enter your Email:-


posted in Exterior, Photos, Tips & Tricks, Uncategorized | 9 Comments

10th August 2008

Daniel’s Bimmer


Hi Guys,

Daniel was so kind to send me some pics of his BMW E36. That was long time ago and I couldn’t publish something about this car until today. I always have a full schedule … you know 😉 .

The car looks really cool with the special touches and colors (I especially like the Plasma guages and the great sub & amplifier). The only thing that is upseting me is that Daniel is going to get rid of her because of the UAE regulations which is banning old cars. What a shame!

Take a look at the photos, then let’s hear your opinions…


BMW E36 Blog: The ultimate E36 information source.

Want to receive exciting tips & information about BMW E36 cars? Enter your Email:-


posted in Interior, Tips & Tricks, Uncategorized | 17 Comments

5th August 2008

Fixing BMW E36 Headliner


Well, I had some free time couple days ago and I decided to clean my front pillars because they’ve been annoying me with their dirty look. So, I removed them carefully and took them inside my house and washed them. After that, I left them to dry for an hour or so. When I went to the car to put them back I’ve noticed a very very big difference between the color of the clean pillars and my headliner. Take a look:

It’s shocking how dirty my headliner is compared to my clean pillars.

So, I’ve decided to clean up my headliner as well but I was afraid to make it worse because the fabric has loosened with time and it’s not going to stand up again my cleaning brush. So, I’ve decided to search the web to see if someone tried this before. Luckily I found this which is a DIY for removing your headliner. Well, this is going to make things much easier for me instead of brushing upside down :p

I kept digging for more information about this subject and I found a kit that can help you change your headliner fabric instead of trying to give it a wash and best of all, it’s very cheap. Take a look here.

All you have to do is to glue the new fabric which comes with this kit on your fiberglass panel which you have removed using the DIY provided above. Then put everything back the way it was.

I’m going to order this kit and try it. Hopefully, it will be a success and give my car a very new OEM look again 😀


Are you looking for more do it yourself procedures (DIY) ? I recommend the Bentley BMW 3 series service manual for you. I got it and I think it’s a gold mine for us -BMW E36 Owners-. If you didn’t grab your copy yet, get it right now! I’m sure you’ll find this book worth every penny you’ve paid for. Get the Bentley BMW 3 series service manual

BMW E36 Blog: The ultimate BMW E36 information source.


Want to receive exciting tips & information about BMW E36 cars? Enter your Email:-


posted in Interior, Technical Info, Tips & Tricks, Uncategorized | 4 Comments