BMW E36 Blog

Replacing BMW E36 Headlights … DIY

11th June 2012

Replacing BMW E36 Headlights … DIY


Hello,

If you’ve seen my BMW E36 pictures before, you’d know that I have low quality Chinese headlights. When I bought the car, I knew these headlights are not the best (lighting-wise), but I kinda liked the way they looked and of course the angel eyes with blue circles added to that look. So, I thought that I can’t replace them easily while keeping the car looking as good as it looked back then.

With time, these headlights started to show the marks of age and since they’re made of plastic, they were deteriorating fast. A month or may be 2 ago when I showed you that BMW E36 Headlights Guide, I thought to myself that may be it’s time that I replace those old-dusty-looking headlights with some original ones that are made of glass (this was my top priority). Headlights can be of huge effect on whether the car looks nice or looks old. Since glass headlights are not affected by time (at least, they are better at that than plastic), I made up my mind to get those glass headlights.

Replacing the old headlights with the new stock ones was very easy. If you care to learn how to do it, the most important thing is to keep in mind that there are 5 screws that will hold a headlight in place in BMW E36 cars.

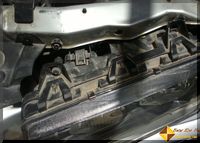
Take a look at this picture. 3 screws at the top and 2 at the sides (bottom).

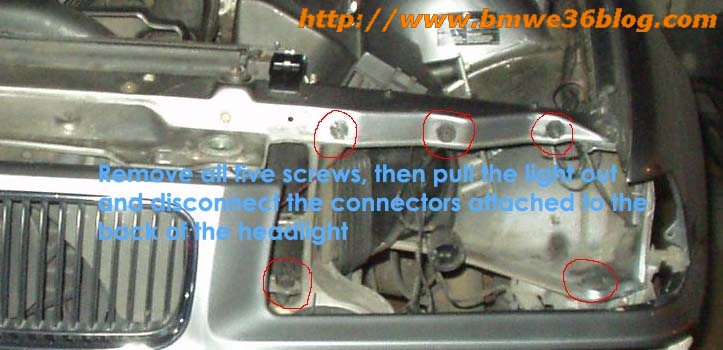
Lucky me, I found that my old headlights were using only 2 of the top screws to hold the headlight and the two at the sides were missing. So, I removed the 2 screws and the old headlights came out right away.


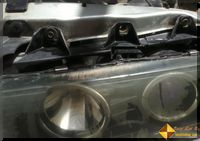
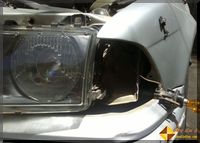
There was one catch here which made me realize how lucky I am, otherwise, this replacement task would’ve become a nightmare. The guy who changed the old stock headlights with these one-piece headlights was smart enough not to cut the sockets that were designed to plug into the original stock headlights. Instead, he scratched the wires and used auxiliary wires to connect the headlight wires with the old one-piece headlights. So, this meant that in order to restore everything to its original shape, I had to remove those auxiliary wires and tape the scratched wires. After that, I’ll just plug the sockets into the stock headlights and I’m done.

That’s exactly what I did. Then, I put the headlight in the correct place and slide it there carefully.

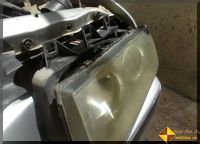
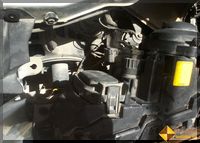
Before each headlight sits perfectly in its position, I connected the sockets to the the headlight.

Installing the turn signals was very easy too. The signal light with its socket will fit into the new stock turn signals perfectly. I didn’t have to do anything in there. Just plug them and you’re good to go.

Notice that you’ll have to be extra careful when sliding the turn signals to the side of the headlight. Never ever try to force it into position. If you’ve installed everything correctly, the turn signals will slide in perfectly with small pushing power.

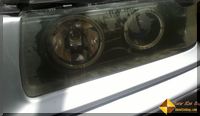
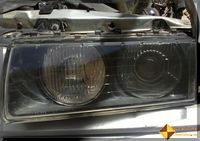
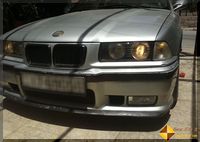
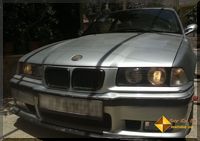
Next, I’ll post about delensing my headlights, but for now, I’ll leave you with these two pictures of the new stock headlights

IMPORTANT: If you’ve not subscribed to the BMW E36 Blog Facebook page, please do using the “LIKE” button below


BMW E36 Blog: The Ultimate BMW E36 Information Source.

Want to receive exciting tips & information about BMW E36 cars? Enter your Email:-


posted in Do It Yourself, Electrical, Exterior, Photos, Technical Info, Uncategorized | 3 Comments

23rd April 2012

BMW E36 Sunroof Problem

 
Hi Guys,

I’m having a problem with my BMW E36 Sunroof. It looks like my motor doesn’t recognize the position of the sunroof correctly. So, when I try to open the sunroof, it opens but doesn’t slide all the way to the back as it’s supposed to. Also, when I close it, it keeps moving until it’s closed, then, it continues and starts tilting the sunroof. So, it’s like it can’t tell that it has already reached to the stop point.

I did some research about this issue and it seems I’ll have to reset my sunroof motor position. I’ll show you that procedure (DIY) when I complete it. In the meantime, you can check out the problem with my sunroof below

NOTE: Did you Like the BMW E36 Blog page on Facebook? If you didn’t, please click the Like button below this video.


BMW E36 Blog: The Ultimate BMW E36 Information Source.

Want to receive exciting tips & information about BMW E36 cars? Enter your Email:-


posted in Electrical, Technical Info, Uncategorized, Videos | Comments Off on BMW E36 Sunroof Problem

9th April 2012

BMW E36 Headlights Guide

 
Hi Guys,

If you’ve seen my car before (here it is BMW E36 318is), you’d know that I’m using aftermarket headlights and although I think these headlights look great, there’s a huge problem with them that is becoming more and more annoying every day. The problem is the headlights plastic lenses. They started to look dirty and old and no matter how I tried to clean them (I’ve even tried to wax them), they’ll revert back to the ugly-old-looking headlights which is clearly started to annoy me very much.

I’ve decided that I should ultimately switch back to stock headlights, but the problem is that I don’t want to lose the angel eyes and the HIDs. So, I started digging to see what options I have and to make some comparisons between the different headlights + their options that are available at the moment. I may write about these soon.

While doing that, I found this great tutorial about BMW E36 headlights and HIDs. So, I thought you guys (the BMW E36 owners) should watch this. It’s definitely helpful although a little bit long… I won’t keep you for so long, so, you go a head and watch it.

IMPORTANT: The BMW E36 Blog is on Facebook now. Please become a fan by pressing the “Like” button below the 4th video.

Have fun 🙂
Part1:


Part2:


Part3:


Part4:


BMW E36 Blog: The Ultimate BMW E36 Information Source.

Want to receive exciting tips & information about BMW E36 cars? Enter your Email:-


posted in Electrical, Technical Info, Tips & Tricks, Uncategorized, Videos | Comments Off on BMW E36 Headlights Guide

6th January 2009

BMW E36 Heated Seats Fixed


Hi Guys,

When I bought my car (it was like 2 years ago), I was taking it for a spin just to test-drive it when I noticed the heated seats buttons. Believe it or not, I didn’t know what these buttons were for at that time as I didn’t have much knowledge about the E36 cars like I do now. I asked the previous owner about the buttons and he said they were for heated seats and pressed them. The funny thing is that he didn’t realize at that time (and I’m sure of it) that the heated seats were not working in his car. After I bought the car, I knew that I have to invest sometime to fix my heated seats as they were not working at all. The weird thing is that the heated seats resistance was indicating that they’re running just fine (I used a multi-meter). I’ve tested the power on the plugs under the car too and they were working fine too. hmmm… that’s odd

I wrote before about Installing BMW E36 Heated Seats and the procedure is straight forward, but it needs some time to accomplish that if you could find the heating elements which everyone said they were not very easy to find. While I was looking for heating elements for my car (thinking it was the reason behind my problem), I’ve found a shop who is ready to give me the heating elements from old BMW E36 seats. I’m sure you can imagine how happy I was after hours and hours of looking.

Anyway, since the guy at the shop seemed to know what he was talking about, I asked him to replace them in my car. Of course he had to remove the seats from the car which is very easy. Then the heating elements replacement process began:

There are 2 heating elements in every seat. One for the back and one inside the seat cushion. The one in the back of the seat was very easy to expose. Simply, he pulled the back leather carefully with a flat screw driver and that was it. To my surprise, I’ve found the heating elements for the back already there and connected. they were also heating just fine. But guess what was the reason why I didn’t feel the heat? Hmmm.. I’m sure you can’t guess because it was the most stupid thing I’ve seen in my entire life. The heating elements were placed behind the sponge. That’s the heating element was heating the sponge instead of heating the leather which I’m supposed to feel. I already know that my seats leather was replaced right before I bought the car, but I didn’t imagine that it was being done by a stupid guy. Damn … stopping heated seats, what were you thinking?!!!

Anyway, the guy at the shop had to separate the leather of the back seat from the sponge and put the heating element there (between them) then make sure that everything returns to its original state.

The cushions were a little bit harder as he needed to remove the knee support part from the cushion, remove 4 screws from the bottom then remove that cushion. After removing the cushion, I was really hoping to find the heating elements in these cushions as well (as in the back), but unfortunately, they were not there. So, he used 2 of the heating elements in the cushions and that was pretty much it. Then put everything together to end up with my heated seats running again… Boy that was fabulous. If your heated seats are not working for some reason, I suggest you fix them right away, you don’t know what you’re missing.


BMW E36 Blog: The ultimate BMW E36 M3 information source.


Want to receive exciting tips & information about BMW E36 cars? Enter your Email:-


posted in Electrical, Interior, Technical Info, Tips & Tricks, Uncategorized | 6 Comments

25th November 2008

EBay Illuminated Shift Knob … Very nice


I’ve found some pictures of an illuminated BMW E36 M3 shift knob. The shift knob is a little bit different from the OEM style, but it looks very decent and it’s very cheap. Costs just $30 (without shipping) which is a killer price when compared to the OEM one. You can find it on ebay here.  I just want you to notice how fabulous it looks with a short shift kit (well, it looks like one). By the way, I’m not a fan of the yellowish illumination color. It would be better if it was amber. Anyway, take a look, I think even with this flaw, it still looks good. Besides, I think you may be able to open it and somehow get it to illuminate amber instead. I know, I tried this with the OEM one and it worked like charm.


BMW E36 Blog: The ultimate BMW E36 M3 information source.


Want to receive exciting tips & information about BMW E36 cars? Enter your Email:-


posted in Electrical, Interior, Tips & Tricks, Uncategorized | 1 Comment