BMW E36 Headlamp Glass Replacement
Hello my friends,
It’s been 3 days since I posted something to the blog. I know that I’m a little bit slow on writing here, but I hope I will have more time in the next few days to write more. Today, I came to you with an article about how to replace your BMW E36 headlight glass ( I found this article here). I know that many of you guys have crystal lights instead of the standard BMW E36 headlights, but I know that many of you have the standard lights as well, so I think you should read this anyway. I hope you like it.
Disclaimer: Use this procedure at your own risk and don’t come crying to me after you break something in your car LOOOL! 🙂
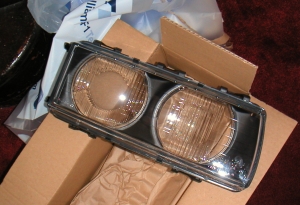
Been on motorway recently? encountered storm of stone chips kicked up by some cunt infront? Cracked headlamp glass or just badly pitted, they both look pants, so change just the glass and the front end of your car will look about 5 years younger. Bit pricey for a bit of glass, dealer will want �72 per side. If you can afford it change both sides otherwise it’ll look odd like mine, but hey. First off let’s see what you get for your wonga.
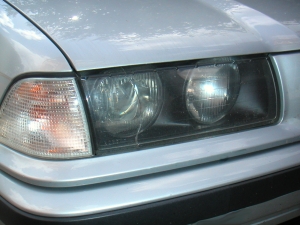
Awww feck, headlamp glass is cracked. Looks pants and probably fails the MOT.
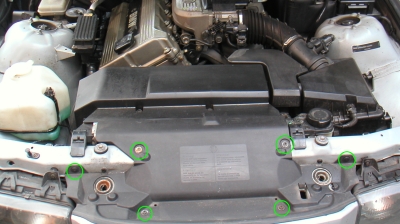
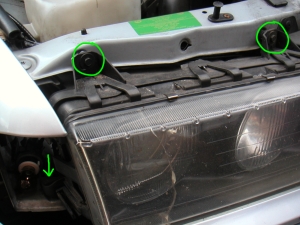
Lift bonnet and take the plastic cover thing off, its held on with 4 normal screws and and 2 plastic ones. This will help with access to the bastard nut that’s really hard to get to and adjust properly.
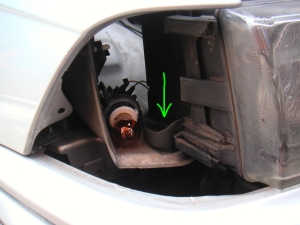
Next take out the the indicator, easier said than done. There’s a clip that you can just see from above looking down in between the indicator and the headlamp unit. Use a screwdriver and carefully but brutally push the clip towards the indicator and push the whole indicator out from behind simultaneously. Have fun with this one. The green arrow shows the location of one of the four/five bolts that hold the headlamp unit in.
My headlamp unit only had four bolts holding it in, earlier cars I believe had five. No matter ‘cos it’ll just be the one missing in the middle that’s obvious. Just undo these bolts being careful not to let the plastic adjustment plug type thing behind it turn, use an open ended spanner to stop them turning and later to adjust the headlamp units position.
The really hard to get to bolt is sort of arrowed here, it sits at the bottom somewhere in that gap, get your socket set and extensions out for this one.
Take all the connector type things off for the lamps and the adjuster motor.
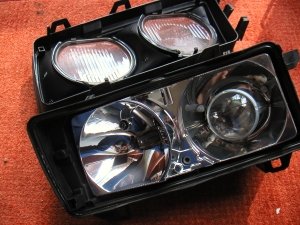
Take the whole unit out and undo the massive clips all the way around. Make sure all the inside parts are clean of dust and fingerprints etc, otherwise it’ll bug you later when you can’t get to them as easily. Clip the new glass in place and stick it back on the car. Use the plastic plug type adjuster things that go between the car body and the bolts to adjust how the lamp sits. Look at the headlamp on other side of the car for what the gap sizes roughly are. Tighten everything back up and replace everything you’ve taken off.

Are you looking for more do it yourself procedures (DIY) ? I recommend the Bentley BMW 3 series service manual for you. I got it and I think it’s a gold mine for us -BMW E36 Owners-. If you didn’t grab your copy yet, get it right now! I’m sure you’ll find this book worth every penny you’ve paid for. Get the Bentley BMW 3 series service manual
Wait for more from . . . BMW E36 Blog
Best regards,
Tony Sticks.

Want to receive exciting tips & information about BMW E36 cars? Enter your Email:-
posted in Do It Yourself, Exterior, Technical Info | 5 Comments

 (4.86 out of 5)
 (4.07 out of 5)


