BMW E36 Blog

How to keep your car cooling system in perfect shape . . . part3!

15th August 2007

How to keep your car cooling system in perfect shape . . . part3!

Finally, we have reached to the third and final part of the series How to keep your car cooling system in prefect shape! For those of you who missed part 1 and part 2 of this series, please read them before you continue to read this part. I hope you enjoyed these posts and found the information I presented here useful.


This final post is about changing the coolant in your BMW. The first and second parts concentrated on information about BMW cars cooling system and how to detect any problems inside it.  Finally, let me thank the original writer Wayne R. Dempsey for the great write-up he made.


Disclaimer: Use this info at your own risk!! I’m not responsible if this didn’t work for you.

Changing the Coolant in Your BMW


Okay, so I’ve convinced you that your coolant needs changing. The good news is that it’s relatively easy on the BMW 3-Series. Begin by getting a large drip pan to place underneath your car. My favorite choice is kitty litter boxes, as they are large, are made of plastic, and will hold a lot of coolant. The BMW 3-Series six cylinder engines will hold just shy of 3 gallons (10.5 liters), so make sure that whatever container you use is capable of holding all of that coolant.


With your BMW cold, elevate it on jack stands. Place the heater control knobs all the way on hot, turn the ignition to the on position, and turn on the passenger compartment fans to their lowest setting. Do not start the car. By turning the heater knobs on, you are opening the valves to the heater core, which will allow you to drain the coolant located in the core. For cars with electronic climate control, make sure the ignition is on and the heater is set to maximum heat.


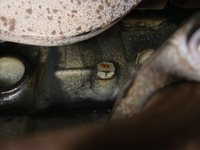
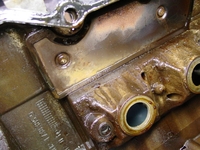
On the right side (passenger side for US-cars) of the engine, just under the manifold, you will see the drain plug for the coolant. This is a photo of exactly where this plug is located.


Place your collection container underneath the plug, as shown below .


Remove the plug and let the coolant empty out into the catch pan. BEWARE: I have found it nearly impossible to empty the coolant without having it spill on myself. Don’t wear any decent clothes, and make sure that you are wearing safety glasses when working underneath the car. The coolant will empty out much like water comes out of a shower – it will spray all over, and will be difficult to catch 100% into your pan. Have plenty of paper towels on hand to clean up the spilled coolant.


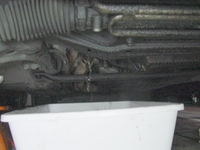
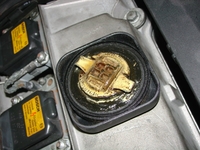
When all of the coolant has been released from the engine block, replace the plug (use a new sealing aluminum ring) and tighten it to 25 Nm (18 ft-lb). Now, move onto the radiator. There should be a plastic drain plug at the bottom of the radiator, as shown below.


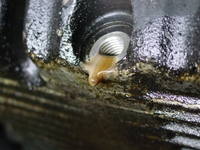
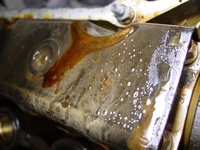
Position your drain pan, and slowly remove this drain plug. The stream from the radiator is a bit more predictable, and should empty in a steady stream, as shown below:


When all of the coolant is emptied out of the radiator, replace the plug. Tighten to 2-3 Nm (18-27 in-lb). Note this torque is very, very small – don’t over tighten the plug as you may damage either the plug or the radiator.


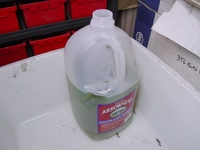
With all of the coolant removed from the system, use a funnel and place it into plastic containers. One gallon spring water or milk containers make excellent storage containers for used coolant.


Don’t pour the coolant down the drain, instead take it to a recycling station. A note about coolant – it is highly toxic and dangerous to pets and small children. Used coolant should be packaged up right away. Less-than-intelligent animals seem to like the smell and taste of coolant, and will be attracted to it. Package it up and seal it off, otherwise you may find kitty dead in the garage one day – no joking. Rinse and dilute any contaminated areas with water.


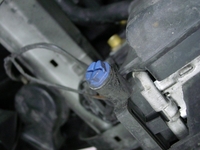
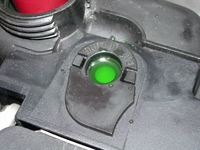
Remove the small plastic bleed screw to the right of the radiator cap. On M3 engines, this screw is located on the thermostat housing. Using a large funnel in the expansion tank, slowly fill the car with new coolant. Use a 50/50 mixture of antifreeze and distilled water. Do not use tap water or spring water, as these have impurities that will contaminate your system. Distilled or ionized water is 100% H20, and does not contain any minerals, additives, or impurities. Fill the system very slowly, as it will take a bit of time for the coolant to get to all points in the system. On 4-cylinder cars, you will need about 7 quarts (6.5 liters). For the six cylinder cars, you will need 10.6 quarts (10 liters). M3 motors require 11.1 quarts (10.5 liters).


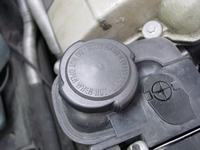
When the system is full of coolant, you will need to bleed air out of it. This applied only to the cars that have the expansion tank attached to the side of the radiator. Other BMWs with a separate, external expansion tank are self-bleeding. The procedure for bleeding these cars seems somewhat sloppy and not too slick. With the bleed screw removed, fill the expansion tank until fluid begins coming out of the bleed screw. Continue filling until there are no more bubbles coming out, as shown below:


This, of course will mean that plenty of coolant will spill all over your radiator, and down onto the ground. Have a catch pan ready to capture this coolant spill. When no more bubbles exit out of the bleed screw, tighten it to 8 Nm (71 in-lb).


Now, run the engine until it reaches it’s operating temperature. Turn off the engine and let it cool down. Then, top off the coolant in the expansion tank to the appropriate level, if necessary.


I’m sure one question you’re about to ask is “what type of coolant should I use?” BMW has issued a 1991 technical bulletin, 17 01 88(1743), which details problems with what is known as silicate gel precipitation in engines. This is the ‘green goo’ (yes, it actually says that in the BMW Tech bulletin – gotta love those German translators) that results as a consequence of an antifreeze over-concentration in the coolant, combined with hard water, and the phosphates commonly used in many antifreezes. BMW factory antifreeze has been formulated to prevent this problem of silicate drop-out without any coolant performance loss. This antifreeze contains no nitrites and no phosphates. The part number for a one gallon container is 88-88-6-900-316, and it costs about $13.00 per gallon. Although I am always eager to find alternatives to BMW factory products, I would stick with the factory coolant for now.


Well, there you have it – everything you’ve always wanted to know about BMW cooling systems. Be sure that after a few days of driving, check the coolant level again, and top it off if necessary.


Are you looking for more do it yourself procedures (DIY) ? I recommend the Bentley BMW 3 series service manual for you. I got it and I think it’s a gold mine for us -BMW E36 Owners-. If you didn’t grab your copy yet, get it right now! I’m sure you’ll find this book worth every penny you’ve paid for. Get the Bentley BMW 3 series service manual


BMW E36 Blog: The ultimate BMW E36 information source.


Want to receive exciting tips & information about BMW E36 cars? Enter your Email:-


posted in Cooling System, Technical Info, Tips & Tricks | 2 Comments

14th August 2007

How to keep your car cooling system in perfect shape . . . part2!

As I promised you in my previous post How to keep your car cooling system in perfect shape . . . part1!, here’s the second part of this series. As I’ve told you in my previous post, the content of this article will create a very very big wall of text that I’m sure many of you will hate to even look at it. So I decided to break it down into 3 parts.


I will be posting the third (final) part tomorrow (well… I hope!).


Before we begin, let me thank the original writer of this article Wayne R. Dempsey.


I hope you will find the second part of this article useful. For those of you who didn’t read my previous post, please follow this link first before reading this part.


Disclaimer: Use this info at your own risk!! I’m not responsible if this didn’t work for you.

Cooling System Maintenance – Checking the Level


It’s very important to check your coolant level regularly, as this will help detect leaks that can siphon off coolant and cause overheating in your engine. You should regularly check the coolant level in your coolant reservoir, making sure that it is within the prescribed High/Low marks. These marks are printed on the side of the coolant container. The container is slightly transparent, and you can see through it slightly to see the current coolant level.


Your BMW will lose a little bit of coolant here and there over time due to evaporation from the reservoir. However, a significant loss of coolant over a very short period of time almost certainly signifies a leak in the system. Sometimes a leak can be seen when you park the car overnight. Often the coolant leaks out and then evaporates while you’re driving, leaving no tell-tale mark of coolant on the pavement. If you suspect a coolant leak, visually inspect all of the hoses, the water pump, the reservoir, and the radiator for seepage or the ‘weeping’ of coolant out of seams and gaskets. Check the seal on the radiator cap. Check that the radiator cap is fastened securely – the way the BMW radiator cap is designed makes it easy to make the simple, yet deadly mistake of leaving the cap cocked – allowing coolant to leak out when the engine is running. If you suspect a leak that you cannot see, a pressure test from a professional mechanic can verify the integrity of your system.

If you can’t find any visible leaks and the system appears to hold pressure, then check to make sure that the cap is good, and is rated for the proper pressure. Verify that the cap you have for your BMW is the proper one for your engine. The following figure shows an example of a proper radiator cap for the BMW 3-Series 325is.


If the system does not hold pressure, and you’re still at a loss where coolant might be disappearing to, then you might want to start looking in the oil. A faulty head gasket will often cause coolant to leak into the oil. If you remove your oil cap and find a yellow murky substance, then you probably have a faulty head gasket. This figure shows an example of what this mixture looks like.


The oil level may be elevated and you will be able to see droplets of coolant inside the oil filler hole. If coolant is leaking past the gasket into a combustion chamber, you will see steam exiting out of the tailpipe, and the spark plugs will foul easily. In addition, the exhaust will be contaminated with the silicate corrosion inhibitors found in the coolant, and your oxygen sensor will be destroyed – plan on replacing it if you have experienced this problem.


These figures show what your oil may look like after the coolant and oil mix together.


These figures clearly show drops of coolant after the valve cover has been removed.


If you can’t discover what happened to the coolant, it may be because there was a temporary overheating problem and some of the coolant boiled over. In this case, top off the coolant and keep a very close eye on it. It’s not uncommon for BMW overheating issues to suddenly destroy a head gasket.


Checking Coolant Strength & Condition


You should periodically test the strength and condition of your coolant to assure that you have achieved the optimum balance for your BMW. This is just as important for protection against heat as it is for protection against freezing. An imbalance between water and antifreeze levels will change the boiling point and/or freezing point of the mixture. A 50/50 mixture of water and ethylene glycol (EG) antifreeze will provide protection against boiling up to approximately 255° F (with a 15 psi radiator cap). This mixture will protect against freezing to a chilly -34° F. On the other hand, a similar 50/50 mixture of propylene glycol (PG) antifreeze and water will give you protection from -26° F to about 257° F.


If you increase the concentration of antifreeze in your coolant, you will raise the effective boiling point, and lower the freezing point. While this may seem beneficial on the surface, having a antifreeze content of greater than 65-70% will significantly reduce the ability of the coolant to transmit and transfer heat. This increases the chances of overheating. As with most things in life, it’s a good thing to maintain a healthy balance.


Beware – you cannot accurately determine the condition of your coolant simply by looking at it. The chemical composition and concentrations in the coolant are very important – if the chemistry is off, then your coolant may be harming your engine.


As mentioned previously, it is important to keep the coolant fresh. The main ingredient in antifreeze, ethylene glycol, typically accounts for 95% of antifreeze by weight. It does not typically wear out, but the corrosion inhibitors that comprise the remaining 5% typically do degrade and wear out over time. Keeping the coolant fresh is especially important with engines that have both aluminum heads and cast iron blocks.


I recommend that the coolant be changed at least every two years, or every 25,000 miles. I’m not a huge fan of long-life antifreeze – if these longer-life fluids are mixed with conventional antifreeze (a very easy mistake to make), the corrosion inhibitors react and reduce the effective protection of the long-life fluid. If you do have this long-life fluid installed in your car, only add the same type of anti-freeze to the car. Don’t mix and match regular and long-life fluid.


Unfortunately, it’s tough to determine if your long-life coolant has been mixed or topped off with ordinary antifreeze. Although some coolants are dyed a separate color (like Dex-Cool in GM vehicles), when mixed with standard antifreeze, it typically isn’t enough to overpower the bright green color. In general, unless you know the entire service history of your BMW, it’s a wise idea to err on the side of caution, and use a shorter service interval for changing your coolant.


Okay, so how do you check the coolant in your system? I recommend using little chemical strip tests that measure how much reserve alkalinity is left within the coolant. The test strip changes color when immersed in the coolant. You can then compare the final color change to a reference chart in order to determine the condition of the coolant. Obviously, if the coolant tests poorly or is borderline, you should plan on replacing your coolant very soon.


An additional note – EG and PG antifreeze has differing specific gravities, so make sure that you use the correct type of test strip when testing your coolant. Otherwise, you may end up with false readings.


Are you looking for more do it yourself procedures (DIY) ? I recommend the Bentley BMW 3 series service manual for you. I got it and I think it’s a gold mine for us -BMW E36 Owners-. If you didn’t grab your copy yet, get it right now! I’m sure you’ll find this book worth every penny you’ve paid for. Get the Bentley BMW 3 series service manual


BMW E36 Blog: The ultimate BMW E36 information source.


Want to receive exciting tips & information about BMW E36 cars? Enter your Email:-


posted in Cooling System, Technical Info, Tips & Tricks | Comments Off on How to keep your car cooling system in perfect shape . . . part2!