BMW E36 Blog

Fixing your BMW OBC (On Board Computer) lights . . . DIY!

19th August 2007

Fixing your BMW OBC (On Board Computer) lights . . . DIY!

If you have a BMW with OBC (On Board Computer). It’s most likely that you will face a problem in its back lights sooner or later. Luckily I didn’t face this problem with my car yet, but my brothers car has this problem and his car’s OBC looks really disgusting. The problem begins when one of the back lights of the OBC decides to die and your OBC which you love to play with from time to time starts to look like a guy with black eye. At that time, you know that you have to do something about it and I know. You will be thinking … man, I shouldn’t mess with this OBC because it looks really complicated and I may end up breaking something. Guess what? you are wrong! Fixing the OBC back lights is a very simple task and it’s the subject of today’s post. I hope you enjoy this post and find it useful for your car. By the way, I want to thank Eduardo Cesconetto the original author of this great post.


For those of you who like to fix their BMW car(s) by themselves, I recommend you to get the Bentley BMW 3 series service manual which is one of the best books I’ve ever read. I got it and recommend you to get one for you as it will save you too much time and effort while fixing your car.


Disclaimer: Use this info at your own risk!! I’m not responsible if this didn’t work for you.

My OBC had only one light working, the one in the left corner, and so it was a pain to look at it, and it looked like the LCD was burned, but it comes out is just a matter of replacing some light bulbs. You can get the bulbs at the dealership for $2.50 each, and just ask for the light bulb for the OBC of your year/model car.


Here is my OBC:


The first thing to do is to carefully place a flat head screwdriver in one of the sides in the crack between the OBC and the bezel, carefully to not scratch anything, then apply a mild pressure pushing the handle of the screw driver outwards, the OBC will pop out a little bit.


Repeat the same procedure in the other side.


Under the OBC and in the top of the sunglass compartment (or whatever you want to call it) there is a hole as shown on this picture:


Put your middle finger in that hole and find the back of the OBC, then push it out slowly but firmly


That will give you enough space to pull the OBC out, slowly so you don’t pull the harness of the OBC


On the top side of the OBC, you will see the 4 light bulbs:


A bit closer…


Using the same flat head screwdriver, rotate the bulb counter-clockwise 1/4 turn to release the bulb


Install the new bulbs and follow the guide backwards to put the OBC back in place.


I suggest you replace all the 4 bulbs at once, otherwise you can end up with uneven light across the display


Are you looking for more do it yourself procedures (DIY) ? I recommend the Bentley BMW 3 series service manual for you. I got it and I think it’s a gold mine for us -BMW E36 Owners-. If you didn’t grab your copy yet, get it right now! I’m sure you’ll find this book worth every penny you’ve paid for. Get the Bentley BMW 3 series service manual


BMW E36 Blog: The ultimate BMW E36 information source.


Want to receive exciting tips & information about BMW E36 cars? Enter your Email:-


posted in Do It Yourself, Interior, Technical Info, Tips & Tricks | 14 Comments

15th August 2007

How to keep your car cooling system in perfect shape . . . part3!

Finally, we have reached to the third and final part of the series How to keep your car cooling system in prefect shape! For those of you who missed part 1 and part 2 of this series, please read them before you continue to read this part. I hope you enjoyed these posts and found the information I presented here useful.


This final post is about changing the coolant in your BMW. The first and second parts concentrated on information about BMW cars cooling system and how to detect any problems inside it.  Finally, let me thank the original writer Wayne R. Dempsey for the great write-up he made.


Disclaimer: Use this info at your own risk!! I’m not responsible if this didn’t work for you.

Changing the Coolant in Your BMW


Okay, so I’ve convinced you that your coolant needs changing. The good news is that it’s relatively easy on the BMW 3-Series. Begin by getting a large drip pan to place underneath your car. My favorite choice is kitty litter boxes, as they are large, are made of plastic, and will hold a lot of coolant. The BMW 3-Series six cylinder engines will hold just shy of 3 gallons (10.5 liters), so make sure that whatever container you use is capable of holding all of that coolant.


With your BMW cold, elevate it on jack stands. Place the heater control knobs all the way on hot, turn the ignition to the on position, and turn on the passenger compartment fans to their lowest setting. Do not start the car. By turning the heater knobs on, you are opening the valves to the heater core, which will allow you to drain the coolant located in the core. For cars with electronic climate control, make sure the ignition is on and the heater is set to maximum heat.


On the right side (passenger side for US-cars) of the engine, just under the manifold, you will see the drain plug for the coolant. This is a photo of exactly where this plug is located.


Place your collection container underneath the plug, as shown below .


Remove the plug and let the coolant empty out into the catch pan. BEWARE: I have found it nearly impossible to empty the coolant without having it spill on myself. Don’t wear any decent clothes, and make sure that you are wearing safety glasses when working underneath the car. The coolant will empty out much like water comes out of a shower – it will spray all over, and will be difficult to catch 100% into your pan. Have plenty of paper towels on hand to clean up the spilled coolant.


When all of the coolant has been released from the engine block, replace the plug (use a new sealing aluminum ring) and tighten it to 25 Nm (18 ft-lb). Now, move onto the radiator. There should be a plastic drain plug at the bottom of the radiator, as shown below.


Position your drain pan, and slowly remove this drain plug. The stream from the radiator is a bit more predictable, and should empty in a steady stream, as shown below:


When all of the coolant is emptied out of the radiator, replace the plug. Tighten to 2-3 Nm (18-27 in-lb). Note this torque is very, very small – don’t over tighten the plug as you may damage either the plug or the radiator.


With all of the coolant removed from the system, use a funnel and place it into plastic containers. One gallon spring water or milk containers make excellent storage containers for used coolant.


Don’t pour the coolant down the drain, instead take it to a recycling station. A note about coolant – it is highly toxic and dangerous to pets and small children. Used coolant should be packaged up right away. Less-than-intelligent animals seem to like the smell and taste of coolant, and will be attracted to it. Package it up and seal it off, otherwise you may find kitty dead in the garage one day – no joking. Rinse and dilute any contaminated areas with water.


Remove the small plastic bleed screw to the right of the radiator cap. On M3 engines, this screw is located on the thermostat housing. Using a large funnel in the expansion tank, slowly fill the car with new coolant. Use a 50/50 mixture of antifreeze and distilled water. Do not use tap water or spring water, as these have impurities that will contaminate your system. Distilled or ionized water is 100% H20, and does not contain any minerals, additives, or impurities. Fill the system very slowly, as it will take a bit of time for the coolant to get to all points in the system. On 4-cylinder cars, you will need about 7 quarts (6.5 liters). For the six cylinder cars, you will need 10.6 quarts (10 liters). M3 motors require 11.1 quarts (10.5 liters).


When the system is full of coolant, you will need to bleed air out of it. This applied only to the cars that have the expansion tank attached to the side of the radiator. Other BMWs with a separate, external expansion tank are self-bleeding. The procedure for bleeding these cars seems somewhat sloppy and not too slick. With the bleed screw removed, fill the expansion tank until fluid begins coming out of the bleed screw. Continue filling until there are no more bubbles coming out, as shown below:


This, of course will mean that plenty of coolant will spill all over your radiator, and down onto the ground. Have a catch pan ready to capture this coolant spill. When no more bubbles exit out of the bleed screw, tighten it to 8 Nm (71 in-lb).


Now, run the engine until it reaches it’s operating temperature. Turn off the engine and let it cool down. Then, top off the coolant in the expansion tank to the appropriate level, if necessary.


I’m sure one question you’re about to ask is “what type of coolant should I use?” BMW has issued a 1991 technical bulletin, 17 01 88(1743), which details problems with what is known as silicate gel precipitation in engines. This is the ‘green goo’ (yes, it actually says that in the BMW Tech bulletin – gotta love those German translators) that results as a consequence of an antifreeze over-concentration in the coolant, combined with hard water, and the phosphates commonly used in many antifreezes. BMW factory antifreeze has been formulated to prevent this problem of silicate drop-out without any coolant performance loss. This antifreeze contains no nitrites and no phosphates. The part number for a one gallon container is 88-88-6-900-316, and it costs about $13.00 per gallon. Although I am always eager to find alternatives to BMW factory products, I would stick with the factory coolant for now.


Well, there you have it – everything you’ve always wanted to know about BMW cooling systems. Be sure that after a few days of driving, check the coolant level again, and top it off if necessary.


Are you looking for more do it yourself procedures (DIY) ? I recommend the Bentley BMW 3 series service manual for you. I got it and I think it’s a gold mine for us -BMW E36 Owners-. If you didn’t grab your copy yet, get it right now! I’m sure you’ll find this book worth every penny you’ve paid for. Get the Bentley BMW 3 series service manual


BMW E36 Blog: The ultimate BMW E36 information source.


Want to receive exciting tips & information about BMW E36 cars? Enter your Email:-


posted in Cooling System, Technical Info, Tips & Tricks | 2 Comments

14th August 2007

How to keep your car cooling system in perfect shape . . . part2!

As I promised you in my previous post How to keep your car cooling system in perfect shape . . . part1!, here’s the second part of this series. As I’ve told you in my previous post, the content of this article will create a very very big wall of text that I’m sure many of you will hate to even look at it. So I decided to break it down into 3 parts.


I will be posting the third (final) part tomorrow (well… I hope!).


Before we begin, let me thank the original writer of this article Wayne R. Dempsey.


I hope you will find the second part of this article useful. For those of you who didn’t read my previous post, please follow this link first before reading this part.


Disclaimer: Use this info at your own risk!! I’m not responsible if this didn’t work for you.

Cooling System Maintenance – Checking the Level


It’s very important to check your coolant level regularly, as this will help detect leaks that can siphon off coolant and cause overheating in your engine. You should regularly check the coolant level in your coolant reservoir, making sure that it is within the prescribed High/Low marks. These marks are printed on the side of the coolant container. The container is slightly transparent, and you can see through it slightly to see the current coolant level.


Your BMW will lose a little bit of coolant here and there over time due to evaporation from the reservoir. However, a significant loss of coolant over a very short period of time almost certainly signifies a leak in the system. Sometimes a leak can be seen when you park the car overnight. Often the coolant leaks out and then evaporates while you’re driving, leaving no tell-tale mark of coolant on the pavement. If you suspect a coolant leak, visually inspect all of the hoses, the water pump, the reservoir, and the radiator for seepage or the ‘weeping’ of coolant out of seams and gaskets. Check the seal on the radiator cap. Check that the radiator cap is fastened securely – the way the BMW radiator cap is designed makes it easy to make the simple, yet deadly mistake of leaving the cap cocked – allowing coolant to leak out when the engine is running. If you suspect a leak that you cannot see, a pressure test from a professional mechanic can verify the integrity of your system.

If you can’t find any visible leaks and the system appears to hold pressure, then check to make sure that the cap is good, and is rated for the proper pressure. Verify that the cap you have for your BMW is the proper one for your engine. The following figure shows an example of a proper radiator cap for the BMW 3-Series 325is.


If the system does not hold pressure, and you’re still at a loss where coolant might be disappearing to, then you might want to start looking in the oil. A faulty head gasket will often cause coolant to leak into the oil. If you remove your oil cap and find a yellow murky substance, then you probably have a faulty head gasket. This figure shows an example of what this mixture looks like.


The oil level may be elevated and you will be able to see droplets of coolant inside the oil filler hole. If coolant is leaking past the gasket into a combustion chamber, you will see steam exiting out of the tailpipe, and the spark plugs will foul easily. In addition, the exhaust will be contaminated with the silicate corrosion inhibitors found in the coolant, and your oxygen sensor will be destroyed – plan on replacing it if you have experienced this problem.


These figures show what your oil may look like after the coolant and oil mix together.


These figures clearly show drops of coolant after the valve cover has been removed.


If you can’t discover what happened to the coolant, it may be because there was a temporary overheating problem and some of the coolant boiled over. In this case, top off the coolant and keep a very close eye on it. It’s not uncommon for BMW overheating issues to suddenly destroy a head gasket.


Checking Coolant Strength & Condition


You should periodically test the strength and condition of your coolant to assure that you have achieved the optimum balance for your BMW. This is just as important for protection against heat as it is for protection against freezing. An imbalance between water and antifreeze levels will change the boiling point and/or freezing point of the mixture. A 50/50 mixture of water and ethylene glycol (EG) antifreeze will provide protection against boiling up to approximately 255° F (with a 15 psi radiator cap). This mixture will protect against freezing to a chilly -34° F. On the other hand, a similar 50/50 mixture of propylene glycol (PG) antifreeze and water will give you protection from -26° F to about 257° F.


If you increase the concentration of antifreeze in your coolant, you will raise the effective boiling point, and lower the freezing point. While this may seem beneficial on the surface, having a antifreeze content of greater than 65-70% will significantly reduce the ability of the coolant to transmit and transfer heat. This increases the chances of overheating. As with most things in life, it’s a good thing to maintain a healthy balance.


Beware – you cannot accurately determine the condition of your coolant simply by looking at it. The chemical composition and concentrations in the coolant are very important – if the chemistry is off, then your coolant may be harming your engine.


As mentioned previously, it is important to keep the coolant fresh. The main ingredient in antifreeze, ethylene glycol, typically accounts for 95% of antifreeze by weight. It does not typically wear out, but the corrosion inhibitors that comprise the remaining 5% typically do degrade and wear out over time. Keeping the coolant fresh is especially important with engines that have both aluminum heads and cast iron blocks.


I recommend that the coolant be changed at least every two years, or every 25,000 miles. I’m not a huge fan of long-life antifreeze – if these longer-life fluids are mixed with conventional antifreeze (a very easy mistake to make), the corrosion inhibitors react and reduce the effective protection of the long-life fluid. If you do have this long-life fluid installed in your car, only add the same type of anti-freeze to the car. Don’t mix and match regular and long-life fluid.


Unfortunately, it’s tough to determine if your long-life coolant has been mixed or topped off with ordinary antifreeze. Although some coolants are dyed a separate color (like Dex-Cool in GM vehicles), when mixed with standard antifreeze, it typically isn’t enough to overpower the bright green color. In general, unless you know the entire service history of your BMW, it’s a wise idea to err on the side of caution, and use a shorter service interval for changing your coolant.


Okay, so how do you check the coolant in your system? I recommend using little chemical strip tests that measure how much reserve alkalinity is left within the coolant. The test strip changes color when immersed in the coolant. You can then compare the final color change to a reference chart in order to determine the condition of the coolant. Obviously, if the coolant tests poorly or is borderline, you should plan on replacing your coolant very soon.


An additional note – EG and PG antifreeze has differing specific gravities, so make sure that you use the correct type of test strip when testing your coolant. Otherwise, you may end up with false readings.


Are you looking for more do it yourself procedures (DIY) ? I recommend the Bentley BMW 3 series service manual for you. I got it and I think it’s a gold mine for us -BMW E36 Owners-. If you didn’t grab your copy yet, get it right now! I’m sure you’ll find this book worth every penny you’ve paid for. Get the Bentley BMW 3 series service manual


BMW E36 Blog: The ultimate BMW E36 information source.


Want to receive exciting tips & information about BMW E36 cars? Enter your Email:-


posted in Cooling System, Technical Info, Tips & Tricks | Comments Off on How to keep your car cooling system in perfect shape . . . part2!

13th August 2007

How to keep your car cooling system in perfect shape . . . part1!

I’m sure that everyone of you has faced a failure in your cooling system one way or another. This happens all the time and especially in BMW cars. I recall that I faced this situation couple times with my previous (precious) BMW E30. Luckily I didn’t face that situation in my E36 as I had to change my radiator couple months ago. I hope this will protect me from such failures for some time although the radiator is not the only thing that may fail 😉 . I want to keep your spirit high, so I’m not going to continue talking about these possible failures.


The article that I brought to you is a long one and because I know that some of you will feel bored (maybe hate me too, who knows ?!) for posting a wall of text. I decided to break this article into 3 posts. I will start of course with number 1 now and continue with number 2 and 3 in the next posts. So, stay tuned to this channel please 🙂


Before we start, let me thank the original writer of this article Wayne R. Dempsey.


Enjoy the post and please please don’t hate me if you find it a little longer than you expected.


Disclaimer: Use this info at your own risk!! I’m not responsible if this didn’t work for you.

One often neglected task on many cars is the maintenance of the cooling system. In general, BMW recommends that you flush and clean out your cooling system once every 36 months, or approximately every three years. I like to perform this task on my own cars about once a year, or if I let it slip, once every two years. The reason for this is that old, exhausted coolant can actually cause irreversible damage to your engine components – I found this out firsthand when I recently replaced the head gasket on my ’93 325is. The previous owner didn’t look like he had changed the fluid once in the past ten years. As a result, there were many parts of the engine that were corroded and showing severe signs of wear.

A properly maintained cooling system must have a few things in order: adequate supply of coolant, a radiator that acts as a heat exchanger with the outside air, a fan or air flow source, a water pump to keep the coolant circulating, and a thermostat to regulate the engine at its optimum operating temperature. The coolant must also have the correct mixture and chemical compounds to promote heat transfer, protect against freezing, and also inhibit corrosion. To keep your BMW operating correctly, it’s important to check the level, strength, and overall condition of the coolant on a regular basis. You also need to change the coolant before it degrades to the point where it doesn’t perform it’s job adequately.


A fact that I keep hearing kicked around revolves around the reported findings of the U.S Department of Transportation, which states that cooling system failures are the leading cause of mechanical breakdowns on the highway. Not exactly surprising, since proper cooling maintenance is one of the most neglected areas of most cars.


Electrolysis


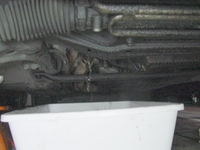
One failure mode associated with dirty coolant is known as electrolysis. Electrolysis occurs when stray electrical current routes itself through the engine coolant. The electricity is attempting to find the shortest path, and impurities in the coolant often generate a path of least resistance that the electricity travels across. The source of this stray electricity is often from electrical engine accessories which have not been properly grounded. A missing engine or transmission ground strap can also cause the coolant to become electrified. Sometimes the path of least resistance becomes a radiator, a heater hose, or even the heater core. These components are often well grounded, and offer a ground path from the engine to the chassis by means of the semi-conductive path of the coolant.


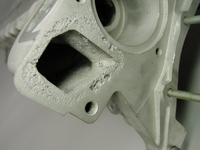
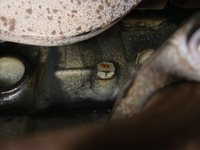
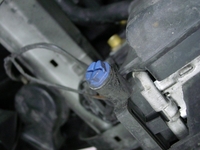
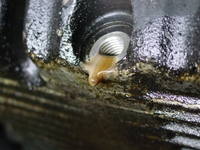
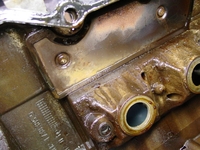
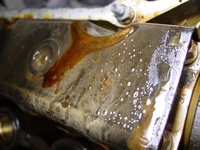
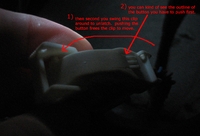
Electrolysis can destroy your engine quickly. Although it’s semi-normal to have very small amounts of voltage potential in your coolant system, values greater than about a tenth of a volt can start reactions between the coolant and the metal in your engine. In particular, electrolysis affects primarily aluminum engine components, resulting in pitting and scaring of the aluminum surface. This eating away of the metal can cause coolant system leaks, and in particular, radiator leaks around aluminum welds. Cast-iron components are also vulnerable, but typically the aluminum metal parts fail first. On BMWs in particular, electrolysis can be easily seen attacking aluminum cylinder heads. Figure 1 shows a picture of the thermostat area of a cylinder head that has been partially damaged by electrolysis. Notice how the aluminum has been eaten away, and eroded by the chemical/electrical reactions.

The process works somewhat like electrical discharge machines (EDM). These machines work by passing a large electrical current through metal, literally zapping away bits of material until nothing remains. Unfortunately, the electrolysis process works in a similar way, zapping bits of metal in proportion to the amount of electrical current passing through the coolant. A poorly grounded starter can literally destroy a radiator or head within a matter of weeks, depending upon how often the car is started. A smaller current drain, like an electric cooling fan, may slowing erode components over many months.


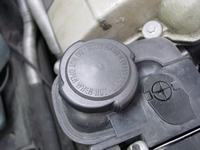
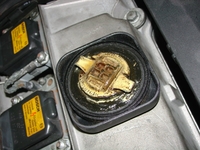
How can you test for electrolysis? Other than actually seeing visible signs of erosion, you can perform a current flow test. Connect the negative terminal of a voltmeter to the chassis ground. Test for adequate continuity by touching another point on the chassis – the resistance should be near to zero. With the engine cold and running, submerge the positive probe into the coolant tank, making sure that the probe does not touch any metal parts. The voltage should be less than .10 volts. If not, methodically turn off or unplug each electrical accessory until the reading reads below .10 volts. Have an assistant switch accessories (like the A/C compressor, heater blower, etc.) while you measure the voltage.


If an accessory doesn’t have an on/off switch, test it by temporarily running a ground from the housing of the accessory to the chassis. Ground each component and check the volt meter. If the wire restores a missing ground connection to the accessory, then you’ve found a component with a faulty ground.


During this test, be sure to check the starter. Not only will a poorly grounded starter struggle to turn over the engine, it will also zap away tremendous amounts of metal in your cooling system. Watch the meter carefully when starting the engine. Any voltage spike will indicate a faulty ground connection.


Coolant System Additives


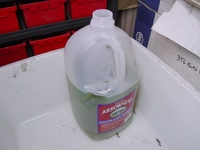
Many people are rightly skeptical of coolant system additives – there are a lot of myths in the automotive industry. Luckily, the coolant system additives are in the category of good practice, for reasons I’ll explain here. It all begins with chemistry. Like today’s modern oils, many of today’s modern coolants incorporate some of the chemicals that help cooling and increase heat flow around your cooling system components. As more and more automotive components are made out of aluminum, and radiators become smaller, the use of these additives becomes more advantageous.


Aftermarket coolant system additives are known as surfactants. What is a surfactant? A surfactant or surface active agent, is a molecule that has a water-loving end (hydrophilic and water fearing end (hydrophobic). Localized boiling of coolant in the cylinder head can create large shock waves that can wreck havoc on your engine, particularly on aluminum components. Without going into too much boring detail, these surfactants also help to reduce the amount of air in the cooling system, and also control the amount of foam within the system.


In general, there are three main reasons why using these additives is beneficial to your cooling system. Firstly, they reduce harmful cavitations and foaming that may occur when your water pump is kicking out fluid at a rapid pace. This reduced foaming helps to prevent damage to aluminum surfaces. Secondly, the use of these additives aid in the transmission of heat from the coolant to the radiating surfaces within the radiator. Even if your car runs very cool, these additives add a extra level of protection in case a thermostat or similar component fails. Thirdly, the additives contain corrosion inhibitors. Most cars on the road have cooling systems that do not contain the ideal 50/50 water / antifreeze ratio that the antifreeze manufacturers design for. The additives help to minimize potential corrosion by maintaining adequate pH levels. Even if your antifreeze already contains surfactant additives, the use of these additional additives is typically beneficial because most cars are shortchanged on the 50/50 coolant/water mix.


In general, the benefits of additives like Water Wetter are:


  • Reduces corrosion due to rust, and electrolysis

  • Increases the ‘wetting ability’ of water and improves heat transfer, thus reducing cylinder head temperatures

  • Cleans and lubricates coolant system seals like those found in the water pump

  • Reduces the formation of foam and cavitations which can cause corrosion

  • Reduces the effects of ‘hard water’ in the cooling system

In general, the addition of these additives is cheap, and it’s a proven benefit too – no snake oil here. Using the additives on a perfectly maintained car can also provide a significant margin of error in case something goes wrong. BMWs are infamous for cooling system failures – keeping the odds on your side can prevent a costly head gasket replacement.


It’s important to keep your cooling system at the correct pH as well. Water has a pH of 7 and is considered neutral. Battery acid is highly corrosive and has a pH of about 2-3, whereas baking soda is very alkaline, and has a pH of about 10-11. In general, you want to make sure that your coolant has a pH greater than seven. Any pH less than that will result in an acidic mixture, which will start to corrode your engine. The corrosion inhibitors in additives and antifreeze are added specifically to keep the pH above 7. A properly mixed 50/50 split between water and antifreeze will yield a pH of about 8-9. Over time, the glycol (one of the main components of antifreeze) will break down and degrade, creating acidic compounds. The alkaline corrosion inhibitors must be adequate enough to neutralize these acidic byproducts over the life of the coolant. Minerals in the water, heat, dissolved oxygen, and other factors gradually deplete the coolant of its corrosion inhibitors. Once gone, the mixture will become acidic, and will begin to eat away at your engine.


Are you looking for more do it yourself procedures (DIY) ? I recommend the Bentley BMW 3 series service manual for you. I got it and I think it’s a gold mine for us -BMW E36 Owners-. If you didn’t grab your copy yet, get it right now! I’m sure you’ll find this book worth every penny you’ve paid for. Get the Bentley BMW 3 series service manual


BMW E36 Blog: The ultimate BMW E36 information source.


Want to receive exciting tips & information about BMW E36 cars? Enter your Email:-


posted in Cooling System, Technical Info, Tips & Tricks | Comments Off on How to keep your car cooling system in perfect shape . . . part1!

7th August 2007

Installing Silver Gauge Cluster Rings for your BMW . . . DIY!

Let me start this post by welcoming our new friend Denise Wright. As you may know I’ve been trying to make a group of BMW E36 enthusiasts from the readers of this blog. I have posted a previous topic Welcome BMW E36 blog readers! in which I asked everyone who reads this blog to write a little bit about him/her self. So if you didn’t read this post yet please do and lets hear from you. I feel really happy when I hear from you guys.


OK, now for the post of today that I know most of you will like very much. This is a DIY (do it yourself) post which will teach you how to install those cute silver gauge cluster rings on your BMW. I really love the way the gauges look after the installation. I also love this DIY as it’s very simple and can be done by almost anyone who doesn’t have any experience in cars. Let not forget to thank Komodo who wrote this great DIY.


Enjoy the post and lets see how things go with you.


Disclaimer: Use this info at your own risk!! I’m not responsible if this didn’t work for you.

This is a DIY for installing those silver gauge rings you can find all the time on
eBay for about $30-35. Here is an after stock photo of how this mod changes your car. It’s a simple mod, but makes a big difference.


Tools needed:

– T10 Torque Screwdriver with a long thin handle (one screw is pretty deep inside)

– Phillips head screw driver


1) Unscrew the gauge cluster. There are two screws and some friction holding your cluster in. One screw is on each side of the top, as shown in this picture:


Unscrew those screws and push on the bottom of the glass to loosen the unit. Mine was stuck in there pretty good, so it took a good amount of pressure and jiggling to break it free.


2) It should now slide forward and up to the steering wheel.


IMPORTANT: At this point you’re about to begin messing with electrical parts, so please stop and disconnect your battery before continuing. Leaving it plugged in might make you physically unable to finish this DIY.


When you reach behind the unit, you’ll feel three wire bundles connecting it to the car. Two are on the right (one big vertical one, and one small horizontal one just below it), and one big vertical plug is on the left.


This is probably the trickiest part of the whole installation. You must reach behind the unit (probably blindly) and unplug them, however they are not a normal plug. There’s a little button you must push in the middle of the latch, then slide the clip up until the connection comes lose. Here’s a picture to try and explain it better:


Then after it’s free just slide it out beside the wheel (again, might require a bit of creative shaking and squeezing, but it’s easily possible.


3) Now you should have the unit out of the car. Bring it inside or somewhere with good light and go get your T10 torque screw driver. There’s 5 screws, as shown by this image of the back of the cluster. Two up top, one on each side, and one deep screw in the very middle.


Unscrew them all, pull gently, and the unit should split open:


4) Now look at the faceplate half of the unit (the top half in the picture above). There are three unique, German engineered, “finger screws” holding the faceplate against the glass. It’s the round black circle knobs on each side, and one in the top middle. To unscrew these, simple twist the white part the direction they will move to free the face plate. Here’s a close up of one of the finger screws:


5) After all of them are turned to the unlocked/open position, gently pull the faceplate up and it should separate:


Now simply take your rings and pop them on to the left part of the above picture. Mine were very tight and clipped on, the friction plenty to hold them on through anything, however I know some of the rings are a lot looser and might require some creative glueing to get them to stay.


Here’s a picture of the rings on just that piece. Notice the Bugatti Veyron Top Gear on the projector in the background. This is a must for this DIY. If you don’t watch Top Gear while installing the rings, they won’t work.


6) Now the reverse install. Put the faceplate back in the glass (re-screwing the three thumb screws all the way to ensure nothing moves), then using the torque screws, reattach the back half of the gauge cluster.


Take it back to your car then, slide it beside the steering wheel, push it firmly into it’s hole, and screw the top two screws in.


Congratulations, you now have silver gauge rings installed in your car.


Are you looking for more do it yourself procedures (DIY) ? I recommend the Bentley BMW 3 series service manual for you. I got it and I think it’s a gold mine for us -BMW E36 Owners-. If you didn’t grab your copy yet, get it right now! I’m sure you’ll find this book worth every penny you’ve paid for. Get the Bentley BMW 3 series service manual


BMW E36 Blog: The ultimate BMW E36 information source.


Want to receive exciting tips & information about BMW E36 cars? Enter your Email:-


posted in Do It Yourself, Interior, Technical Info | 8 Comments