Cleaning BMW E36 Ellipsoid headlights . . . DIY!
Hi Guys,
First of all, let me start today’s post by welcoming our new friend Mortuis Gratis. As you may know, I added the post Welcome BMW E36 blog readers! and I asked the members of this blog to fill in their information in order to get to know each other. The goal is to create a community of BMW E36 enthusiasts. So, if you love BMW E36 cars, and didn’t read that post yet, please do and remember to post your information. I really like hearing from you guys. Until this moment, I received responses from 6 guys and girls + me :-), but of course I’m looking for more E36 lovers.
Now for today’s post: In the last couple days, I noticed that my right headlight is getting very dirty and it even started screaming at me to clean it. Every time I see that light, I feel a little guilty for leaving it like this and try to pretend like I didn’t see it. Yesterday, I decided to look up for some information on how to clean BMW E36 headlights and fortunately, I found this DIY (Do It Yourself!) on how this can be done. From the description of the process, it seems quite easy and I’m intending to do it for my car very soon. But, I hope that my headlights can be cleaned in the same way. My car has a totally different headlights, and I’m not sure if this procedure will work on it. But I don’t have anything to lose, so I will try it.
You too, if your headlights are dirty or started looking ugly, maybe it’s time for you to do some cleaning. Please read the DIY below and if you have any notes or questions , please let me know.
Disclaimer: Use this info at your own risk!! I’m not responsible if this didn’t work for you.
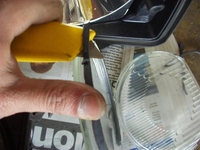
1. First, you have to remove your corner lamps. Remove the indicator lamp bulb, then use a screwdriver to pry the clip that holds the indicator lamp free. Slide the indicator lamp out forwards.
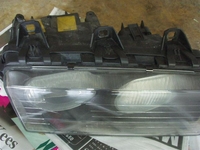
2. You can now remove the headlights. To do so, you need to remove the 3 screws that are on the top, and two on the side. On my car, they were all Phillips screws. The screw below the indicator lamp area is quite hard to get to. It would probably be relatively easy if you have a short Phillips screwdriver.
Pull the headlamp out towards you, then disconnect the connectors. Set your precious headlamp down on a soft, gentle surface!
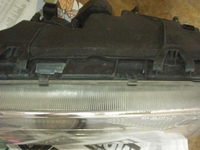
3. There will be 2 small metal clips on both the top and bottom of the ellipsoids. Unclip them by prying them off with a flathead screwdriver. Remember to pry from the plastic end because you might break/chip the glass if you apply too much force on it.
4. Unhook the 5 big plastic clips (3 on top and 2 on the bottom) with a flathead screwdriver.
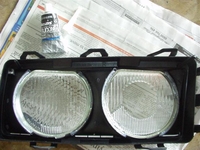
5. You should now be able to separate the lens part from the reflector part of the headlight. Pull them in separate directions. They might be tight, so wiggle them free.
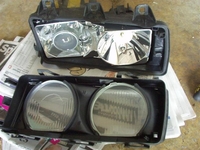
6. This is how your headlight will look like when it has been opened:
7. Notice that both lenses are held in by factory silicone. Using a blade, slice them off. Your lenses should now fall out quite easily. If they don’t, you can use a flathead screwdriver to gently nudge it out. Be very, very careful!
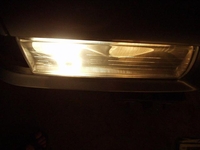
8. Clean the insides of the headlight thoroughly. I sprayed window cleaner then used newspaper to wipe it clean. You may want to wipe the projector for the low beam as well. Remember to wipe underneath the projector lens! You will see a definite improvement in clarity.
9. Make sure you have gotten rid of most, if not all, of the factory silicone. Put the lenses back into their original positions. Double check by looking at the orientation of the other headlight. Now, apply new silicone (I used Selley’s Marine Sealant silicone) to the rim of the lenses (where the factory silicone was before). Let the silicone dry, then make sure the lenses are secure.
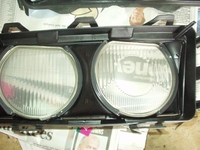
10. Double check for any smudges on the glass, then reassemble in the reverse order of disassembly.
Now, let’s make a comparison:
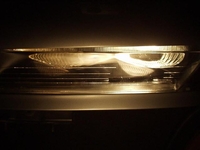
Dirty Left Ellipsoid
Clean Right Ellipsoid
At this point you’ll say “That was worth it!”

Are you looking for more do it yourself procedures (DIY) ? I recommend the Bentley BMW 3 series service manual for you. I got it and I think it’s a gold mine for us -BMW E36 Owners-. If you didn’t grab your copy yet, get it right now! I’m sure you’ll find this book worth every penny you’ve paid for. Get the Bentley BMW 3 series service manual
BMW E36 Blog: The ultimate source of information about BMW E36 cars.
Best regards,
Tony Sticks.

Want to receive exciting tips & information about BMW E36 cars? Enter your Email:-
posted in Do It Yourself, Exterior, Tips & Tricks | 5 Comments

 (4.86 out of 5)
 (4.07 out of 5)


