This DIY (Do It Yourself) is a contribution by spoonerDee from Bimmerforums. In this DIY, you can convert your sunroof to become a one-touch open/close sunroof. Isn’t that awesome? Take a look ,the procedure is very very simple.
To start this is a very easy mod, will cost about $25 plus shipping from this link.
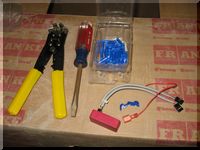
Here are the basic tools you will need: your hands, a wire cutter/stripper/crimper and one butt connector. I thought I might need a screw driver but I did not.
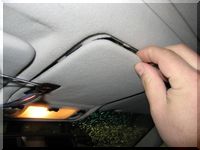
First either close the door as you work, or turn off your interior lights as you work. Now pull the panel off where the switch is, its barely held in so you can do this by hand with little to no force.
Next, you need to locate the harness from which you will tap your power from. You will see a bunch of small wires wrapped in a red sleeve that goes towards the left, to remove it you will have to push it to the left to get it off of its holder then maneuver it around the motor and the roof liner out so you can work with it.
Here is the harness pulled out.
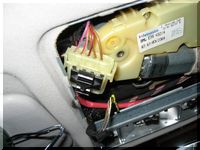
Disconnect the harness and locate the power wire, it is the Red wire with the White stripe.

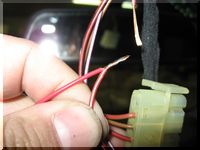
Next, take your crimper/cutter/striper and cut the wire, be sure to leave enough room on both sides to work with. Once cut, strip both ends of the wire.
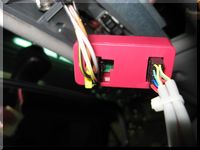
Next take the part you ordered and cut the worthless tip off the power wire (the red wire) then strip the end of it. Next connect one end of the harness to the power wire of the module by twisting them together as shown
Then take your butt connector and crimp them into one end, then take the other end of the power wire and crimp it in the other side like so
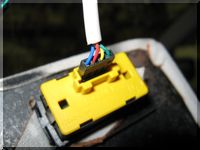
Now the module has power, next you need to disconnect the wires going into the switch in your panel, take that wire and plug it into the module. you will notice there is a yellow sleeve on the plug, that insures that it will only plug in, in one direction. PAY ATTENTION YOU WHICH WAY YOUR PLUG IS PUT ON IN THE BUTTON IN THE PANEL, look at the plug in the switch, from the side, you will notice that underneath that sleeve the plug indents on one side. make a note of that.
Now that you have plugged the wire from the switch into the module, plug the matching wire from the module into the switch being sure to face it the right way
Now with everything together turn the car on all the way so to get full power and not put any strain on the battery or the sunroof motor.
Once on push and hold the switch until the sunroof opens all the way, once it is open, push and hold the switch until the sunroof closes all the way. This will set the memory in the module which times how long you hold it in each direction. from then on when you push the button either way it will always open for that amount of time, so be sure you hold it the whole time so it opens and closes completely.
Once you have done this, do your first test run, push and release to open, then push and release to close, sit back and enjoy your one touch roof.
Once you are set, tuck all the wires back into the roof, and replace the panel and your done, CONGRATULATIONS!
Here is a video link to the mod in action. Hard to see the tilt in action but you get the idea.
If you are nervous about working with wires, don’t be, this is simple, easy and a great way to learn how to do minor electrical work on a car.
Note: If you have a pre 97 model, you need to get a 97 plus model plus this part to do the same.
Are you looking for more do it yourself procedures (DIY) ? I recommend the Bentley BMW 3 series service manual for you. I got it and I think it’s a gold mine for us -BMW E36 Owners-. If you didn’t grab your copy yet, get it right now! I’m sure you’ll find this book worth every penny you’ve paid for. Get the Bentley BMW 3 series service manual


 (4.86 out of 5)
 (4.07 out of 5)


