BMW E36 Blog

Cleaning E36 ICV (Idle Control Valve) . . . DIY!

23rd June 2007

Cleaning E36 ICV (Idle Control Valve) . . . DIY!

Hi Guys,


Car hesitation and RPM bouncing are the most common problems between the BMW E36 cars. It seems that many cars have the problem and the problem is very hard to fix. I recall that even my previous E30 used to have the problem, but some how, the problem was solved. Maybe with something that I did and didn’t notice it fixed the problem.


Now my E36 318is is having the same symptoms and it gets very annoying especially when I turn my A/C on.


I started looking for a solution to this problem and it seems that cleaning the ICV (Idle Control Value) is one of the most obvious reasons for the problem, so I looked for a DIY about it and found one. The DIY is for M42 engines. I will be writing another post to fix same problem for the M50 engines. Please notice that I didn’t try this DIY myself yet, but I’m going to do it very soon.


Please notice that that cleaning the ICV will not always fix the problem, but it’s a very common reason, so if it didn’t totally solve your car’s problem, then you have other issues, but since the procedure is very simple, I guess everyone should start with it. Please follow the steps below and see if this fixes your car’s RPM bouncing problem. Enjoy 😉


Disclaimer: Use this info at your own risk!! I’m not responsible if this didn’t work for you.

This DIY / write-up will require the following tools/supplies:

Flashlight would be helpful.

11mm socket

Flathead screwdriver

Throttle body (TB) cleaner

OEM hoses if in need of replacement

Throttle body gasket and intake manifold gasket (not technically necessary, but a good idea)


It took me about an hour to remove, clean, and put back the ICV. Plus I let the hoses dry (while out of the car) for about 20 minutes on top of that.


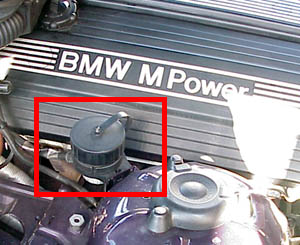
First, start by opening the hood with the engine off and hopefully not too hot, as you will make contact with the block and the intake manifold.


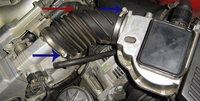
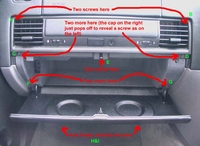
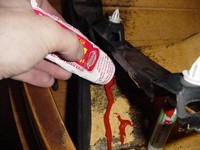
You will take off the intake tube, shown below, by loosening the screws at the blue arrows, and pulling off the hose at the red arrow. Then pull the intake tube off completely.


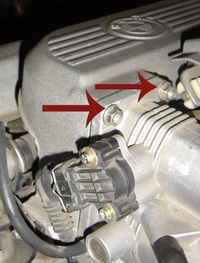
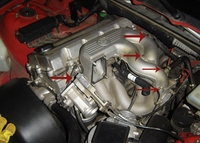
Next, you remove the throttle body, by four 11mm bolts. The top two are shown with red arrows below. The bottom two are on the bottom of the TB, in the same position as the top two.


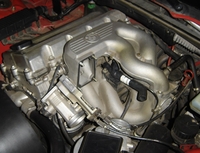
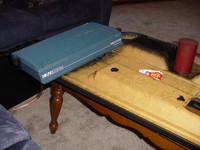
Move the throttle body off to the side, to gain access to the upper intake manifold, like this:


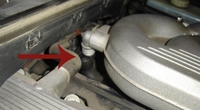
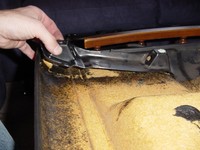
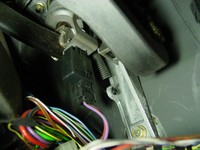
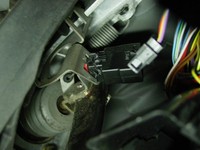
Next, we’ll disconnect the hose connecting the manifold to the ICV we wish to remove and clean. Behind the manifold, at the back of the engine bay, is the hose. Just twist it off, as shown by the red arrow.


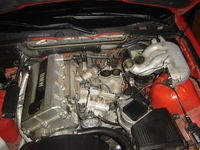
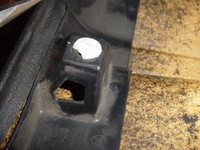
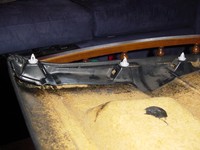
Now it’s time to remove the upper intake manifold. Undo all 5 of the 11mm nuts attaching it to the lower manifold. The nut locations are highlighted below with red arrows. The nut in the rear of the engine bay is hard to get to, but a small 11mm socket and 1/4″ drive ratchet should get it out.


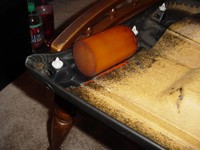
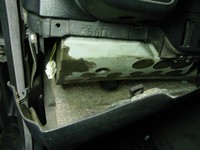
Next, carefully remove the manifold, by slowly lifting it up. I pried it off woodworker style using the backside of a hammer against the block. Be sure to remove it evenly though, lifting it up equally on all sides. Otherwise it will get stuck on the bolts on the manifold’s drivers side. It is easiest to place it as shown:


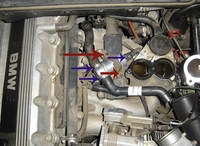
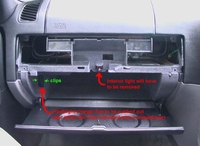
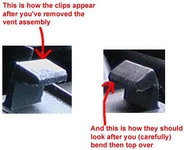
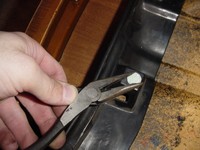
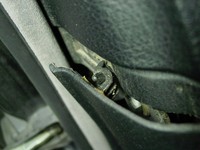
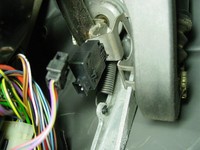
Now we have acces to the ICV. As shown below, it is attached with a rubber strap at the point shown with red arrows. The blue arrows indicate the electrical connection, which pulls of when you press down a wire clip. They also point to the hose connections, which you will also want to remove. Note the arrow on top of the ICV. It points TOWARDS the block. The part label with Bosch and the BMW part number written on it also face the front of the car. This is important. You want to put it back facing the correct direction.


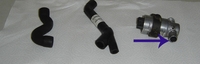
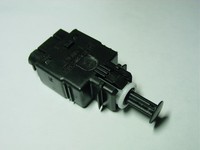
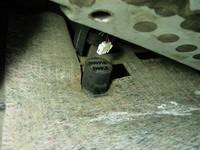
Now, take the ICV and clean it. The image below shows the ports into which the tubes were plugged, and air flows, with a blue arrow. You’ll want to hit it with an old toothbrush and a gratuitous soaking with the TB cleaner. You may choose to clean the throttle body itself while at it with some paper towels and the cleaner.


Let everything dry, and clean off the hoses if you’d like. One of mine was cracked and therefore replaced, but washing the oil and grease off of them will help them last longer. Replace any that are cracked! They will make your idle worse and allow unfiltered air into the engine = bad. Be sure to let everything dry, especially items that were cleaned with water (hoses.) Installation is the reverse of removal. Be sure to connect ALL the hoses – double check!


Are you looking for more do it yourself procedures (DIY) ? I recommend the Bentley BMW 3 series service manual for you. I got it and I think it’s a gold mine for us -BMW E36 Owners-. If you didn’t grab your copy yet, get it right now! I’m sure you’ll find this book worth every penny you’ve paid for. Get the Bentley BMW 3 series service manual


Wait for more from BMW E36 Blog.


Best regards,

Tony Sticks.

Want to receive exciting tips & information about BMW E36 cars? Enter your Email:-


posted in Do It Yourself, Engine, Technical Info | 133 Comments

2nd May 2007

Removing BMW E36 Glove box . . . DIY!

Hi Guys,


I’ve been looking for information on how to remove the glove box of my car and the job seemed to be a little bit complicated. Anyway, I’ve found a DIY (Do It Yourself) article which describes the process in a very simple way. The steps turned out to be very easy, (not as I thought in the beginning). I hope you guys will like this DIY and find it useful. The article was originally posted on www.e36coupe.com but I found it here in came you may want to take a look.


Disclaimer: Use this info at your own risk!! I’m not responsible for your mistakes man! 😀

For the benefit of anyone out there that is having as much difficulty as I did in removing their glovebox (and then locating the “grommet” that allows you to run power lines from your fuse box to head unit etc.), I’ve produced a picture-rich how-to guide.


Ok, there are three different configurations of glovebox. Two (I think) correspond to those cars without a passenger airbag. The main differences for these and the type I describe below are:


1) neither have a retaining bolt (E) behind the interior glovebox light

2) the vents themselves (but not the entire assembly) may be pulled off to allow access to the screws A and B in the diagrams below

3) you may have to remove the kick panel by the door


I can’t give exact descriptions for these, since I don’t have that type of glovebox!


Anyway, first things first, let’s look at the glovebox as it is and locate the screws we need to remove:


There are three different type of screws, together with E, which is a 10mm bolt (I think it was 10mm – can’t quite remember now). It is important to get the correct screws back in the correct places, otherwise the plastic caps over screws C and D will not go back on. The three screw types look like this:


I’d recommend removing screws H and I first of all, since it’s easier to do this with the glovebox door closed. They’re under the glovebox (you should be able to feel them – they’re more or less where screws F and G are, except beneath the actual glovebox, and a little way back).

Next, I’d take off screws A and B – they’re pretty easy to do, as long as you have a reasonably long, thin screwdriver. They are in the top left & right corners of the left & right passenger vents, respectively:


Then we can remove the vent assembly by taking off the plastic caps for screws C and D (in the picture above, screw D still has the plastic cap on) and then removing the screws beneath. The vent assembly should then just pull out; there are a couple of clips, but with a couple of seconds of patience, it comes off pretty easily. Then we’re left with the glovebox itself:


This is retained my the two remaining screws near the hinges and the bolt that is hidden under the interior light. In addition to these, there are two wires that supply power to the interior light and flashlight charger that need to be removed. First the interior light:


The interior light is very easy to remove when you find the indentation that is on the left edge, at the back of the light. Prise the light out with a flat bladed screwdriver. Be careful when removing the light itself now, and be sure to disconnect the power lines from the back. In the middle of the recess that held the interior light, there should be a 10mm (I think) bolt, which holds the glovebox onto the metal chassis supporting the airbag assembly. Locate this bolt with your fingers and then, using a wrench (I doubt you’ll be able to get to it using a spanner), unscrew the bolt.


Now we can remove the final two screws by the hinges, which can be removed with either an offset screwdriver or a long regular screwdriver:


Now, the whole glovebox interior should begin to pull out. The only thing left to do is to pull the interior light clear and remove the flashlight charger. Press the clips indicated on the picture earlier with a flat-bladed screwdriver, and pull the back of the charger connector:


Now we have access to the electrics, should you wish to meddle. While we’re here, I can show you how to get to the mystical grommet that allows access to the engine bay (I routed some dedicated 20 Amp power lines for my Alpine head unit this way). Remove the horizontal kick panel just under the glovebox by pulling (it was secured by screws H and I, which we removed at the beginning of this process):


As you can see from the picture above, the access hole is beneath the carpet (not the mat, but the actual carpet – it just pulls back if you tug it hard enough) and under its attached heat-retardent foam. It is covered by a round plastic cover (which, incidentally is an exact fit over the cigarette lighter – I’ve now used that to make my car a no-smoking one!). This plastic cover just pulls off, revealing a hole. If you put your finger inside this hole you should feel a metal pipe running upwards (I think it was at about 270° to 315°). If you push a red (or other brightly coloured cable) up here, you should see it appear eventually in the engine bay. Note that if you want to run a black cable as well (and I can see the reason for only running one cable, personally), I’d recommend taping the end of the cables together and pushing them up together. This saves time, and the black cable is very hard to spot when it comes out in the engine bay. Power can then be routed from the fuse box connector (just under the lid of the box – held by a 12mm bolt, I think, and requires a 10mm ring connector on the red cable) and the chassis bolt near the air filter (8mm bolt I think, needing a 6mm ring connector on the black).


As for the other end of the power cables, this may be obvious advice, but I’d STRONGLY recommend using female connectors (bullets are perfect). The last thing you want is to use exposed males that end up touching and shorting out the fuse box!


Once you’re done, the reassembly is a relatively easy task. However, in order to make sure your glovebox closes do not just reverse the order in which you did everything. The reason being is that the vent assembly (that clips on above the glovebox) has four plastic clips that will almost certainly not fully latch on to the glovebox interior.


First of all, if you’ve removed the horizontal kickpanel below the glovebox, reattach this (although do not screw it back in yet, since these screws also hold the bottom of the glovebox, which you have not put back yet). Now, take the vent assembly and turn it over so you’re looking at the back. You should see four clips, two small ones at the top of the assembly and two wider ones at the bottom. Chances are, the ones at the bottom have been bent outwards (away from the rest of the vent assembly) when you removed the plastic unit.


Carefully bend back the clip so that it forms an 80 or so degree angle (rather than the 100+ degree angle it was after removing the assembly). The picture below should make it clearer.


Once you’ve bent the bottom clips over, you’re ready to mount the vent assembly on to the glovebox interior (you need to do this before screwing the interior back in to make sure all four clips have taken). Now, reattach the combined glovebox interior and vent assembly into the hole (be careful to make sure the prongs at the bottom of the glovebox fit back inside the horizontal kickpanel piece). I then screwed back bolt E (into the hole left by the interior light), since on mine this required a bit of play in the glovebox to get the thing back into the hole. Then, it’s a simple matter of replacing all the remaining screws. Be careful when putting screws A and B back, as the screws can end up falling inside the vents. Make sure you close the vents first, and just take your time. If the vents are closed, you should be able to retrieve any dropped screws without having to remove the whole unit.


Finally, your reassembled glovebox should look as good as (or better than) new. Congratulations!


Are you looking for more do it yourself procedures (DIY) ? I recommend the Bentley BMW 3 series service manual for you. I got it and I think it’s a gold mine for us -BMW E36 Owners-. If you didn’t grab your copy yet, get it right now! I’m sure you’ll find this book worth every penny you’ve paid for. Get the Bentley BMW 3 series service manual


Wait for more from . . . BMW E36 Blog


Best regards,

Tony Sticks.

Want to receive exciting tips & information about BMW E36 cars? Enter your Email:-


posted in Do It Yourself, Interior, Technical Info | 7 Comments

28th March 2007

Fixing BMW E36 door panel!

Hi Friends,


The door panels in BMW E36 and especially the coupe type is a very common problem that every owner will sooner or later face. As you might have guessed I’m facing this problem right now with my babe :-(. So it’s time to fix it, but I realized that I don’t have any knowledge about the issue, so how am I supposed to fix it. Well, as usual, I will go out and dig to find some people who faced this problem before me and successfully solved it. I’ve found this post which describes the process in detail and I thought I should share it with you guys. Maybe you’d like to do the same to your cars.


Note: don’t forget to buy some clips before starting the surgery, otherwise you will fail to do the job successfully. Good luck!


Disclaimer: Use this procedure at your own risk!! I’m not responsible for your mistakes man! 😀


This is a simple way to fix you sagging or lose door card. I spent about 10 min doing everything, the only catch is that you will need to let the
adhesive cure or dry.


Removal: The panel is fastened by clips and screws, there are 2 screws tucked behind the handle on the arm rest, simply pop the covers off and unscrew them, after that just pull the door card off and unplug the speakers, the speaker wires pull right out, don’t be to
aggressive though as you may damage them.


Things you’ll need once the door panel is off:

Pliers, and RTV silicone.


This is what it looked like before I took it off the car


This is what the repair did


Once I examined the door I found what the cause was. There is a plastic molding holding the door clips that was glued to the door card and had separated itself due to many opening and closings.


Some of the clips were broken as well. I recommend purchasing new ones from the dealer, don’t be a cheap wad. You should have these clips before the repair so that you can do everything at once. To remove the clips simply wist and pull them with pliers, they are notched and are designed to be done that way.


Remove the clips before you decide to apply the adhesive as this may cause some issues later on in the repair. To put new clips in, just twist them in with your fingers, it doesn’t take much effort.


Next you simply apply the adhesive thoroughly. Cleaning shouldn’t really be an issue, but if you decide to clean the area, use a mild soap and warm water. Push down on the plastic to spread the silicone around, you don’t need to smooth it, let the plastic do the work for you, plus you don’t get dirty.


That’s pretty much it for the repair, the next thing you’ll want to do is apply pressure. I chose to use a piece of cylinder poly and laid my amp on it. You’ll want to have adequate pressure to ensure a tight bond. When you add the weight, have the door panel somewhere that will be out of ways harm. I chose the coffee table….


Let the RTV dry before you mount it back on the car. I let mine sit over night just to be safe. Simply reverse the removal process to re-attach the door panel…and your finished


Hope this helps, it’s super easy and cheap, it’s not the most interesting thing in the world but I needed it fixed so I’m sure someone else does to. If you guys think I left something out then let me know but I think I covered everything.


Are you looking for more do it yourself procedures (DIY) ? I recommend the Bentley BMW 3 series service manual for you. I got it and I think it’s a gold mine for us -BMW E36 Owners-. If you didn’t grab your copy yet, get it right now! I’m sure you’ll find this book worth every penny you’ve paid for. Get the Bentley BMW 3 series service manual


Wait for more from . . . BMW E36 Blog


Best regards,

Tony Sticks.

Want to receive exciting tips & information about BMW E36 cars? Enter your Email:-


posted in Do It Yourself, Interior, Technical Info, Tips & Tricks | 14 Comments

15th March 2007

Replacing BMW E36 brakes switch!

Hello my friends,


The BMW E36 brakes switch can fail easily and you should always check to make sure that your brakes are working fine. Of course, if you’ve checked and found that the brake lights are not working, you should fix the problem. First, you should check the rear lamps to make sure they’re working fine. If you found that they’re working fine, this means that you have to replace your brakes switch. The following article (which I found originally here) will guide you through this simple process . . . so enjoy it and after you finish, send me some $$$ LOOOL! just kidding.


Disclaimer: Use this procedure at your own risk!! I’m not responsible for your mistakes man! 😀


There may come a time when someone on the road motions to you about your brake lights not coming on. The brake pedal switch (Figure 1) in both the E30 and E36 BMWs gets a lot of use, and has a tendency to fail once and a while. Replacement is really easy, and should take only about 30 minutes maximum.


The first step is to verify that your brake lamps are not working. If you’re by yourself, then wait until night time and back up against a brick wall. You should see the reflection off of the wall when you step on the brakes – if you don’t, then your switch is probably shot. It’s important to note that at least on some years, the BMW warning system that tells you when a lamp is out will not tell you if the switch is broken – you will have to figure it out for yourself.


The first step is to gain access to the switch. Remove the panel directly above the driver’s side foot well. This panel is secured by a few screws (Figure 2), and a few snaps as well (Figure 3). In addition, you may have an electrical speaker unit attached to the panel. Disconnect the harness (Figure 4) and pull the panel down (Figure 5).


The brake switch is shown in Figure 6. It’s the rater large switch assembly that moves in conjunction with the brake pedal. Remove the harness from the brake switch (Figure 7) and yank it out of it’s bracket. I found that I had to break the plastic housing of the switch in order to remove it (Figure 8). That’s perfectly okay, since you will be replacing it with a new one very soon anyways.


To finish the job, simply install the new switch into place, and reconnect the wire harness. Test the brake lights to make sure that they are working properly, and then reinstall the knee panel.


Well, there you have it – it’s really not too difficult at all.

Are you looking for more do it yourself procedures (DIY) ? I recommend the Bentley BMW 3 series service manual for you. I got it and I think it’s a gold mine for us -BMW E36 Owners-. If you didn’t grab your copy yet, get it right now! I’m sure you’ll find this book worth every penny you’ve paid for. Get the Bentley BMW 3 series service manual


Wait for more from . . . BMW E36 Blog


Best regards,

Tony Sticks.

Want to receive exciting tips & information about BMW E36 cars? Enter your Email:-


posted in Brakes, Do It Yourself, Technical Info | 6 Comments

24th February 2007

Reset BMW E36 oil service light

Hello my friends,

After changing the oil for your car, the oil service light stays on (on the red) and it becomes very annoying to you sometimes. It makes me upset just to see it like that, so I wanted to find out how this creature is reset. It turned out that the procedure is very simple and it doesn’t need time, money or even special equipment. Well, only a paperclip ;-). The following article will show you how this thing is done within couple minutes. BTW, I didn’t write this article. I found it here in case you want to read it. Ready? ok here we go . . .


Disclaimer: Use this procedure at your own risk!! I’m not responsible for your mistakes man! 😀

First, pop your hood and find the diagnostic data port. It is located on the right side of the engine bay near the right strut tower.


Unscrew the cap. You will see a big Pac-Man shaped hole and twenty little round holes. What is a Pac-Man? Never mind. We are only concerned with pin 7 and pin 19 (note: the words "pin" and "hole" are used interchangeably in this text). Refer to the picture below to find pins 7 and 19.


What we will be doing in this exercise is connecting pins 7 and 19 with a paperclip for four seconds. This will reset the oil service light. Simple, no? But first, here is the list of pins and what they are supposed to do:


Pin Terminal Description
1 TD TD Signal
2 Not occupied
3 Not occupied
4 Not occupied
5 Not occupied
6 Not occupied
7 SI Service Interval Reset
8 Not occupied
9 Not occupied
10 Not occupied
11 Not occupied
12 61 (D+) Generator Charge Indicator
13 Not occupied
14 30 Voltage; Hot At All Times
15 RXD Diagnostic Data Link
16 15S Voltage; Ignition Switch in Run
17 Not occupied
18 PGSP Programming Line
19 31 Ground
20 TXD Diagnostic Data Link


OK, using a paperclip, Bend your paperclip it so it looks like this:


Well it doesn’t have to look exactly like this, but you get the idea. Use pliers if you have to. We want those little loops at the end to maximize the contact with the conductors in the holes of the data port. If you can’t make those little loops at the ends, that’s okay. Just don’t go running around with sharp objects.


OK, now you’re ready to reset the oil service light, so turn the ignition key to position II, but don’t start the car. Get out of the car and go to the data port. Always connect pin 7 first. Once you’ve inserted one end into pin 7, insert the other end into pin 19 and hold it there for 4 seconds. Then remove the paperclip. Check the dash and the oil inspection lights should be reset. The reset occurs upon removal of the clip.


IMPORTANT: DO NOT HOLD IT THERE FOR LONGER THAN 10 SECONDS or you may inadvertently reset your inspection I/II interval.


OK, you’re done. It was pretty easy as I promised! wasn’t it?


Are you looking for more do it yourself procedures (DIY) ? I recommend the Bentley BMW 3 series service manual for you. I got it and I think it’s a gold mine for us -BMW E36 Owners-. If you didn’t grab your copy yet, get it right now! I’m sure you’ll find this book worth every penny you’ve paid for. Get the Bentley BMW 3 series service manual


Wait for more from . . . BMW E36 Blog


Best regards,

Tony Sticks.

Want to receive exciting tips & information about BMW E36 cars? Enter your Email:-


posted in Do It Yourself, Electrical, Technical Info, Tips & Tricks | 293 Comments