BMW E36 Blog

Fixing BMW E36 door panel!

28th March 2007

Fixing BMW E36 door panel!

Hi Friends,


The door panels in BMW E36 and especially the coupe type is a very common problem that every owner will sooner or later face. As you might have guessed I’m facing this problem right now with my babe :-(. So it’s time to fix it, but I realized that I don’t have any knowledge about the issue, so how am I supposed to fix it. Well, as usual, I will go out and dig to find some people who faced this problem before me and successfully solved it. I’ve found this post which describes the process in detail and I thought I should share it with you guys. Maybe you’d like to do the same to your cars.


Note: don’t forget to buy some clips before starting the surgery, otherwise you will fail to do the job successfully. Good luck!


Disclaimer: Use this procedure at your own risk!! I’m not responsible for your mistakes man! 😀


This is a simple way to fix you sagging or lose door card. I spent about 10 min doing everything, the only catch is that you will need to let the
adhesive cure or dry.


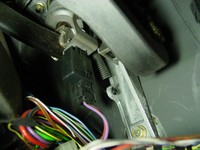
Removal: The panel is fastened by clips and screws, there are 2 screws tucked behind the handle on the arm rest, simply pop the covers off and unscrew them, after that just pull the door card off and unplug the speakers, the speaker wires pull right out, don’t be to
aggressive though as you may damage them.


Things you’ll need once the door panel is off:

Pliers, and RTV silicone.


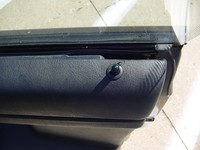
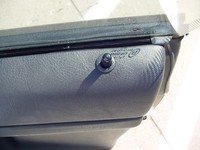
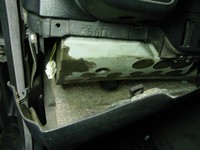
This is what it looked like before I took it off the car


This is what the repair did


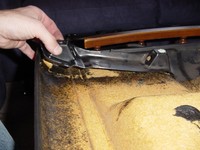
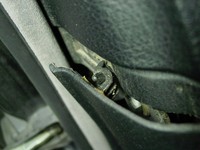
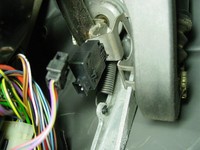
Once I examined the door I found what the cause was. There is a plastic molding holding the door clips that was glued to the door card and had separated itself due to many opening and closings.


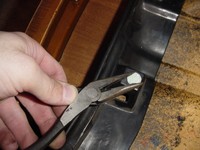
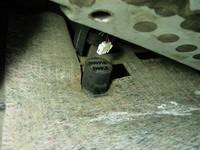
Some of the clips were broken as well. I recommend purchasing new ones from the dealer, don’t be a cheap wad. You should have these clips before the repair so that you can do everything at once. To remove the clips simply wist and pull them with pliers, they are notched and are designed to be done that way.


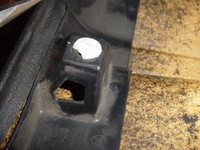
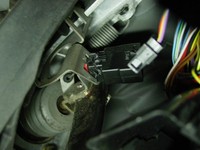
Remove the clips before you decide to apply the adhesive as this may cause some issues later on in the repair. To put new clips in, just twist them in with your fingers, it doesn’t take much effort.


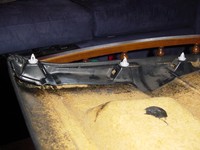
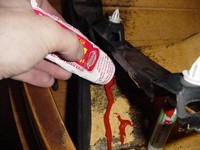
Next you simply apply the adhesive thoroughly. Cleaning shouldn’t really be an issue, but if you decide to clean the area, use a mild soap and warm water. Push down on the plastic to spread the silicone around, you don’t need to smooth it, let the plastic do the work for you, plus you don’t get dirty.


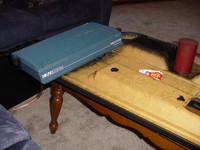
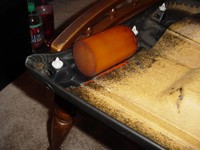
That’s pretty much it for the repair, the next thing you’ll want to do is apply pressure. I chose to use a piece of cylinder poly and laid my amp on it. You’ll want to have adequate pressure to ensure a tight bond. When you add the weight, have the door panel somewhere that will be out of ways harm. I chose the coffee table….


Let the RTV dry before you mount it back on the car. I let mine sit over night just to be safe. Simply reverse the removal process to re-attach the door panel…and your finished


Hope this helps, it’s super easy and cheap, it’s not the most interesting thing in the world but I needed it fixed so I’m sure someone else does to. If you guys think I left something out then let me know but I think I covered everything.


Are you looking for more do it yourself procedures (DIY) ? I recommend the Bentley BMW 3 series service manual for you. I got it and I think it’s a gold mine for us -BMW E36 Owners-. If you didn’t grab your copy yet, get it right now! I’m sure you’ll find this book worth every penny you’ve paid for. Get the Bentley BMW 3 series service manual


Wait for more from . . . BMW E36 Blog


Best regards,

Tony Sticks.

Want to receive exciting tips & information about BMW E36 cars? Enter your Email:-


posted in Do It Yourself, Interior, Technical Info, Tips & Tricks | 14 Comments

19th March 2007

What is BMW VANOS engine?

Hello Guys,


I heard many times about E36 BMWs with VANOS engine and I heard that it’s a very special engine that can boost performance and enhance the overall car responsiveness. But to be honest, I have never read or see that engine in person :-p. Today I did a search for some information regarding this cutie and I found a great article that I thought everyone should read . So as usual, here we go, enjoy and remember to drop me some lines if you have more information about it  that you think is missing in this article.


Introduction:


VANOS is a combined hydraulic and mechanical camshaft control device managed by the car’s DME engine management system.

The VANOS system is based on an adjustment mechanism that can modify the position of the intake camshaft versus the crankshaft. Double-VANOS adds an adjustment of the intake and outlet camshafts.


VANOS operates on the intake camshaft in accordance with engine speed and accelerator pedal position. At the lower end of the engine-speed scale, the intake valves are opened later, which improves idling quality and smoothness. At moderate engine speeds, the intake valves open much earlier, which boosts torque and permits exhaust gas re-circulation inside the combustion chambers, reducing fuel consumption and exhaust emissions. Finally, at high engine speeds, intake valve opening is once again delayed, so that full power can be developed.


VANOS significantly enhances emission management, increases output and torque, and offers better idling quality and fuel economy. The latest version of VANOS is double-VANOS, used in the new M3.

VANOS was first introduced in 1992 on the BMW M50 engine used in the 5 Series.


Here’s how it works:


In overhead cam engines, the cams are connected to the crankshaft by either a belt or chain and gears. In BMW VANOS motors there is a chain and some sprockets.

The crankshaft drives a sprocket on the exhaust cam, and the exhaust cam sprocket is bolted to the exhaust cam. A second set of teeth moves a second chain that goes across to the intake cam. The big sprocket on the intake cam is not bolted to the cam, for it has a big hole in the middle. Inside the hole is a helical set of teeth. On the end of the cam is a gear that is also helical on the outside, but it’s too small to connect to the teeth on the inside of the big sprocket. There is a little cup of metal with helical teeth to match the cam on the inside and to match the sprocket on the outside. The V (Variable) in VANOS is due to the helical nature of the teeth. The cup gear is moved by a hydraulic mechanism that works on oil pressure controlled by the DME.


At idle, the cam timing is retarded. Just off idle, the DME energizes a solenoid which allows oil pressure to move that cup gear to advance the cam 12.5 degrees at midrange, and then at about 5000 rpm, it allows it to come back to the original position. The greater advance causes better cylinder fill at mid rpms for better torque. The noise some people hear is the result of tolerances that make the sprocket wiggle a bit as the cup gear is moved in or out.


Double VANOS


Double-VANOS (double-variable camshaft control) significantly improves torque since valve timing on both the intake and outlet camshafts are adjusted to the power required from the engine as a function of gas pedal position and engine speed.


On most BMW engines that use a single VANOS, the timing of the intake cam is only changed at two distinct rpm points, while on the double-VANOS system, the timing of the intake and exhaust cams are continuously variable throughout the majority of the rpm range.

With double-VANOS, the opening period of the intake valves are extended by 12 degrees with an increase in valve lift by 0.9 mm.

Double-VANOS requires very high oil pressure in order to adjust the camshafts very quickly and accurately, ensuring better torque at low engine speeds and better power at high speeds. With the amount of un-burnt residual gases being reduced, engine idle is improved. Special engine management control maps for the warm-up phase help the catalytic converter reach operating temperature sooner.


Double-VANOS improves low rpm power, flattens the torque curve, and widens the powerband for a given set of camshafts. The double-VANOS engine has a 450 rpm lower torque peak and a 200 rpm higher horsepower peak than single-VANOS, and the torque curve is improved between 1500 – 3800 rpm. At the same time, the torque does not fall off as fast past the horsepower peak.


The advantage of double-VANOS is that the system controls the flow of hot exhaust gases into the intake manifold individually for all operating conditions. This is referred to as “internal” exhaust gas re-circulation, allowing very fine dosage of the amount of exhaust gas recycled.


While the engine is warming up, VANOS improves the fuel/air mixture and helps to quickly warm up the catalytic converter to its normal operating temperature. When the engine is idling, the system keeps idle speeds smooth and consistent thanks to the reduction of exhaust gas re-circulation to a minimum. Under part load, exhaust gas re-circulation is increased to a much higher level, allowing the engine to run on a wider opening angle of the throttle butterfly in the interest of greater fuel economy. Under full load, the system switches back to a low re-circulation volume providing the cylinders with as much oxygen as possible.

Wait for more from . . . BMW E36 Blog


Best regards,

Tony Sticks.

Want to receive exciting tips & information about BMW E36 cars? Enter your Email:-


posted in Engine, Technical Info | 16 Comments

15th March 2007

Replacing BMW E36 brakes switch!

Hello my friends,


The BMW E36 brakes switch can fail easily and you should always check to make sure that your brakes are working fine. Of course, if you’ve checked and found that the brake lights are not working, you should fix the problem. First, you should check the rear lamps to make sure they’re working fine. If you found that they’re working fine, this means that you have to replace your brakes switch. The following article (which I found originally here) will guide you through this simple process . . . so enjoy it and after you finish, send me some $$$ LOOOL! just kidding.


Disclaimer: Use this procedure at your own risk!! I’m not responsible for your mistakes man! 😀


There may come a time when someone on the road motions to you about your brake lights not coming on. The brake pedal switch (Figure 1) in both the E30 and E36 BMWs gets a lot of use, and has a tendency to fail once and a while. Replacement is really easy, and should take only about 30 minutes maximum.


The first step is to verify that your brake lamps are not working. If you’re by yourself, then wait until night time and back up against a brick wall. You should see the reflection off of the wall when you step on the brakes – if you don’t, then your switch is probably shot. It’s important to note that at least on some years, the BMW warning system that tells you when a lamp is out will not tell you if the switch is broken – you will have to figure it out for yourself.


The first step is to gain access to the switch. Remove the panel directly above the driver’s side foot well. This panel is secured by a few screws (Figure 2), and a few snaps as well (Figure 3). In addition, you may have an electrical speaker unit attached to the panel. Disconnect the harness (Figure 4) and pull the panel down (Figure 5).


The brake switch is shown in Figure 6. It’s the rater large switch assembly that moves in conjunction with the brake pedal. Remove the harness from the brake switch (Figure 7) and yank it out of it’s bracket. I found that I had to break the plastic housing of the switch in order to remove it (Figure 8). That’s perfectly okay, since you will be replacing it with a new one very soon anyways.


To finish the job, simply install the new switch into place, and reconnect the wire harness. Test the brake lights to make sure that they are working properly, and then reinstall the knee panel.


Well, there you have it – it’s really not too difficult at all.

Are you looking for more do it yourself procedures (DIY) ? I recommend the Bentley BMW 3 series service manual for you. I got it and I think it’s a gold mine for us -BMW E36 Owners-. If you didn’t grab your copy yet, get it right now! I’m sure you’ll find this book worth every penny you’ve paid for. Get the Bentley BMW 3 series service manual


Wait for more from . . . BMW E36 Blog


Best regards,

Tony Sticks.

Want to receive exciting tips & information about BMW E36 cars? Enter your Email:-


posted in Brakes, Do It Yourself, Technical Info | 6 Comments

24th February 2007

Reset BMW E36 oil service light

Hello my friends,

After changing the oil for your car, the oil service light stays on (on the red) and it becomes very annoying to you sometimes. It makes me upset just to see it like that, so I wanted to find out how this creature is reset. It turned out that the procedure is very simple and it doesn’t need time, money or even special equipment. Well, only a paperclip ;-). The following article will show you how this thing is done within couple minutes. BTW, I didn’t write this article. I found it here in case you want to read it. Ready? ok here we go . . .


Disclaimer: Use this procedure at your own risk!! I’m not responsible for your mistakes man! 😀

First, pop your hood and find the diagnostic data port. It is located on the right side of the engine bay near the right strut tower.


Unscrew the cap. You will see a big Pac-Man shaped hole and twenty little round holes. What is a Pac-Man? Never mind. We are only concerned with pin 7 and pin 19 (note: the words "pin" and "hole" are used interchangeably in this text). Refer to the picture below to find pins 7 and 19.


What we will be doing in this exercise is connecting pins 7 and 19 with a paperclip for four seconds. This will reset the oil service light. Simple, no? But first, here is the list of pins and what they are supposed to do:


Pin Terminal Description
1 TD TD Signal
2 Not occupied
3 Not occupied
4 Not occupied
5 Not occupied
6 Not occupied
7 SI Service Interval Reset
8 Not occupied
9 Not occupied
10 Not occupied
11 Not occupied
12 61 (D+) Generator Charge Indicator
13 Not occupied
14 30 Voltage; Hot At All Times
15 RXD Diagnostic Data Link
16 15S Voltage; Ignition Switch in Run
17 Not occupied
18 PGSP Programming Line
19 31 Ground
20 TXD Diagnostic Data Link


OK, using a paperclip, Bend your paperclip it so it looks like this:


Well it doesn’t have to look exactly like this, but you get the idea. Use pliers if you have to. We want those little loops at the end to maximize the contact with the conductors in the holes of the data port. If you can’t make those little loops at the ends, that’s okay. Just don’t go running around with sharp objects.


OK, now you’re ready to reset the oil service light, so turn the ignition key to position II, but don’t start the car. Get out of the car and go to the data port. Always connect pin 7 first. Once you’ve inserted one end into pin 7, insert the other end into pin 19 and hold it there for 4 seconds. Then remove the paperclip. Check the dash and the oil inspection lights should be reset. The reset occurs upon removal of the clip.


IMPORTANT: DO NOT HOLD IT THERE FOR LONGER THAN 10 SECONDS or you may inadvertently reset your inspection I/II interval.


OK, you’re done. It was pretty easy as I promised! wasn’t it?


Are you looking for more do it yourself procedures (DIY) ? I recommend the Bentley BMW 3 series service manual for you. I got it and I think it’s a gold mine for us -BMW E36 Owners-. If you didn’t grab your copy yet, get it right now! I’m sure you’ll find this book worth every penny you’ve paid for. Get the Bentley BMW 3 series service manual


Wait for more from . . . BMW E36 Blog


Best regards,

Tony Sticks.

Want to receive exciting tips & information about BMW E36 cars? Enter your Email:-


posted in Do It Yourself, Electrical, Technical Info, Tips & Tricks | 293 Comments

20th February 2007

BMW E36 on board computer . . . learn how to use it

Hey Guys,


I’ve been looking for information about how to use the on board computer (OBC) for sometime now and I finally found it 🙂 Yaay! Below I will list what you can accomplish using the on board computer, so read on and let me know what you think.


Disclaimer: Use this procedure at your own risk!!


TEMP (A-TEMP)

Outside temperature


Displays the outside temperature after pressing the TEMP (A-TEMP) button. If it falls below +3�C, a gong signal is heard as a warning; the outside temperature is displayed and flashes for eight seconds.
The warning is repeated if the temperature rises to at least +6�C and then drops again to +3�C.


RANGE (REICHW)

Probable range


This display indicates after pressing the RANGE (REICHW) button how far the car can probably be driven on the fuel remaining in the tank. The value takes into account the way in which the car has so far been driven. A plus sign (+) in front of the displayed value means that it is still undergoing a correction process (measuring tolerance).
If three horizontal display segments flash, the range is below 15km and the car should be refuelled as soon as possible.
The on-board computer registers fuel added to the tank only when the engine has been stopped and the quantity of fuel exceeds four litres.


SPEED (GESCHW)

Average speed


Shows the average speed since the last reset. To display press the SPEED (GESCHW) button.

To reset the calculation press SET/RES. The on-board computer doesn’t include the time the car is standing with the engine off in its calculation.


CONSUM (VERBR)

Average fuel consumption


Average fuel consumption can be computed for two distances in parallel. Each time the button CONSUM (VERBR) is pressed, the display alternates between the average consumptions for distances one and two. There is also an indication of whether distance one or two is being displayed.

To reset the calculation press SET/RES.


DIST (DISTANZ)

Distance from destination


After pressing the DIST (DISTANZ) button the display shows how far the car is from the destination, provided the total distance was input before the journey started.
The probable time of arrival, which is recalculated continually as driving conditions change, is also displayed.
If the car has already completed the full distance which was input, the distance value is preceded by a minus sign ().


LIMIT

Speed limit


If you exceed a speed limit which you have previously input, you will hear a warning gong. The corresponding LED flashes and the display shows the stored limit briefly. The warning is repeated if the speed limit is again exceeded after the car’s speed has in the meantime dropped by at least 5 km/h below the entered value.
To cancel the speed limit input press the LIMIT button again. The LED goes out but the stored value is not lost and can be re-activated with the Limit button.
To adopt the car’s actual speed as the limit value press the LIMIT and then the SET/RES button.


km/mls

Display units changeover

Press the km/mls button to switch display units between km/h and mph or litres per 100km and mpg and back.


CODE

Immobilizing vehicle


A 4-digit number can be entered with the "CODE" key in ignition switch position 1. The engine hood and radio contact is monitored when the vehicle is parked with CODE armed. The engine cannot be started until the same code number is entered again in the BC to disarm the system. Depending on the selected function, the small display shows either the date or the time. Date and time can be displayed for 8 seconds by pressing the key in ignition lock position "0".


CHECK

Check control faults


A display test is performed if there are no check-control faults and the "CHECK" key is pressed for at least 10 seconds. The test appears immediately after pressing the "CHECK" key in ignition switch position 1 or when no check-control is coded in the BC V.


MEMO

Arbitrary reminder


An hour signal and/or any arbitrary reminder time can be programmed or checked with the "MEMO" key:


After pressing the "MEMO" for 3 seconds enter "MEMO" appears in the large display, ":00" appears in the small display.


After entering any time (minutes) with the digit keys "1" and "10" and acknowledging with the "SET/RES" key, the hour signal then sounds 15 seconds before each full hour plus the set time in minutes.


Gong time = Full hour plus input time in minutes minus 15 seconds.


Wait for more from . . . BMW E36 Blog


Best regards,

Tony Sticks.

Want to receive exciting tips & information about BMW E36 cars? Enter your Email:-


posted in Technical Info, Tips & Tricks | 8 Comments

  • Our Sponsors

  • Forum Posts

  • Calendar

  • October 2025
    M T W T F S S
    « Jun    
     12345
    6789101112
    13141516171819
    20212223242526
    2728293031