BMW E36 Blog

BMW E36 Handbrakes adjustment!

8th February 2007

BMW E36 Handbrakes adjustment!

Hello my friends,


I was looking for information about BMW E36 and I found this article about how to adjust BMW E36 handbrakes. Every time I pull the handbrake, I notice that it goes far more than it should and I notice also that it doesn’t stop the car 100%. Usually, when I release the brake pedal, after pulling the handbrake, the car moves slightly and then stops. This shouldn’t happen and the following procedure should fix this problem. So, if your car is like mine, then you have some work to do instead of reading this post . . . well, you can finish reading this post and then do the work 😉


Disclaimer: Use this procedure at your own risk!! There’s no way you can blame me for breaking your car this time ..ok ? then proceed 🙂


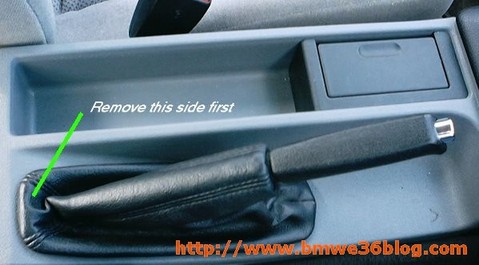
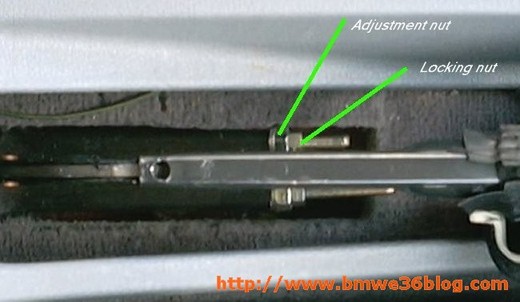
To adjust the handbrake you need to carefully pull up the leather gaiter by the rear of the base base and pull out of the way it turn until it’s inside out. Put the car in 5th gear and slowly release the handbrake. Undo the top locking nut and adjust the handbrake travel by tightening or loosening the lower bolts i.e. tightening makes the travel shorter.


The handbrake is adjusted correctly when it takes between 5 and 10 clicks to be fully on, you can check both rear brakes are equally adjusted by slowly rolling the car forwards and stopping it on the handbrake, if you feel it rocks the car, the side that rises first is this side that is braking more than the other so either loosen it off a bit or tighten up the other side, don’t rely on looking at the two threads and adjusting each one until they are equal as this doesn’t take into account cable stretch and differing pad wear etc – this can clearly be seen in the picture.


Once they are adjusted equally tighten the top locking bolts and clip the handbrake leather gating back into place.


Are you looking for more do it yourself procedures (DIY) ? I recommend the Bentley BMW 3 series service manual for you. I got it and I think it’s a gold mine for us -BMW E36 Owners-. If you didn’t grab your copy yet, get it right now! I’m sure you’ll find this book worth every penny you’ve paid for. Get the Bentley BMW 3 series service manual


Wait for more from . . . BMW E36 Blog


Best regards,

Tony Sticks.

Want to receive exciting tips & information about BMW E36 cars? Enter your Email:-


posted in Brakes, Do It Yourself, Technical Info | 5 Comments

2nd February 2007

BMW E36 Headlamp Glass Replacement

Hello my friends,


It’s been 3 days since I posted something to the blog. I know that I’m a little bit slow on writing here, but I hope I will have more time in the next few days to write more. Today, I came to you with an article about how to replace your BMW E36 headlight glass ( I found this article here). I know that many of you guys have crystal lights instead of the standard BMW E36 headlights, but I know that many of you have the standard lights as well, so I think you should read this anyway. I hope you like it.


Disclaimer: Use this procedure at your own risk and don’t come crying to me after you break something in your car LOOOL! 🙂

Been on motorway recently? encountered storm of stone chips kicked up by some cunt infront? Cracked headlamp glass or just badly pitted, they both look pants, so change just the glass and the front end of your car will look about 5 years younger. Bit pricey for a bit of glass, dealer will want �72 per side. If you can afford it change both sides otherwise it’ll look odd like mine, but hey. First off let’s see what you get for your wonga.


Awww feck, headlamp glass is cracked. Looks pants and probably fails the MOT.


Lift bonnet and take the plastic cover thing off, its held on with 4 normal screws and and 2 plastic ones. This will help with access to the bastard nut that’s really hard to get to and adjust properly.


Next take out the the indicator, easier said than done. There’s a clip that you can just see from above looking down in between the indicator and the headlamp unit. Use a screwdriver and carefully but brutally push the clip towards the indicator and push the whole indicator out from behind simultaneously. Have fun with this one. The green arrow shows the location of one of the four/five bolts that hold the headlamp unit in.


My headlamp unit only had four bolts holding it in, earlier cars I believe had five. No matter ‘cos it’ll just be the one missing in the middle that’s obvious. Just undo these bolts being careful not to let the plastic adjustment plug type thing behind it turn, use an open ended spanner to stop them turning and later to adjust the headlamp units position. 


The really hard to get to bolt is sort of arrowed here, it sits at the bottom somewhere in that gap, get your socket set and extensions out for this one.

Take all the connector type things off for the lamps and the adjuster motor.


Take the whole unit out and undo the massive clips all the way around. Make sure all the inside parts are clean of dust and fingerprints etc, otherwise it’ll bug you later when you can’t get to them as easily. Clip the new glass in place and stick it back on the car. Use the plastic plug type adjuster things that go between the car body and the bolts to adjust how the lamp sits. Look at the headlamp on other side of the car for what the gap sizes roughly are. Tighten everything back up and replace everything you’ve taken off.


Are you looking for more do it yourself procedures (DIY) ? I recommend the Bentley BMW 3 series service manual for you. I got it and I think it’s a gold mine for us -BMW E36 Owners-. If you didn’t grab your copy yet, get it right now! I’m sure you’ll find this book worth every penny you’ve paid for. Get the Bentley BMW 3 series service manual


Wait for more from . . . BMW E36 Blog


Best regards,

Tony Sticks.

Want to receive exciting tips & information about BMW E36 cars? Enter your Email:-


posted in Do It Yourself, Exterior, Technical Info | 5 Comments

28th January 2007

BMW E36 information video

Hi Guys,


Today, I found this video with tons of information about the BMW E36 history and its progress. It also describes some of the important characteristics of this great car and some information about its design.


Enjoy.


Wait for more from … BMW E36 Blog.


Best regards,

Tony Sticks.

Want to receive exciting tips & information about BMW E36 cars? Enter your Email:-


posted in Technical Info, Uncategorized, Videos | 3 Comments

27th January 2007

Installing stock speakers inside your BMW E36 without making any damages!

Hi Friends,


As I promised you, I’m writing today about how I upgraded my BMW E36 sound system without doing any damages to my car. I was not happy with the standard sound in my car as I kept recalling the sound system that I used to have in my previous BMW E30. It was a sound system with (Kenwood speakers, Subwoofers, Boschmann amplifier and a Sony Xplod headset with a CD changer). So, I wanted to do a similar change to my new car, but I didn’t want to make any damages to the car as I had to cut through the metal to place the speakers and the subwoofers in my old car. I found a new way which I think it’s away better than the old one and I’m going to explain it with photos next . So enjoy and I hope you’ll find this article very interesting.


Disclaimer: Use this procedure at your own risk and don’t blame me of any trouble 😉


With that said, we can start now. . .


The first thing that I had to do with is to remove the covers that BMW used to hide the rear speakers. By using a screwdriver, you can easily do that but you have to be careful in order not to break them. After you remove that cover, you’ll be able to see the rear speakers. See screenshot below:


and this one:


Now, after your see this, you can use the screwdriver again to remove the 2 screws that hold each of the rear speakers. After you remove the screws, you can easily remove the rear speakers, but you should do that from the trunk side, not from the room side. Don’t forget to unplug the speakers first, see screenshot below:


Now that you’ve removed the speaker, it’s time to put the new speakers. See screenshots below:


Now, you have to remove the speakers cover, like screenshots above. This will give you the ability to stick the rounded area of the speaker which holds the small speakers (Tweeters) in the whole of the original speakers.


After that, you’ll have to use the drill to make two small wholes (or four) from the trunk side for each speaker to hold it using screws. This was a little bit hard for me because there’s no much space in the trunk to do it, but after some hard tries/fails, I successfully did it.


The next step is to connect the wires of the original plug of each speaker to the new one. After you do this, it should look something like the screenshots below:


So, now we have the speakers placed in the trunk and without cutting anything in the car steel. After that, you should put the rear covers back in the same way your removed them (from the car room side) and everything will be done.


In the next few days, I will be writing about connecting the new CD headset. I’m putting these photos for the headset after it’s installed for you to see.


So what do you think? I’ve tried the new sound and it’s so cool. Of course, there’s more to do to get a very good sound, but the budget is out now, so I will have to wait before proceeding with this.


Are you looking for more do it yourself procedures (DIY) ? I recommend the Bentley BMW 3 series service manual for you. I got it and I think it’s a gold mine for us -BMW E36 Owners-. If you didn’t grab your copy yet, get it right now! I’m sure you’ll find this book worth every penny you’ve paid for. Get the Bentley BMW 3 series service manual


I’m done for today, see you soon guys.


Wait for more on … BMW E36 Blog.


best regards,

Tony Sticks.

Want to receive exciting tips & information about BMW E36 cars? Enter your Email:-


posted in Audio, Do It Yourself, Technical Info, Tips & Tricks | 19 Comments

24th January 2007

BMW On Board Diagnostics

Hello friends,

I found this article about on board diagnostics for your BMW E36 and I thought wow! that’s cool. Unfortunately, I tried to do it on my BMW E36 1993 318is but it didn’t work 🙁 I’m not sure whether I did it right or not, maybe some of you guys will try it. I think it should work, but in my case, I don’t know why it didn’t. Anyway, I shouldn’t forget to thank Jared Fenton, the author of the article. Ready? here it goes:

Disclaimer: Use it at your own risk !!!

Did you know that your BMW 3 Series has an internal diagnostic program built into the computer? Not many people know about this. On the BMW 3 Series, there is a way that you can diagnose common engine problems without having to purchase a code tool or take it to the dealer to have it scanned. This is one of those neat little features of the Service Indicator Computer; the series of lights directly under the tachometer and speedometer that remind you to change the oil and perform service. In this tech article, I will provide you with the procedure for checking the fault codes and what the codes mean. This guide will help you to diagnose any possible problems with your car.

This article is written for both the BMW E30 and E36 3 Series cars (up to 95) and should work on both models where a Service Indicator Computer is used. I will go over the small differences between the early and late cars, as they differ slightly. Keep in mind that this procedure will not work on early cars with Motronic 1.1.

Now on the E30 models, get in the car and put the key in the ignition and turn it to the second turn or �ON� position, but do not start the car. Now, press the accelerator pedal all the way to the floor, then let it release all the way back. Now repeat the depress/release cycle 4 more times fairly quickly, but not too fast. It may take some time to get this timing down correct. It should only take you a few seconds to do this. What this does is activate the wide-open throttle switch and the idle switch 5 times. This then sends a signal to the Motronic ECU to send fault codes to the Service Indicator Light.

On the E36 models, the procedure works the same way, but the timing at which you press/release the gas pedal is faster than on the E30. Just keep at it, and you will eventually get the correct speed.

Watch the �Check Engine� light. It should blink once, and then start blinking a series of four numbers. For instance, say this is a sequence you see� the light blinks once, then twice, then four times and lastly four times. If you read it correctly this means that the SI light is reading out the code 1244 (faulty camshaft sensor) The codes appear as a series of flashes for each digit. The flashes indicating one digit are about one second apart, the next digit will appear after a couple seconds interval. If there are no faults in the car, the computer will flash out the number 1444.

Here is the list of codes and what they indicate.


1211 DME Control Unit

1215 Air Mass Sensor

1216 Throttle Potentiometer

1218 Output Stage, Group 1

1219 Output Stage, Group 2

1221 Oxygen Sensor 1

1212 Oxygen Sensor 2

1222 Lambda Control 1

1213 Lambda Control 2

1223 Coolant Temperature Sensor

1224 Intake Air Temperature Sensor

1225 Knock Sensor 1

1226 Knock Sensor 2

1227 Knock Sensor 3

1228 Knock Sensor 4

1231 Battery Voltage/DME Main Relay

1232 Throttle Idle Switch

1233 Throttle Wide Open Throttle Switch

1234 Speedometer A Signal

1237 A/C Compressor Cut Off

1242 A/C Compressor

1243 Crankshaft Pulse Sensor

1244 Camshaft Sensor

1245 Intervention AEGS

1247 Ignition Secondary Monitor

1251 Fuel Injector 1 (or group 1)

1252 Fuel Injector 2 (or group 2)

1253 Fuel Injector 3

1254 Fuel Injector 4

1255 Fuel Injector 5

1256 Fuel Injector 6

1257 Fuel Injector 7

1258 Fuel Injector 8

1261 Fuel Pump Relay Control

1262 Idle Speed Actuator

1263 Purge Valve

1264 EGO Heater

1265 Fault Lamp (check engine light)

1266 VANOS

1267 Air Pump Relay Control

1271 Ignition Coil 1

1272 Ignition Coil 2

1273 Ignition Coil 3

1274 Ignition Coil 4

1275 Ignition Coil 5

1276 Ignition Coil 6

1277 Ignition Coil 7

1278 Ignition Coil 8

1281 Control Unit Memory Supply

1282 Fault Code Memory

1283 Fuel Injector Output Stage

1286 Knock Control Test Pulse

1444 No Fault Codes
 

I hope you enjoyed this article and I hope it will work for you.


Wait for more from . . . BMW E36 Blog


Best regards,

Tony Sticks.

Want to receive exciting tips & information about BMW E36 cars? Enter your Email:-


posted in Technical Info, Tips & Tricks | 7 Comments