18th
March
2008
Before I start this post. There’s one thing that is really confusing me? Why I’m not getting any response for these articles from you guys? Don’t you like to make your car headlights turn on automatically like the 200X cars? Isn’t that cool? Come on people, let me hear what you think good or bad 😈 .
I wrote four articles until now about how you can make your BMW lights turn on automatically at night. In the first post, I proved that this should be something easy to implement inside a BMW E36 car. In the second post, I presented a circuit diagram that will help you create the electronic circuit that is supposed to control your lights and turn them on automatically when it gets dark. In the third post, I wrote about my first attempt to implement this circuit and told you that it’s partially working but it needed some enhancements. In the fourth post, I created a video with the circuit implemented on breadboard and connected directly to my brother’s car lights. The video showed how the car lights turned on when I covered the light sensor with my hand (tricking the sensor to "think" it’s dark). So, the circuit is working correctly as intended.
In this new post, I soldered the circuit on permanent board and the end result looks like this:
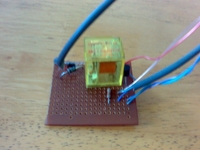
I made sure that this circuit has the following:
1. Two wires for power (positive and negative).
2. Two long wires that are connected to the external light sensor. I made them long because I’m still not sure where I’m going to place that sensor. Take a look at this:

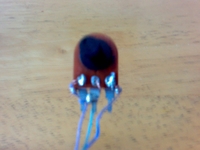
3. Three wires connected to an external variable resistor, this will allow us to adjust how sensitive the unit will be for light. Take a look at this:
4. Three wires that will deliver current from the battery directly to the headlights when it becomes dark.
With this circuit implemented, I think I’m ready to integrate this into my car. I hope in the next week, I will post a video here while I’m driving my car under a tunnel and show you how everything will work. :-). But please let me know what do you think of all this? Also, if you have any ideas about where I should put the light sensor, please let me know.
BMW E36 Blog: The Ultimate E36 Information Source.

posted in Do It Yourself, Electrical, Technical Info, Tips & Tricks, Uncategorized |
14th
March
2008
I wrote three articles until now about how you can make your BMW lights turn on automatically at night. In the first post, I proved that this should be something easy to implement inside a BMW E36 car. In the second post, I presented a circuit diagram that will help you create the electronic circuit that is supposed to control your lights and to turn them on automatically at night. In the third post, I wrote about my first attempt to implement this circuit and told you that it’s partially working but it needed some enhancements.
Today, I had the time to re-implement the circuit that I’ve been talking about and I connected it to the car. Then, I shot this video for the circuit in action. In the video, I tried to put my hands closer to the light sensor to make it "think" it’s night. Take a look at the video and let me know what you all think.
Note: this car is not mine, it’s my brother’s car and it’s dirty as usual 😆 .
Enjoy :-
BMW E36 Blog: The Ultimate E36 Information Source.
posted in Do It Yourself, Electrical, Technical Info, Tips & Tricks, Videos |
11th
March
2008
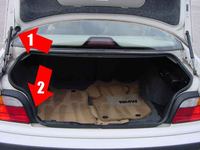
If you open your trunk, you will notice that there are some wires that are running from you car into your trunk and these wires are covered with with a black coat. The problem with these wires is that they move whenever you open or close your trunk and if you add the time factor to this, you will end up with a wiring disaster that may affect the entire car. I’ve checked my wires and found that some of them are cut and the cover of the wires is removed. Luckily these wires didn’t make a contact to each other. Otherwise, I’m sure a disaster will occur. I’ve heard about a guy who faced this same situation and the entire car went crazy. The dash lights, the headlights, the OBC and a bunch of fuses burned trying to keep the car alive. So I thought you all need to know about this. Besides, the job is very simple, all you need to do is to open your trunk, remove the black coat that’s covering the wires (take a look at the photo below) and make sure they’re in a good shape. If they’re not, which I think it will be the common case, I suggest your replace them right away to avoid some serious problems in your car’s wiring.
BMW E36 Blog: The ultimate E36 information source.
posted in Electrical, Tips & Tricks, Uncategorized |
10th
March
2008
It seems that I have a weakness towards head units that will look and act great inside a BMW E36. I’m sure that by now, every BMW E36 owner here knows that if you don’t like the original BMW head unit or you just need a little bit more options inside your head unit, that you will have to sacrifice the look of the car to get these options. In my "quest" to find the best head unit for the BMW E36, I wrote about the Bluetooth Ready Headunits For Your BMW and the Bluetooth Ready Headunits For Your BMW . . . Revisited! which were very good choices indeed. The problem with all these great head units was that they will not fit into your dashboard 100%. It will always look a little bit different than its surroundings.
Today, I’ve found a new head unit which is the Blaupunkt Bahamas MP46. This unit is great and will blend nicely inside your BMW E36. Take a look at these photos of the head unit:
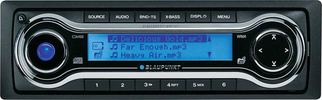

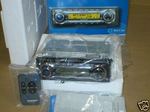
Now for the best part. This head unit can be set to illuminate amber which will match your BMW dash 100%. I saw a picture of this head unit with the Amber color somewhere, but now, I can’t find it. Sorry about this guys, if you saw that photo, you would know what I’m talking about.
BMW E36 Blog: The ultimate E36 information source.
posted in Audio, Electrical, Interior, Uncategorized |
29th
February
2008
As I promised in my previous post, Top Gear BMW M5 Review, I prepared a DIY (Do It Yourself) to show you how to fix your BMW E36 light switch illumination. This is a very very common problem in BMW E36 cars and it always goes unnoticed. Having illumination in the BMW E36 light switch looks great and if you can’t see that illumination in your dashboard, this means that this DIY is for YOU. I hope you enjoy it and find the information provided below useful.
Disclaimer: Use this info at your own risk!! I’m not responsible if this didn’t work for you :-).
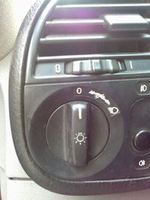
The illumination of your light switch can be fixed easily and it costs nothing. Well, only a dollar to buy the correct light bulb to use for replacement. To start, take a look at this:
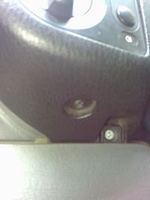
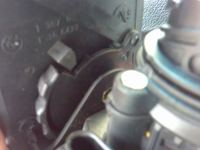
Now, at the bottom of this is a screw that you will need to remove. After that, you can remove the light switch and the air vent easily. Take a look at the screw here:
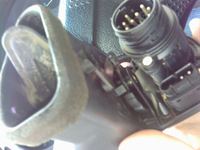
After you remove that screw, you will need to use a flat screw driver to push the whole light switch + air vent out. Be careful with this to avoid breaking anything. The whole part should be removed by pulling a little bit. You can pull it by hand by grabbing the light switch and the air vent opening. Just apply a little effort and it should come lose. After you remove the switch and the air vent, you will not be able to remove it totally out of its place. That’s because it’s connected by two wires that will need to be disconnected first. Take a look at the connectors that need to be removed:
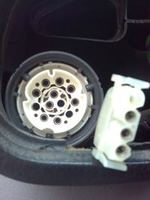
To remove the light connecter you should turn it anti-clockwise (from your point of view). Be careful with this, the wires are very short and you will need to use your fingers to turn the connector. It’s a little bit tight place to work with. After you finish it, you will have the whole part (light switch + air vent) out like this:
This is where you will find the pin that is holding the light bulb that needs to be replaced. Take a look:
You will need to use a flat screw driver to remove the pin out of its place. Pay attention not to break anything ok? After you remove the pin, it should look something like this:

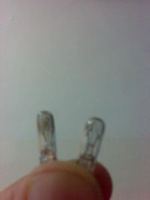
This is the light bulb that needs to be replaced. I brought another type of bulb by mistake thinking that these small bulbs are all of standard size. It turned out that I was wrong, so I had to go and get a different one. Take a look:
After you replace the bulb, put everything back the way your removed them. It’s going to be a little bit hard to reconnect the wires to the light switch, but don’t worry, you will be able to do it with a little patience and concentration.
After you connect the wires, you should try to place the air vent + the light switch back and you will notice that it’s not fitting exactly. That’s because you will need to make sure the opening of the air vent will slide in its place correctly. Just keep moving it a little bit up and down while pushing it gently. It will slide in and everything should look good now. Now turn your lights on and see if it’s working. If you’ve successfully accomplished the task, your light switch should look like this at night 😆
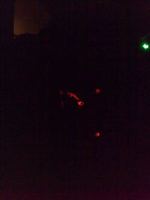
So, what do you think? Isn’t that a cool fix or what?
Are you looking for more do it yourself procedures (DIY) ? I recommend the Bentley BMW 3 series service manual for you. I got it and I think it’s a gold mine for us -BMW E36 Owners-. If you didn’t grab your copy yet, get it right now! I’m sure you’ll find this book worth every penny you’ve paid for. Get the Bentley BMW 3 series service manual
BMW E36 Blog: The ultimate BMW E36 information source.
posted in Do It Yourself, Electrical, Interior, Uncategorized |

 (4.86 out of 5)
 (4.07 out of 5)


