BMW E36 Blog

Installing stock speakers inside your BMW E36 without making any damages!

27th January 2007

Installing stock speakers inside your BMW E36 without making any damages!

Hi Friends,


As I promised you, I’m writing today about how I upgraded my BMW E36 sound system without doing any damages to my car. I was not happy with the standard sound in my car as I kept recalling the sound system that I used to have in my previous BMW E30. It was a sound system with (Kenwood speakers, Subwoofers, Boschmann amplifier and a Sony Xplod headset with a CD changer). So, I wanted to do a similar change to my new car, but I didn’t want to make any damages to the car as I had to cut through the metal to place the speakers and the subwoofers in my old car. I found a new way which I think it’s away better than the old one and I’m going to explain it with photos next . So enjoy and I hope you’ll find this article very interesting.


Disclaimer: Use this procedure at your own risk and don’t blame me of any trouble 😉


With that said, we can start now. . .


The first thing that I had to do with is to remove the covers that BMW used to hide the rear speakers. By using a screwdriver, you can easily do that but you have to be careful in order not to break them. After you remove that cover, you’ll be able to see the rear speakers. See screenshot below:


and this one:


Now, after your see this, you can use the screwdriver again to remove the 2 screws that hold each of the rear speakers. After you remove the screws, you can easily remove the rear speakers, but you should do that from the trunk side, not from the room side. Don’t forget to unplug the speakers first, see screenshot below:


Now that you’ve removed the speaker, it’s time to put the new speakers. See screenshots below:


Now, you have to remove the speakers cover, like screenshots above. This will give you the ability to stick the rounded area of the speaker which holds the small speakers (Tweeters) in the whole of the original speakers.


After that, you’ll have to use the drill to make two small wholes (or four) from the trunk side for each speaker to hold it using screws. This was a little bit hard for me because there’s no much space in the trunk to do it, but after some hard tries/fails, I successfully did it.


The next step is to connect the wires of the original plug of each speaker to the new one. After you do this, it should look something like the screenshots below:


So, now we have the speakers placed in the trunk and without cutting anything in the car steel. After that, you should put the rear covers back in the same way your removed them (from the car room side) and everything will be done.


In the next few days, I will be writing about connecting the new CD headset. I’m putting these photos for the headset after it’s installed for you to see.


So what do you think? I’ve tried the new sound and it’s so cool. Of course, there’s more to do to get a very good sound, but the budget is out now, so I will have to wait before proceeding with this.


Are you looking for more do it yourself procedures (DIY) ? I recommend the Bentley BMW 3 series service manual for you. I got it and I think it’s a gold mine for us -BMW E36 Owners-. If you didn’t grab your copy yet, get it right now! I’m sure you’ll find this book worth every penny you’ve paid for. Get the Bentley BMW 3 series service manual


I’m done for today, see you soon guys.


Wait for more on … BMW E36 Blog.


best regards,

Tony Sticks.

Want to receive exciting tips & information about BMW E36 cars? Enter your Email:-


posted in Audio, Do It Yourself, Technical Info, Tips & Tricks | 19 Comments

24th January 2007

BMW On Board Diagnostics

Hello friends,

I found this article about on board diagnostics for your BMW E36 and I thought wow! that’s cool. Unfortunately, I tried to do it on my BMW E36 1993 318is but it didn’t work 🙁 I’m not sure whether I did it right or not, maybe some of you guys will try it. I think it should work, but in my case, I don’t know why it didn’t. Anyway, I shouldn’t forget to thank Jared Fenton, the author of the article. Ready? here it goes:

Disclaimer: Use it at your own risk !!!

Did you know that your BMW 3 Series has an internal diagnostic program built into the computer? Not many people know about this. On the BMW 3 Series, there is a way that you can diagnose common engine problems without having to purchase a code tool or take it to the dealer to have it scanned. This is one of those neat little features of the Service Indicator Computer; the series of lights directly under the tachometer and speedometer that remind you to change the oil and perform service. In this tech article, I will provide you with the procedure for checking the fault codes and what the codes mean. This guide will help you to diagnose any possible problems with your car.

This article is written for both the BMW E30 and E36 3 Series cars (up to 95) and should work on both models where a Service Indicator Computer is used. I will go over the small differences between the early and late cars, as they differ slightly. Keep in mind that this procedure will not work on early cars with Motronic 1.1.

Now on the E30 models, get in the car and put the key in the ignition and turn it to the second turn or �ON� position, but do not start the car. Now, press the accelerator pedal all the way to the floor, then let it release all the way back. Now repeat the depress/release cycle 4 more times fairly quickly, but not too fast. It may take some time to get this timing down correct. It should only take you a few seconds to do this. What this does is activate the wide-open throttle switch and the idle switch 5 times. This then sends a signal to the Motronic ECU to send fault codes to the Service Indicator Light.

On the E36 models, the procedure works the same way, but the timing at which you press/release the gas pedal is faster than on the E30. Just keep at it, and you will eventually get the correct speed.

Watch the �Check Engine� light. It should blink once, and then start blinking a series of four numbers. For instance, say this is a sequence you see� the light blinks once, then twice, then four times and lastly four times. If you read it correctly this means that the SI light is reading out the code 1244 (faulty camshaft sensor) The codes appear as a series of flashes for each digit. The flashes indicating one digit are about one second apart, the next digit will appear after a couple seconds interval. If there are no faults in the car, the computer will flash out the number 1444.

Here is the list of codes and what they indicate.


1211 DME Control Unit

1215 Air Mass Sensor

1216 Throttle Potentiometer

1218 Output Stage, Group 1

1219 Output Stage, Group 2

1221 Oxygen Sensor 1

1212 Oxygen Sensor 2

1222 Lambda Control 1

1213 Lambda Control 2

1223 Coolant Temperature Sensor

1224 Intake Air Temperature Sensor

1225 Knock Sensor 1

1226 Knock Sensor 2

1227 Knock Sensor 3

1228 Knock Sensor 4

1231 Battery Voltage/DME Main Relay

1232 Throttle Idle Switch

1233 Throttle Wide Open Throttle Switch

1234 Speedometer A Signal

1237 A/C Compressor Cut Off

1242 A/C Compressor

1243 Crankshaft Pulse Sensor

1244 Camshaft Sensor

1245 Intervention AEGS

1247 Ignition Secondary Monitor

1251 Fuel Injector 1 (or group 1)

1252 Fuel Injector 2 (or group 2)

1253 Fuel Injector 3

1254 Fuel Injector 4

1255 Fuel Injector 5

1256 Fuel Injector 6

1257 Fuel Injector 7

1258 Fuel Injector 8

1261 Fuel Pump Relay Control

1262 Idle Speed Actuator

1263 Purge Valve

1264 EGO Heater

1265 Fault Lamp (check engine light)

1266 VANOS

1267 Air Pump Relay Control

1271 Ignition Coil 1

1272 Ignition Coil 2

1273 Ignition Coil 3

1274 Ignition Coil 4

1275 Ignition Coil 5

1276 Ignition Coil 6

1277 Ignition Coil 7

1278 Ignition Coil 8

1281 Control Unit Memory Supply

1282 Fault Code Memory

1283 Fuel Injector Output Stage

1286 Knock Control Test Pulse

1444 No Fault Codes
 

I hope you enjoyed this article and I hope it will work for you.


Wait for more from . . . BMW E36 Blog


Best regards,

Tony Sticks.

Want to receive exciting tips & information about BMW E36 cars? Enter your Email:-


posted in Technical Info, Tips & Tricks | 7 Comments

15th January 2007

Installing amplifier inside your BMW E36

Hello friends,


Today, I was digging for some information about how to install a nice sound system in E36 cars and I found a very good article here . In this article, a step by step tutorial on how to do is provided. It also describes some of the options like the best tools to use, where to place the amplifier in your trunk. So, are you ready ? No not yet, first the disclaimer


Disclaimer: Use it at your own risk pal!!


OK now I’m ready so here we go 3 . . . 2 . . . 1 . .


When my father ordered his ’98 E38 740i, he opted for the $2200 “premium package.” When the car arrived and I was able to test out the system, it was very disappointing. My Oldsmobile had more bass!!! Well, that’s his car and he can do whatever he wants to it. When it was time to order my ’99 E36 M3, I knew not to opt for the Harmon/Kardon option. The $900 I saved would go towards my aftermarket system.

After much research, listening to people’s setups (thanks Ben), and going to an a/d/s/ sponsored audio tech session in Maryland, I decided on the following setup:

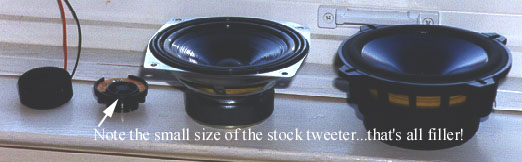
a/d/s/ 335is.2 front separates. I consider these speakers top of the line. Only the PX series is higher but at a significant price premium. Also, the PX series only comes in a 6″ diameter so it wouldn’t fit the kick panel locations without some modifications. Also, keep in mind these are the newly released revision 2 series.

a/d/s/ P840.2 8-channel amplifier. a/d/s/ is well-known for the clear and accurate response.

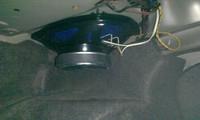
JL Audio stealthboxes in the rear. These fit the ’93-’96 E36 sedan and the ’93-’99 E36 coupe. I wanted to keep the trunk as stock looking as possible and I didn’t want to lose a lot of space to a sub-woofer enclosure. The stealthboxes are 8″ subs. They won’t pack the punch of a 10″ or 12″, but I think I’ll be happy with the 8 inchers..

This writeup will follow the flow of how I did it in real life. If you’re using the stock wires, the project can be partitioned into two sub-projects: 1) replacing the front woofers and tweeters and 2) mounting and installing the amp and running wires (optional).

Replacing the Front Woofers

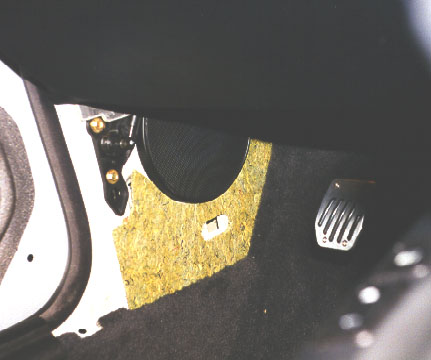
Remove the driver’s side kick panel. First, you need to remove the hood latch�a philips screw driver will do. There is also a plastic anchor of sorts. A slotted screw driver will do here. Next, slide the lip of the kick panel from under the strip that says M3 in my case (I know, real technical words). Now slide the kick panel forward.

Undo the four bolts holding the factory speaker. I had to solder a new spade connector onto the negative lead because the factory one was too small. Place the gasket seal on the back of the speaker to ensure an airtight seal. Screw the speaker back into place. The green cardboard type insulation material had to be cut in order for the new speaker to fit. Heck, I forgot to put it back in on the passenger side. Hahaha.

Removal of the passenger side is pretty much the same.

To remove the tweeters, you have to pull the door panel off. To do this, use a butter knife to remove the two plastic covers behind the door pull. Also, remove the little black plastic cover that says, “Airbag.” There are torx screws behind there. For the drivers, side, use a screw driver to push the door latch to fool the system into thinking the door is closed. Cut a butter knife at the lower edge of the door and twist. The whole door panel should pop off. Once one body clip comes off, they all seem to pop off! Be careful with the driver’s door panel because there’s still a connection to the mirror controls.

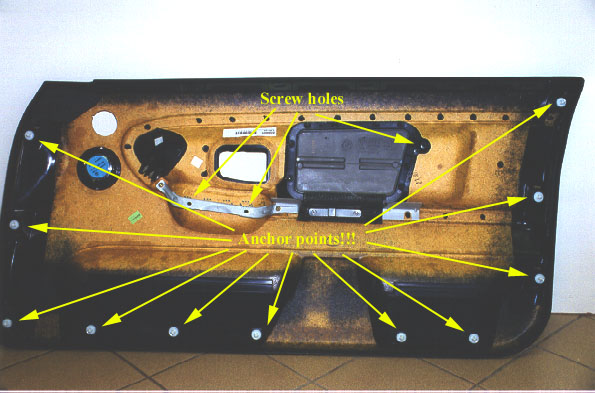
The tweeter is held in place with a lockring. Twist it off and pop out the factory one. You’ll need to use a dremel and remove the plastic obstruction. Be careful not to go through the grill. Once that’s off, you can use silicone sealant to hold the new tweeters in place. Don�t forget to get your molex 2-conductor connector. I ended up using the cheesy radio shack versions�not as elegant.

Mounting and Installing the Amplifier

I spent many hours just looking for possible areas to mount the amp. Here were the possibilities:

Suspend it from the rear deck shelf.
Mount it to the back of one of the fold-down rear seats
Or come up with something clever.
I’m a masochist and opted for the third option. The idea of shooting holes into my sheet metal didn’t sit well with me. Mounting the amp to the back seat was plausible, but not only are the seats curvy, where will you run all the ugly wires?

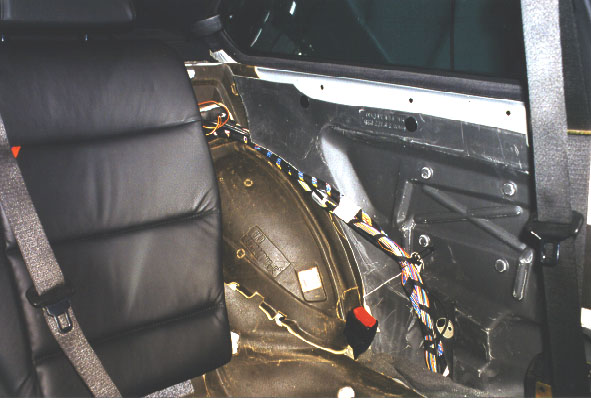
First, you need to remove the left rear brake light cover housing by turning the retaining screw counterclockwise and pulling up and out.
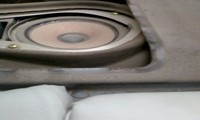
Next, you need to remove the left rear speaker. To remove the grill, push your thumbs against the front edge. Once you bend the grill sufficiently, you can push upwards. Next, remove the two screws holding the speakers in place. There should be (at least on mine) a metal clip holding the whole unit in place. Push this tab and the speaker will drop out.
Now you can work the molded carpet on the side of the trunk outwards.
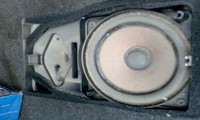
You will now see the factory amp. It’s held in place by three 10mm bolts.

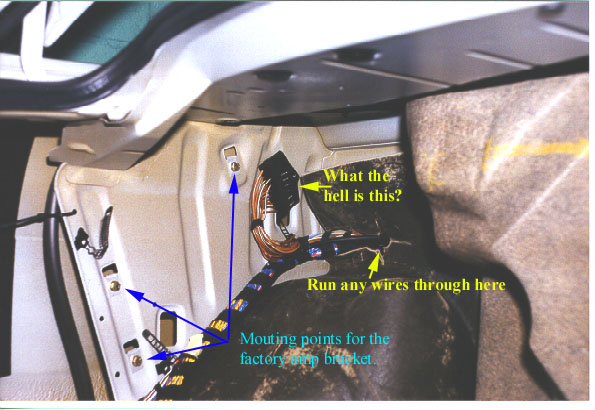
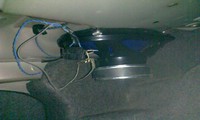
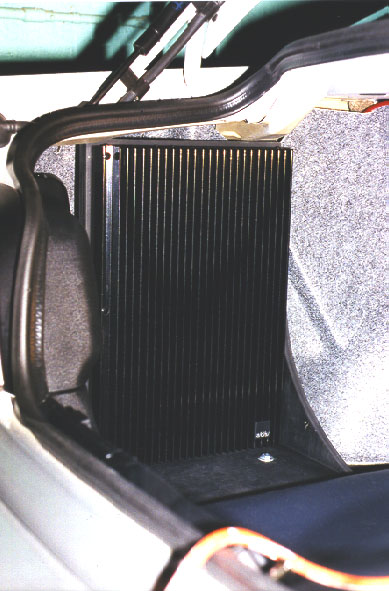
I looked around and removed the black plastic trim left to the spare tire by removing the plastic nuts. I found what I though to be a perfect location. There were already holes in the sheet metal for me to secure a bracket to. I pestered my uncle for some 3/4″ plywood stock–we are talking about a 15 pound metal object subjected to the extreme cornering forces of my M3–and fabricated a sturdy bracket.

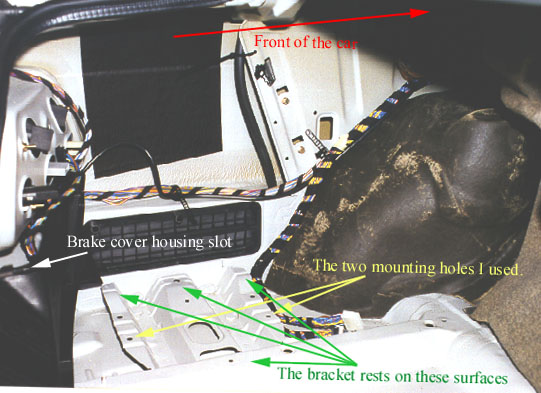
I used 2″ 1/4″ bolts with washers to secure the bracket in place. If you look, you’ll see the area with the holes is lower than the rest points. I used a piece of scrap 3/4″ plywood to make a shim. It works perfectly.

I cut the factory amp connectors off. I ended up following Bob Hazelwood’s advice and ordered two (you’ll probably need three�so I’m short a connector) 14-conductor mini-fit molex connectors from http://www.digikey.com. Definitely order the crimp tool while you’re at it. It makes life so much easier and the crimps look real nice.

I wired up the crossovers into the factory wiring. Some people run new wires. Well, I looked at the gauge of the wires running to the front woofers. I think they are at least 16ga�.good enough. Here’s the end result:

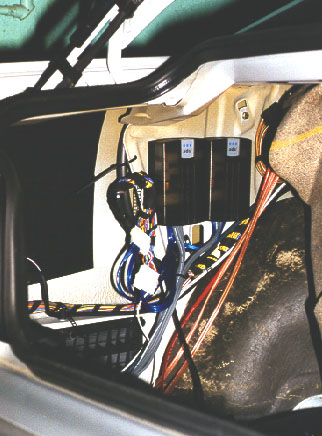
After running wires and soldering everything (oh, solder all crimp connections just in case!), roll back the carpet, place the brake light cover back, and install the amp bracket and amp. I had to cut 1/2″ off the bottom of the molded carpet (a new one costs $45) so the bracket would fit easily. I was planning on lifting it and squishing the bracket underneath, but after all the wires were in place, there was really no room.

Running Wires

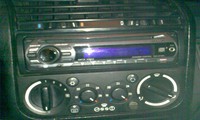
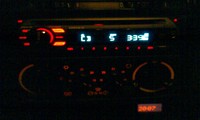
I decided to run a 4-conductor wire for my radar detector, 8-conductor wire for the bass control, and a patch cable for the new head unit. Time to run wires.

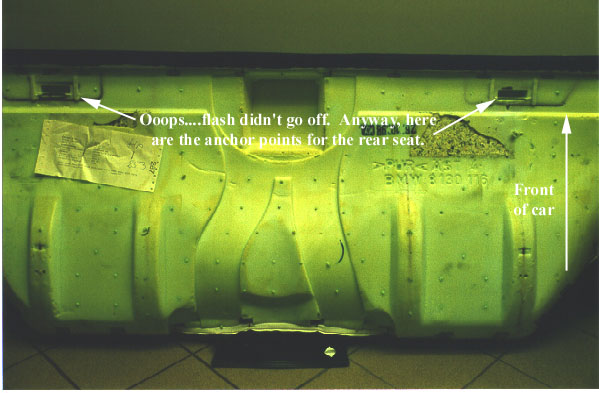
First, remove the rear seat. This is accomplished by hovering over the seat as if you’re about to sit on it. Grab right underneath the lip of the leather and pull up.

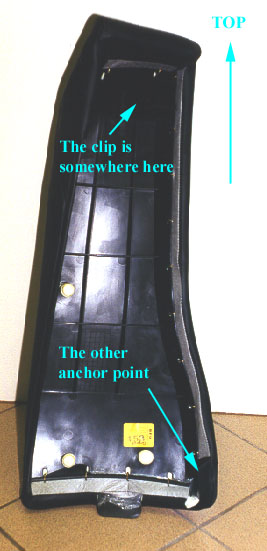
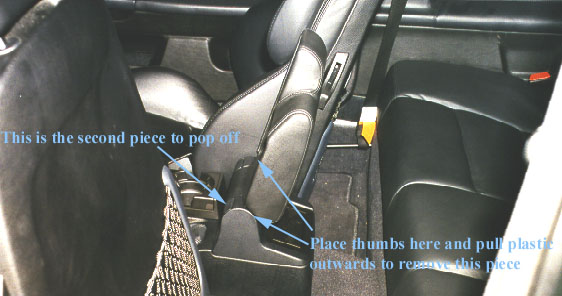
Next, remove the side bolster next to the fold-down seat. The latch is on the top of the bolster. I guess you could simply grab and yank. I wedged my fingers at the bottom between the bolster and the side panel and ran my fingers upwards. Once there, I was able to get leverage to pop the clip off. The remaining anchor point is on the bottom where the seat hinges. Simply push in with your finger and the side bolster will come off.

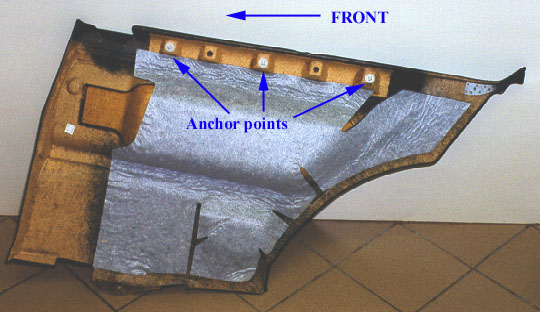
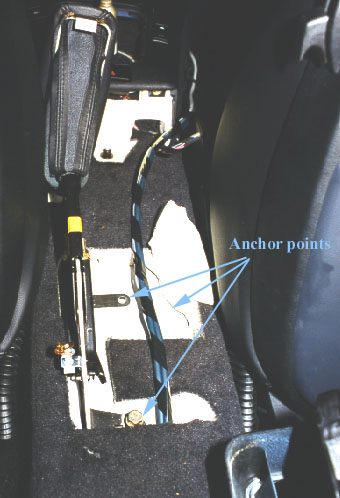
Next, remove the side panel. The body clips are located at the top. I put my hand at the rear and pulled. Pop�came right off. See the picture for the anchor points.

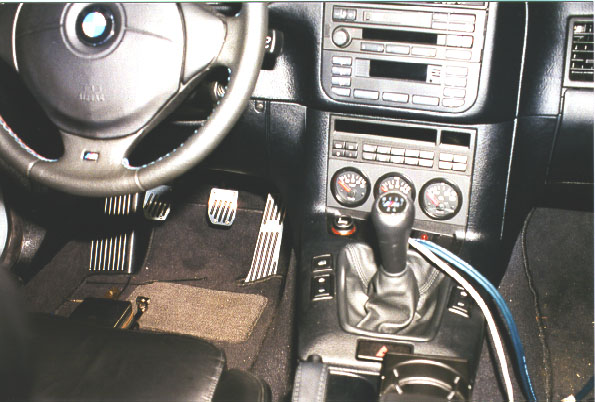
You’ll need to remove or at least loosen the center piece between the seats in order to run the wires. A picture is worth a thousand words:

Pop the hazard light out using a butter knife covered with a cloth. It’s easiest to pop out at the left side. There will be a screw there holding down the front of the center piece.

Once that’s removed, the center piece will be loose. You can run wires now or if you’re like me, you can actually remove everything. The armrest bracket is fastened to the chassis using three 13mm bolts. You’ll need a swivel/universal socket to remove the front two. A box wrench will remove the rear bolt.

Put everything back. You feel better now, right? There it is�a complete audio overhaul. More pictures to come when the stealthboxes arrive. Sorry for the graphics intensive page.


Are you looking for more do it yourself procedures (DIY) ? I recommend the Bentley BMW 3 series service manual for you. I got it and I think it’s a gold mine for us -BMW E36 Owners-. If you didn’t grab your copy yet, get it right now! I’m sure you’ll find this book worth every penny you’ve paid for. Get the Bentley BMW 3 series service manual


Wait for more from … BMW E36 Blog


best regards,

Tony Sticks.

Want to receive exciting tips & information about BMW E36 cars? Enter your Email:-


posted in Audio, Do It Yourself, Technical Info | 11 Comments

26th December 2006

Replacing BMW E36 Brake Pads

Hi Guys,


I found this nice article ,which was written by Wayne R. Dempsey, on this page. I thought that many of you guys would like to know how to change these pads. For those who don’t like to use their hands, at least, it’s a nice thing to know how to do it.


I saw that many times being done, but there’s nothing better than doing the work yourself to make sure you learned it, so here you go … enjoy. Please remember to wash your hands after you’re done 🙂


Disclaimer
: Use it at your own risk!


Replacing your brake pads is one of the easiest jobs to perform on your BMW. In general, you should inspect your brake pads about every 10,000 miles, and replace them if the material lining of the pad is worn down enough to trigger the pad replacement sensor. In reality, most people don�t inspect their pads very often, and usually wait until they see the little brake warning lamp appear on the dashboard. It’s a wise idea to replace the pads, and inspect your discs as soon as you see that warning lamp.


     If you ignore the warning lamp, you may indeed get to the point of metal on metal contact, where the metal backing of the pads may be contacting the brake discs. Using the brakes during this condition will not only give you inadequate braking, but will also begin to wear grooves in your brake discs. Once the discs are grooved, they are damaged, and there is almost no way to repair them. Resurfacing will sometimes work, but often the groove cut will be deeper than is allowed by the BMW specifications. The smart thing to do is to replace your pads right away.


     Brake pads should only be replaced in pairs � replace both front pads or both rear pads at a time. The same rule applies to the brake discs that should be checked each time you replace your brake pads.


     The procedure for replacing pads on all the wheels is basically the same. There are slight configuration differences between front and rear brakes, but in general the procedure for replacement is similar. The first step is to jack up the car and remove the road wheel. This will expose the brake caliper that presses the pads against the disc


Tip: Make sure that the parking brake is off when you start to work on the pads.


     If you look inside the caliper, you will see the brake pads – usually they will look very thin, as is shown here


Begin by removing the small plastic cap that covers the caliper guide bolts


The BMW caliper used on the 3-Series (and many other BMWs) is a single piston caliper design. One piston presses against the side of the brake disc, and the whole caliper slides on the guide bolt to achieve equal pressure on the disc from both pads.


replace the brake pads, you need to remove the caliper. Remove both guide bolts from the
caliper


Then remove the brake pad retaining clip (keeps the pads from rattling)


Make sure you wear safety glasses during this step, as the clip can come flying off if you’re not careful. Then, use a pair of needle-nose pliers to remove the brake pad sensor


After the guide bolts have been removed, you should be able to simply lift the caliper off of its mount


Suspend the caliper using some zip-ties or rope – don’t let the caliper hang from its rubber hose (very bad). See the follow screenshot for details.


As this point, you can pluck the outer brake pad out of the caliper, and use a screwdriver to pry the inner pad out of the caliper piston. The caliper should resemble this when you’re done.


Once you have the pads removed, inspect the inside of the caliper. You should clean this area with some compressed air and isopropyl alcohol. Make sure that the dust boots and the clamping rings inside the caliper are not ripped or damaged. If they are, then the caliper may need to be rebuilt.


At this point, you should inspect the brake discs carefully. Using a micrometer, take a measurement of the disc thickness. If the disc is worn beyond its specifications, then it�s time to replace it along with the one on the other side. See our Pelican Technical Article on Replacing BMW Brake Discs for more information.


The installation of the new brake pads is quite easy. You will need to take a small piece of wood or plastic and push the caliper piston back into the caliper


This is because the new pads are going to be quite a bit thicker than the old ones, and the piston is set in the old pad�s position. Pry back the piston using the wood, being careful not to use too much force. Using a screwdriver here can accidentally damage the dust boot and seals inside the caliper, and is not recommended. Be aware that as you push back the pistons in the calipers, you will cause the level of the brake reservoir to rise. Make sure that you don�t have too much fluid in your reservoir. If the level is high, you may have to siphon out a bit from the reservoir to prevent it from overflowing. Also make sure that you have the cap securely fastened to the top of reservoir. Failure to do this may result in brake fluid accidentally getting on your paint.


When the piston is pushed all the way back, you should then be able to insert the new pads


into the caliper. If you encounter resistance, double check to make sure that the inside of the caliper is clean.  Simply snap the inner brake pad into place using your hand


When firmly mounted, the new pad should resemble this


     The process for assembly is the reverse of the disassembly.  Mount the caliper back onto its mounting bracket, surrounding the brake disc.  If the caliper won’t fit, then you need to push in the piston a bit more until the space in-between both pads is wide enough for the brake disc to fit.  Tighten down the guide bolt using a torque wrench to 22 ft-lb (30 Nm).


     If your brake sensors activated the lamp on your dashboard, they should be replaced with new ones.  Disconnect the sensor


and plug in the new one.  Then snap the new sensor into the small gap in the brake pad


     You also may want to spray the back of the brake pads with some anti-squeal glue. This glue basically keeps the pads and the pistons glued together, and prevents noisy vibration. Anti-squeal pads can also be purchased as sheets that are peeled off and placed on the rear of the pads.

     When finished with both sides, press on the brake pedal repeatedly to make sure that the pads and the pistons seat properly. Also make sure that you top off the master cylinder brake fluid reservoir if necessary. Brake pads typically take between 100 and 200 miles to completely break in. It�s typical for braking performance to suffer slightly as the pads begin their wear-in period. Make sure that you avoid any heavy braking during this period.

     Well, there you have it – it’s really not too difficult at all. 


Are you looking for more do it yourself procedures (DIY) ? I recommend the Bentley BMW 3 series service manual for you. I got it and I think it’s a gold mine for us -BMW E36 Owners-. If you didn’t grab your copy yet, get it right now! I’m sure you’ll find this book worth every penny you’ve paid for. Get the Bentley BMW 3 series service manual


Wait for more from BMW E36 Blog


best regards,

Tony Sticks.

Want to receive exciting tips & information about BMW E36 cars? Enter your Email:-


posted in Brakes, Do It Yourself | 11 Comments

23rd December 2006

How to remove BMW E36 rear seats?

How to remove the rear seats that fold down. Come
over here Kid, Let me show you how to do this!?


First you pop the bottle and open up a Corona, then pop the bottom seat off by
pulling up and then out towards the front of the car. You have to pull on both
sides from the bottom portion of the seat up with both hands. (Pull it quick).
Once you have the bottom seat off, take a 16mm wrench or socket and take your
seat belts off. You then have to open both seats and bring them down. Once they
are down, in the center where the seats meat halfway you are going to see this.

Take a flat tip screwdriver and pry it off from the rear. When you take it off,
it�s going to look like this. You will see 2 latches, one for the left and one
for the right. All you have to do is push the latches to the rear and pull up on
the side that you want. (Look at picture below)

Once you lift up, pull the seat towards the opposite side, and it will come off
the other side and you will see this.

Take that bushing looking thing and pull it out. If it�s to hard, pry it out
with a flat tip screwdriver.

After taking that bushing portion thing out, Place your hand on the top portion
of the side and yank it out. It should look like this.

You then pull up on it and take it off the other little bracket it has on the
bottom. It will look like this. (Picture below).


That is it!! Same thing for the other side. Installation is the same way as
removal.?


Are you looking for more do it yourself procedures (DIY) ? I recommend the Bentley BMW 3 series service manual for you. I got it and I think it’s a gold mine for us -BMW E36 Owners-. If you didn’t grab your copy yet, get it right now! I’m sure you’ll find this book worth every penny you’ve paid for. Get the Bentley BMW 3 series service manual


Wait for more!


best regards,

Tony Sticks.


Want to receive exciting tips & information about BMW E36 cars? Enter your Email:-


posted in Do It Yourself, Interior | 3 Comments