BMW E36 Blog

BMW E36 Heated Seats Fixed

6th January 2009

BMW E36 Heated Seats Fixed


Hi Guys,

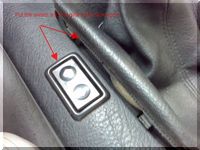
When I bought my car (it was like 2 years ago), I was taking it for a spin just to test-drive it when I noticed the heated seats buttons. Believe it or not, I didn’t know what these buttons were for at that time as I didn’t have much knowledge about the E36 cars like I do now. I asked the previous owner about the buttons and he said they were for heated seats and pressed them. The funny thing is that he didn’t realize at that time (and I’m sure of it) that the heated seats were not working in his car. After I bought the car, I knew that I have to invest sometime to fix my heated seats as they were not working at all. The weird thing is that the heated seats resistance was indicating that they’re running just fine (I used a multi-meter). I’ve tested the power on the plugs under the car too and they were working fine too. hmmm… that’s odd

I wrote before about Installing BMW E36 Heated Seats and the procedure is straight forward, but it needs some time to accomplish that if you could find the heating elements which everyone said they were not very easy to find. While I was looking for heating elements for my car (thinking it was the reason behind my problem), I’ve found a shop who is ready to give me the heating elements from old BMW E36 seats. I’m sure you can imagine how happy I was after hours and hours of looking.

Anyway, since the guy at the shop seemed to know what he was talking about, I asked him to replace them in my car. Of course he had to remove the seats from the car which is very easy. Then the heating elements replacement process began:

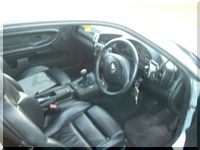
There are 2 heating elements in every seat. One for the back and one inside the seat cushion. The one in the back of the seat was very easy to expose. Simply, he pulled the back leather carefully with a flat screw driver and that was it. To my surprise, I’ve found the heating elements for the back already there and connected. they were also heating just fine. But guess what was the reason why I didn’t feel the heat? Hmmm.. I’m sure you can’t guess because it was the most stupid thing I’ve seen in my entire life. The heating elements were placed behind the sponge. That’s the heating element was heating the sponge instead of heating the leather which I’m supposed to feel. I already know that my seats leather was replaced right before I bought the car, but I didn’t imagine that it was being done by a stupid guy. Damn … stopping heated seats, what were you thinking?!!!

Anyway, the guy at the shop had to separate the leather of the back seat from the sponge and put the heating element there (between them) then make sure that everything returns to its original state.

The cushions were a little bit harder as he needed to remove the knee support part from the cushion, remove 4 screws from the bottom then remove that cushion. After removing the cushion, I was really hoping to find the heating elements in these cushions as well (as in the back), but unfortunately, they were not there. So, he used 2 of the heating elements in the cushions and that was pretty much it. Then put everything together to end up with my heated seats running again… Boy that was fabulous. If your heated seats are not working for some reason, I suggest you fix them right away, you don’t know what you’re missing.


BMW E36 Blog: The ultimate BMW E36 M3 information source.


Want to receive exciting tips & information about BMW E36 cars? Enter your Email:-


posted in Electrical, Interior, Technical Info, Tips & Tricks, Uncategorized | 6 Comments

30th December 2008

Miss December 2008 . . . Great!


Hello guys,

It’s time for a new model for the month of December 2008. I believe I’m a little bit late with this post as I decided long time ago to make these posts in the beginning of the month or at least in the middle but not at the end. I guess this month is a special case and I hope you’ll forgive me for that. Take a look at this cool car. It’s really nice and I’m sure many will kill just to get one with such clean exterior and interior. Take a look… Can you beat that?


BMW E36 Blog: The ultimate BMW E36 M3 information source.


Want to receive exciting tips & information about BMW E36 cars? Enter your Email:-


posted in Exterior, Interior, Models, Photos, Tips & Tricks, Uncategorized | 4 Comments

25th November 2008

EBay Illuminated Shift Knob … Very nice


I’ve found some pictures of an illuminated BMW E36 M3 shift knob. The shift knob is a little bit different from the OEM style, but it looks very decent and it’s very cheap. Costs just $30 (without shipping) which is a killer price when compared to the OEM one. You can find it on ebay here.  I just want you to notice how fabulous it looks with a short shift kit (well, it looks like one). By the way, I’m not a fan of the yellowish illumination color. It would be better if it was amber. Anyway, take a look, I think even with this flaw, it still looks good. Besides, I think you may be able to open it and somehow get it to illuminate amber instead. I know, I tried this with the OEM one and it worked like charm.


BMW E36 Blog: The ultimate BMW E36 M3 information source.


Want to receive exciting tips & information about BMW E36 cars? Enter your Email:-


posted in Electrical, Interior, Tips & Tricks, Uncategorized | 1 Comment

31st October 2008

Fixing BMW E36 Window Switch Light . . . DIY!


I’ve been looking for a way to fix my windows switches. The switches work just fine, but the problem is that they don’t light up at night. So, I thought they would look great if I could fix them. I did a lot of search for information about how to do that, but all I could find is one solution that is to replace my switches. Of course that was an option, but I wanted to fix the problem myself because I thought it would be very easy and I would have a chance to spend more time with my beautiful babe (I hope my wife doesn’t hear this :p ). Anyway, This DIY (Do It Yourself) will definitely help you fix the window switch light problem. I hope you’ll find it useful.

Disclaimer: Use this info at your own risk!! The author is not responsible if this didn’t work for you :-).

First, you’ll need to pull the switch out of the center console. You can do that by simply removing the gear boot and pushing the switch from below. After that, unplug the light wires attached to the switch. Then, use a flat screwdriver to remove the button cover. It’s very easy, but you should be gentle with it in order not to break it. After that, you’ll be looking at the switch which should look similar to this:

This orange or amber light bulb is what needs to be replaced and that’s exactly what we’re going to do. To get access to that bulb, we need to remove the green plastic that is attached to the switch bottom. Using a flat screw driver, push these carefully to remove that piece.

And on the other side as well


Now that the green plastic piece is out of your way, you’ll be able to see the electronic board that is holding the switch buttons and the light bulb.


Push the board to remove the black plastic case as well. Be careful not to break anything.


Now, we have access to the board itself. This is the light bulb that needs to be replaced.

There’s a plastic piece that is used to hold the light bulb. You should remove that carefully while trying to get the bulb out. Remember to be gentle with it.

This is the light bulb that I’m going to use as a replacement for the original one. Unfortunately, I couldn’t get the part number for it. Anyway, the light bulb should be:

1. As small as possible in order to fit inside the white plastic base that we removed previously.

2. It should not have a strong illumination, otherwise, your switches will look very odd and they’ll start to heat.

3. These bulbs give a yellowish color. You may want to use your wife’s or girlfriend nail paint (red preferably) to change its color to amber (orange).

Using a soldering iron, you can put the new bulb instead of the old one. Don’t forget to put the plastic white base again before soldering the new bulb.

Put the board back inside the black plastic case.

Reattach the green plastic base to the switch.

Put everything back as it was when you disassembled the switch.

Now, connect the switch to your car and test it. Make sure everything is working fine. I know I didn’t paint the bulb using the red nail paint because it was my first attempt. After I saw the result which is shown in the last picture below, I decided to repeat the whole process again and paint it with red.


This is the result I got after using the yellow bulb without painting it. I’m sure you’ll like the switches more if you paint them.


Are you looking for more do it yourself procedures (DIY) ? I recommend the Bentley BMW 3 series service manual for you. I got it and I think it’s a gold mine for us -BMW E36 Owners-. If you didn’t grab your copy yet, get it right now! I’m sure you’ll find this book worth every penny you’ve paid for. Get the Bentley BMW 3 series service manual

BMW E36 Blog: The ultimate BMW BMW E36 information source.


Want to receive exciting tips & information about BMW E36 cars? Enter your Email:-


posted in Do It Yourself, Electrical, Interior, Tips & Tricks, Uncategorized | 9 Comments

27th October 2008

BMW E36 M3 Pre-Purchase Info


Hi, These are 3 videos that contain loads of essential information about buying a BMW E36 M3. So, if you’re going to buy one, or if you already have one, I’m sure you’ll find this information very helpful. The videos also try to mention the most common problems known about these cars and how you should check to make sure that your car doesn’t have one of them.

This is a gold mine in my opinion, so after you watch the videos you should be able to tell whether your car was hit before or not. You should know the VIN number locations in your car plus determine if any of the body parts has been replaced by a previous owner or has been messed with.

Take a look, I hope you find these videos useful:-


BMW E36 Blog: The Ultimate BMW E36 M3 Information Source.

Want to receive exciting tips & information about BMW E36 cars? Enter your Email:-


posted in Cooling System, E36 M3, Engine, Exterior, Interior, Technical Info, Tips & Tricks, Uncategorized, Videos | 2 Comments