Disclaimer: Use this info at your own risk!! I’m not responsible if this didn’t work for you :-).
Specialized knowledge is required.
Installation time is appox. 4-5 hours, though this may vary according to the condition of the vehicle and its fittings.
Information
All instructions and illustrations are given for left-hand drive models. Certain work steps must be carried out in mirror-image fashion for right-hand drive models.
The seat heating is ready for operation when the ignition key is turned to position 2 (terminal 15).
The seat cushion-heating conductors are marked R (right) and L (left).
The backrest-heating conductors can be installed on either side.
Tools and materials required
Regular screwdriver
Phillips screwdriver
Torx screwdriver T 20
1/2" Torque wrench
Ratchet with 1/2" drive
1/2" Extension
1/2" Drive socket, A/F 16mm
Ratchet with 1/4" drive
1/4" extension
1/4" drive socket, A/F 7mm, 10mm
Cable lamp
Universal pliers
Pointed pliers
Contents
1.Preliminary work
2.Overview of connectors at supplementary wiring harness
3.Installing supplementary wiring harness
4.Installing actuating switches
5.Installing heating conductors
1.Preliminary work
Print out fault memory (or memories)
Disconnect battery
Remove paneling at fool pedals
Remove paneling at bottom left-hand and right-hand speakers
Remove glove box
Remove center console
Remove driver and passenger seats
Remove right-hand and left-hand entrance strips
Remove right-hand and left-hand seat-belt fixtures
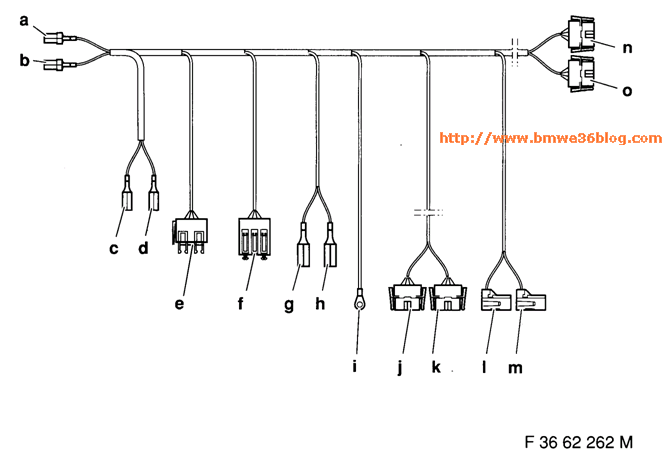
2. Overview of connections at supplementary wiring harness
F 36 62 262 M
3. Installing supplementary wiring harness
F 36 51 128 M
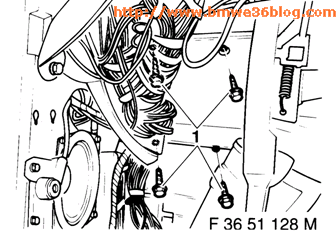
Remove metal hexagon screws (1) from distribution box fixture in left-hand footwell.

F 36 62 276 M
Remove cover of distribution box.
Remove Torx screws.
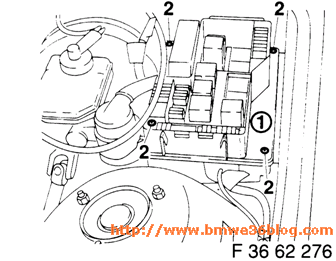
Pull upper section (1) of distribution box upwards as far as vehicle-wiring harness will allow.
F36 51 129 M
Remove guide element (1) of vehicle wiring harness in direction of arrow in illustration.
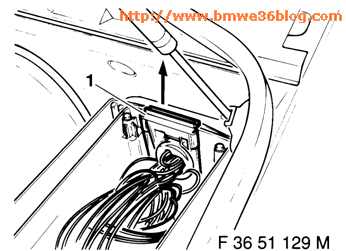
Installation information
In order to prevent moisture from penetrating distribution box, ensure that guide element (1) is installed correctly in distribution box.
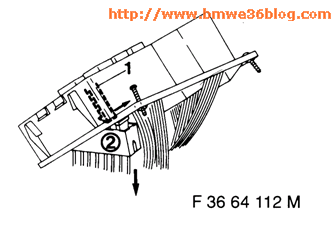
F 36 64 112 M
Release lock (1) of fuse carrier (fuse F1 � F10) X10015 (2) in direction of arrow in illustration.
Remove Fuse carrier X10015 (2) in direction of arrow in illustration.
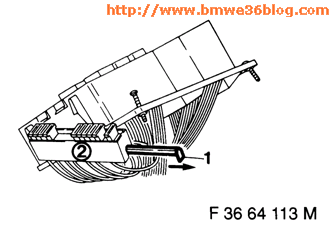
F 36 64 113 M
Remove lock (1) of fuse carrier X10015 (2) in direction of arrow in illustration.
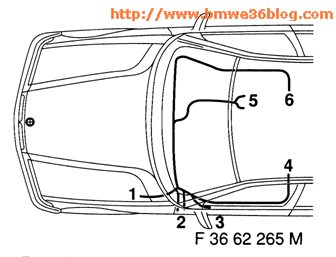
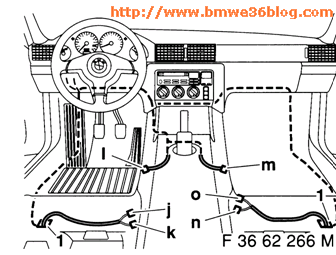
F 36 62 265 M
Lay supplementary wiring harness along vehicle wiring harness as shown in illustration:
Lay branches a � d into distribution box (1),
Branches e � h to left-hand fan-connector box (2),
branch i to earth support X173 (3),
branches j and k to front-left seat (4),
branches l and m to center console (5) and
branches n and o to front-right seat (6).
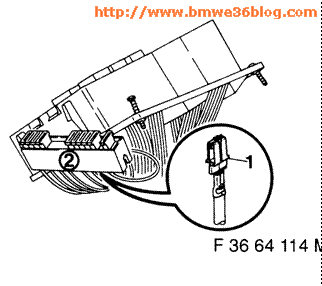
F 36 64 114 M
a. Plug branch for output terminal, fuse F4 (1), red/violet cable, into plug-in station No. 8 of fuse carrier X10015 (2) in distribution box.
b. Plug branch for input terminal, fuse F4 (1), red cable, into pug-in station No. 7 of fuse carrier X10015 (2) in distribution box.
Install lock of fuse carrier X10015 (2).
Install fuse carrier X10015 (2).
Plug 15 Amp safety fuse into plug-in station F4 of fuse carrier X10015 (2).
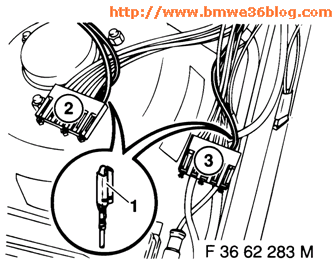
F 36 62 283 M
c. Plug branch for terminal 30 (1), red cable, into fan connector X1066 (2), red cable, in distribution box.
d. Plug branch for terminal 15 (1), green/blue cable, into fan connector X1076 (3), green/blue cable, in distribution box.
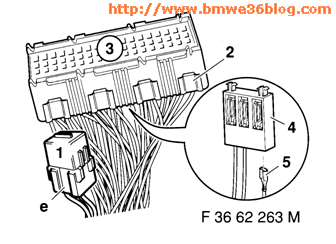
F 36 62 263 M
e. Connect branch for relief relay socket X63, relay K9 (1), to pin base X63 (e) and connect to plug-in station (2) of left-hand fan-connector box (3).
f. Plug branch for fan connector X13021, red/yellow cable, into left-hand fan-connector box (3).
g/h. Plug branches for instrument light (5), grey/red cable, into fan connector X1019 (4), grey/red cable, of fan-connector box (3).
F36 51 256 M
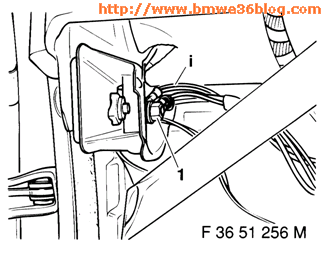
i. Connect branch for earth brown cable, to earth support X173 (1) under instrument panel on left.
F 36 62 266 M
j/k. Lay branches for front-left seat, black 4-pin connectors X732 and X733, along vehicle wiring harness (as shown in illustration) through opening (1) in carpet to illustration point of front-left seat.
l/m. Lay branches for actuating switches, yellow 6-pin connectors X651 and X658, along vehicle wiring harness (as shown in illustration) to installation point in center console.
n/o. Lay branches for front-right seat, black 4-pin connectors X740 and X741, along vehicle wiring harness (as shown in illustration) through opening (1) in carpet to installation point of front-right seat.
4. Installing actuating switches
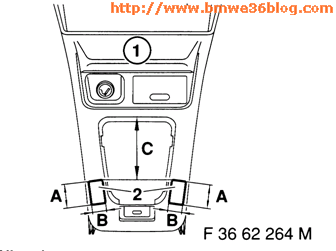
F 36 62 264 M
Note
In the case of vehicles with power windows, the openings have already been cut and it is only necessary to unclip the covers.
Cut out opening (2) of center console (1) as shown in illustration and press in cover frames.
Dimension A: 44mm
Dimension B: 24mm
Dimension C: 105mm
Install center console (1).
Lay branch l through left-hand opening and branch m through right-hand opening (2) and connect actuation switches S53 and S54.
Press actuating switches S53 and S54 into opening (2).
5.Installing heating conductors
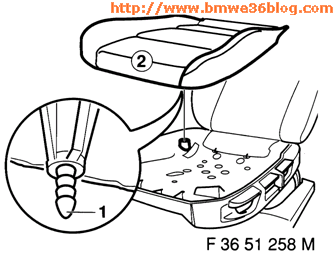
F 36 51 258 M
Cut off split pins (1) on underside of seat.
Lift out seat cushion (2).
Installation information
Replace split pins (1) of seat cushion.
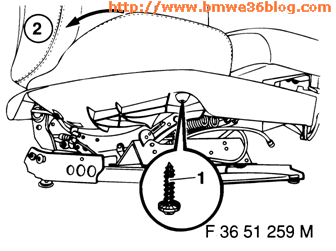
F 36 51 259 M
Sport seats only
Remove Torx screws (1).
Tilt backrest (2) in direction of arrow in illustration.
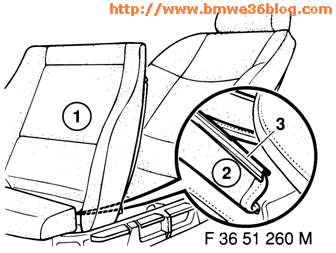
F 36 51 260 M
Lift out seat cushion (1).
Carefully lift out seat cover (2) from connecting strip (3).
Remove seat cushion (1).
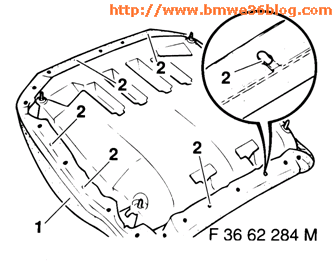
F 36 62 284 M
All models
Release seat cover 91) from tensioning tabs (2).
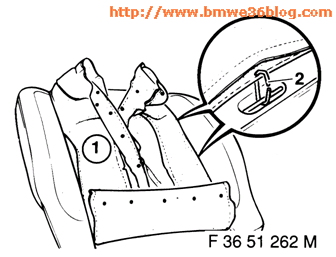
F 36 51 262 M
Fold up seat cover 91) and remove retaining clips (2) of seat cushion.
Remove seat cover (1).
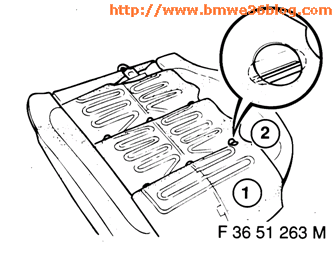
F 36 51 263 M
Note
Right-hand and left-hand heating conductors are marked accordingly.
Place corresponding heating conductor (1) on seat cushion (2) as shown in illustration.
Fit seat cover and secure with retaining clips.
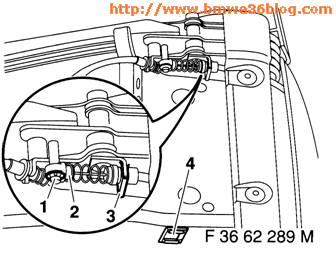
F 36 62 289 M
Remove securing ring (1) and retaining clip (3).
Detach Bowden cable (2).
Secure bracket (4) (from installation kit) as shown in illustration.
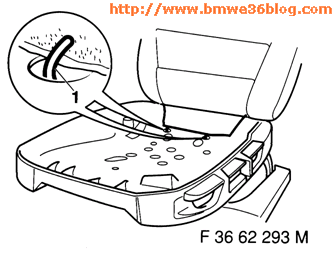
F 36 62 293 M
Lever out clips (1).
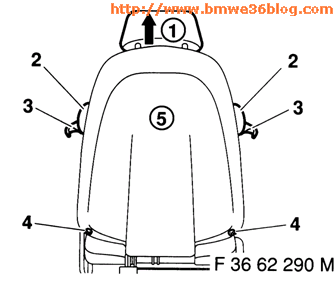
F36 62 290 M
Pull out head restraint (1) in direction of arrow in illustration.
Remove lever (3), unclip cover (2) and remove Torx screws (4).
Remove cover (5).
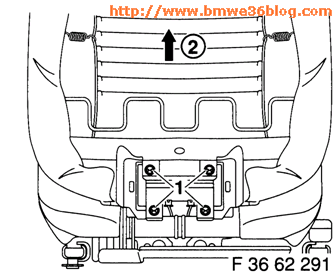
F 36 62 291 M
Remove Torx screws (1) and detach backrest (2) in direction of arrow in illustration.
F 36 62 292 M
Release seat cover (1) from tensioning tabs (2).

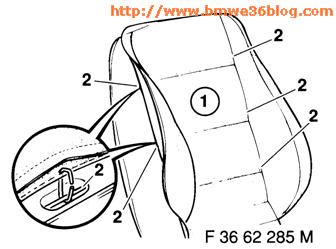
F 36 62 285 M
Fold up backrest cover (1) and remove fastening clips (2). Remove backrest cover (1).
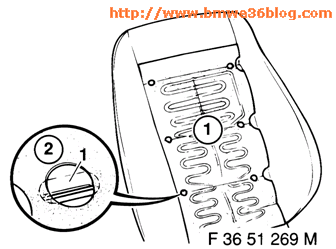
F 36 51 269 M
Place heating conductors (1) on backrest as shown in illustration.
Fit backrest cover (2) and secure with fastening clips.
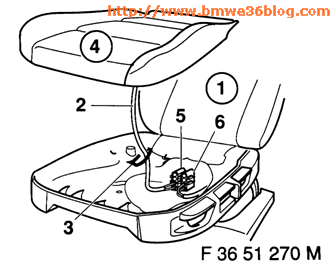
F 36 51 270 M
Reinstall backrest 91) in reverse sequence to installation.
Lay cable (2) of backrest (1) and seat cushion (4) through opening (3) of seat base.
Install seat cushion (4).
Secure connectors (5 and 6) to bracket of seat base.
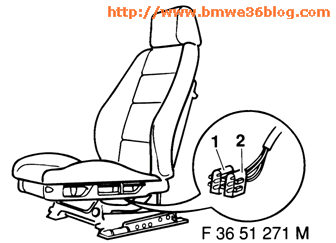
F 36 51 271 M
Plug branches j and k and n and o(1 and 2), black 4-pin connectors, into mating connectors of seat heating of left-hand/right-hand front seats.
Reinstall all removed parts in reverse sequence to removal.
Connect battery and test for correct operation.
Are you looking for more do it yourself procedures (DIY) ? I recommend the Bentley BMW 3 series service manual for you. I got it and I think it’s a gold mine for us -BMW E36 Owners-. If you didn’t grab your copy yet, get it right now! I’m sure you’ll find this book worth every penny you’ve paid for. Get the Bentley BMW 3 series service manual


 (4.86 out of 5)
 (4.07 out of 5)


