BMW E36 Fog lights removal . . . DIY!
First of all, let me welcome our new friend here Ricardo Mollinedo. Until now, we have received 8 responses from readers for the post Welcome BMW E36 blog readers!. Well, I still hope that I receive more response from the loyal readers of this blog. So, please if you are a reader of BMW E36 blog, please submit your information here (Welcome BMW E36 blog readers!). We will be glad to hear from you!.
Today’s post is about BMW E36 fog lights removal. I was thinking that this is a very hard task to do because I already tried it on my car and it was just hard. The problem is that the fog lights are in a very bad place that you can’t easily remove or change as my car is maybe 10cm above the ground. This means that every time I needed to change a burned bulb or something, I had to dig deep until I reach it.
It seems that this plan was not very good and that there’s a much easier way to do it. So, if you either looking for changing your burned light or want to change/clean your fog lights, this post is for you. I hope you find it useful.
For those of you who like to fix their BMW car(s) by themselves, I recommend you to get the Bentley BMW 3 series service manual which is one of the best books I’ve ever read. I got it and recommend you to get one for you as it will save you too much time and
money while fixing your car.
Disclaimer: Use this info at your own risk!! I’m not responsible if this didn’t work for you :-).
The fog lights on the E36 are prone to stone chips because they are so low on the ground and can also crack due to thermal stress if you go through a puddle of water when they are hot. Fortunately they are easy and not too expensive to replace. German & Swedish sell original quality replacements for 60$ or alternative ones for 40$.
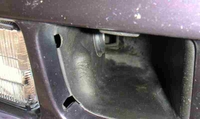
Pictured below is the drivers side brake duct and fog light. To release the fog light all you need to do is insert a screw driver in the hole at the top and push the releasing clip forwards. The fog light will then pivot on the opposite side and come out.
The picture below shows the release clip on the left and the pivot point on the right of the photo.
If this plastic clip has broken then it is more difficult to remove the fog light. You need to remove the 4 bolts and 2 plastic rivets holding the plastic panel underneath to the bumper. You will probably have to force the rivets out and buy a couple more. They are only about 12p each from a dealer.
Once the panel is off then raise the wheel up a little by for example driving onto a kerb and put your head underneath.The picture below is what you should be able to see. You will need to hook a flat bit of metal over the top of the bracket and down between the bracket and other side of the lever and then twist it.
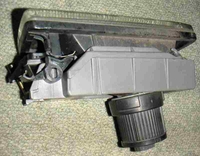
The finished result. You might wish to replace the fog light the opposite side as well as you can see from my photo the old fog light glass discolors after a while.

Are you looking for more do it yourself procedures (DIY) ? I recommend the Bentley BMW 3 series service manual for you. I got it and I think it’s a gold mine for us -BMW E36 Owners-. If you didn’t grab your copy yet, get it right now! I’m sure you’ll find this book worth every penny you’ve paid for. Get the Bentley BMW 3 series service manual
BMW E36 Blog: The ultimate BMW E36 information source.

Want to receive exciting tips & information about BMW E36 cars? Enter your Email:-
posted in Do It Yourself, Exterior, Technical Info, Tips & Tricks | 2 Comments

 (4.86 out of 5)
 (4.07 out of 5)


