BMW E36 Blog

Just upgraded the blog to WordPress 2.3.1

20th November 2007

Just upgraded the blog to WordPress 2.3.1

Hi Guys,

You may have noticed that this blog fails to load occasionally in the last couple days. When you try to load the website, you will be greeted with a problem like “Account Suspended, please contact the webmaster” and it talks about CPU usage being exceeded. I saw this yesterday and I contacted Host Monster to report this problem. They answered me that this problem has nothing to do with their servers and that I will need to fix the problem with my website. One of the suggestions that they offered was to upgrade the blog software to the latest (WordPress 2.3.1). I did that and now I’m hoping this will resolve the issue.

The problem is that I’m not sure if this will totally fix the problem, so I will need your help. Just post a comment in this post if you saw the Death Screen.

Important: Please notice that the BMW Blog account is not suspended. So, if you saw the death screen, simply wait for a minute and try again. It will work. I tried it myself.

Death Screen

Want to receive exciting tips & information about BMW E36 cars? Enter your Email:-


posted in Uncategorized | 4 Comments

19th November 2007

What problems does your BMW E36 have?


We all know that BMW E36 cars do have some (or many) problems that you will have to face sooner or later. I usually try to ignore them for a while, but find myself unable to keep ignoring them anymore, so I start a campaign to fix any problems that I see (or feel 🙂 ). Last time, my headlights were looking foggy and I thought of replacing them, but unfortunately, found a very good solution (kind of waxing) that restored them to their great shiny look. Although I successfully managed to fix this, I still have many issues to fix in the car. For instance, the paint needs some maintenance. My sunroof doesn’t open correctly, so I have to address this as well. I also need to do the Making your BMW Angel Eyes Fadeout . . . DIY! procedure which I talked about yesterday. That’s for my car, what about you guys? Anyone cares to share his/her car’s problems with us? Is it your headliner? Glove box? Windows? AC? Engine? . . . come on people, don’t be shy . . . Oh . . . one more thing, I forgot to mention my idle problem that’s driving me crazy.

BMW E36 Blog: The ultimate BMW BMW E36 information source.


Want to receive exciting tips & information about BMW E36 cars? Enter your Email:-


posted in Uncategorized | 107 Comments

18th November 2007

Making your BMW Angel Eyes Fadeout . . . DIY!


I’ve published A sweet idea for your BMW angel eyes! before in which there was a video for a BMW E36 which has a fading out angel eyes. The fading effect looked very nice on that car and I promised back then that I’m going to search for a DIY that will help you guys create this effect on your cars too. Guess what? I have found that DIY and luckily, it seems very simple and straight forward.This DIY procedure was created by clumpymold from BimmerForums. I hope you like it.

One last thing, this DIY (Do It Yourself) is assuming that you have done the Footwell light for your BMW E36 . . . DIY! procedure although it not necessary. Anyway, you can check it out if you like. You may find it useful.

Disclaimer: Use this info at your own risk!! I’m not responsible if this didn’t work for you :-).

The purpose of this modification is for the angel eye rings to fade on when the interior lights go on and for the angel eye rings to fade off when the interior lights go off. Since I have an aftermarket alarm, this is considered a “remote” feature.

You do NOT have to have an alarm nor angel eyes to utilize this write-up. You could have your city lights fade on/off whenever you unlock/lock your vehicle with your key as well. The possibilities are endless.

Anyway, without further ado, here is what you need:

– Wire stripper (I prefer using scissors)
– 4 male connectors (one pink, one blue, preferably)
– 1 female connector (pink, preferably)
– 3 wire taps
– 1 diode (I used a 2.5A 1000V one – 3pk @ Radio Shack $1.69)
– 3-4 feet of electrical tape (NOT PICTURED)
– electrical tape or heat shrink & lighter (NOT PICTURED)
– crimper
– screwdriver (Philips – standard size “+”)
– voltmeter (just in case)

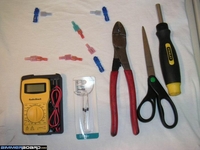
I realized, after completing this project, that you do NOT need the two pink pairs of male/female connectors (center left in picture). In case you do not know, pink colored connectors are for smaller gauge wires whereas blue are for larger gauge wires. I’d recommend pink throughout unless you’re combining two wires into one connector.

I arranged the connectors and wire taps in essentially the format you’re going to be replicating (minus the two PAIRS of pink connectors).

Since I had everything above, the only thing I had to purchase for this DIY was the diodes. Total cost ~$2.00.

Summary:
What you’re basically going to be doing is connecting the two wires going to each side of the parking lights (i.e., your angel eyes) with one wire and connecting that wire to the positive wire of your footwell light (or dome light for you older model BMWs). It’s pretty much as simple as that.

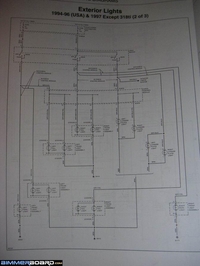
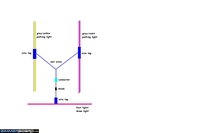
Here’s a picture of my Bentley Repair Manual electrical diagram in case anyone was curious as to what I’m doing:

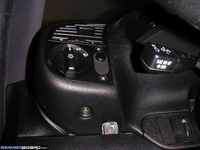
First off, remove the three screws holding the panel above the pedals. One is to the left of the steering wheel, another to the right, and the third is underneath on the left side (see pictures below). While doing that, remove that one screw holding the light switch in place (see first picture):

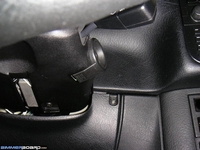
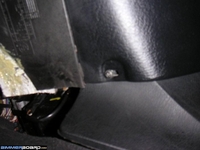
After you remove all the screws, grasp the left side of the panel and pull slightly outward away from the car. You’ll see this plastic tab which holds the panel in place:

You’ll then see this mess:

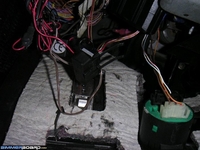
Now unplug (i.e., by squeezing) the black and white connectors plugged into whatever that funky circular thing is . Pull the plug connected to the footwell light (black plug) and disconnect your OBDII connector (if you have one). Pull panel towards the driver’s seat and set panel aside.

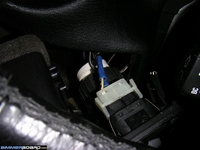
Now gently pull the headlight switch out. What you’ll see behind is one white plug for the fog lights and a round black plug for the main headlight switch (see picture below). Squeeze the white plug and disconnect. Remove the round plug by turning counter-clockwise (when facing the plug as if you were IN the dash). Set entire swith and vent aside.

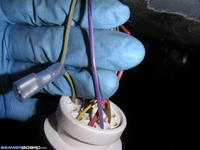
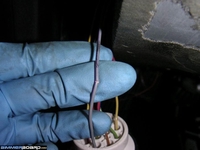
What you’re looking for are TWO wires. One is GRAY/VIOLET and the other is GRAY/YELLOW. I found it is MUCH easier to gain access to these wires by sliding the round plug down towards the footwell light and pulling it out from there. Now once you get those two wires out, use two wire taps, one on each wire and connect them using another wire and a MALE connector on each end of that wire (I used two separate wires instead combined into one blue male connector instead and my GRAY/YELLOW wire already happened to have a connector from a previous install so ignore that). Then add another wire tap at the center of that new wire.

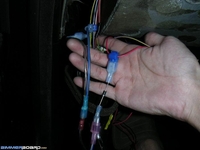
What I normally do when using wire taps is I make a tiny slit in the wire to increase the connection and then crimp the tap to that (see below).

Using a longer piece of wire (~2-3′), crimp a male connector on one side and a female connector on the other side. Plug the male side into the open/free wire tap above (at the center of the wire connecting the two wires). For the female side, you’re going to use a DIODE to prevent the interior lights from coming on when using your parking lights. I used a FEMALE connector on the CATHODE side (grey stripe) and a MALE connector on ANODE side. BEFORE crimping the connectors, slide a piece of heat shrink over it (these suckers get HOT!) or you can use electrical tape afterwards. Connect as follows (the diode in the picture below has blue connectors because I already heat shrunk the diode I was going to use – so use PINK connectors as the diode’s wires are pretty thin):

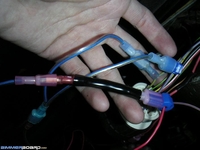
Finally, add another wire tap to your POSITIVE (i.e., RED) wire connected to your footwell light (I used the long one that is attached to my lighted door sills since they were easier to access). Connect your diode (male connector) to this wire tap. Now plug the headlight switch back in and close your door. Test and make sure this modification works. Turn on your parking lights and make sure your interior lights do NOT go on. Arm/lock and disarm/unlock. If all works well, tuck the wires away carefully and replace the panel. Install is reverse of removal.

Here is a wiring schematic for this procedure:

This is a video clip for the final result video


Are you looking for more do it yourself procedures (DIY) ? I recommend the Bentley BMW 3 series service manual for you. I got it and I think it’s a gold mine for us -BMW E36 Owners-. If you didn’t grab your copy yet, get it right now! I’m sure you’ll find this book worth every penny you’ve paid for. Get the Bentley BMW 3 series service manual

BMW E36 Blog: The ultimate BMW E36 information source.


Want to receive exciting tips & information about BMW E36 cars? Enter your Email:-


posted in Do It Yourself, Electrical, Technical Info, Tips & Tricks | Comments Off on Making your BMW Angel Eyes Fadeout . . . DIY!

13th November 2007

BMW E36 OBC (On Board Computer) Manual – Part 2


As I promised you in my previous post (BMW E36 OBC (On Board Computer) Manual – Part 1) which I published yesterday, here’s the second part of the BMW E36 OBC manual. It turned out that it’s a valuable source of information. I didn’t really expect the manual to be this precise, but you know what. It is precise. I really enjoyed the information it provided.

I hope you find this post useful. Now it’s time for you to try this information on your car, so hurry up. What are you waiting for? 🙂

On-Board Computer Manual
 

Speed Limit (LIMIT)
bmw e36 obc manual

If you exceed a speed limit which you have previously input (for instance in order not to infringe legal road speed limits), you will hear a warning gong. The corresponding LED flashes and the display shows the stored limit briefly.
The warning is repeated if the speed limit is again exceeded after the car’s speed has in the meantime dropped by at least 5 km/h.

Speed limit input:
Press the keys in the order illustrated above. The LED will come on.
Cancelling the speed limit input:
Press the LIMIT button again. The LED goes out, but the stored value is retained and can be re-activated with the LIMIT button.
Adopting the car’s actual speed as the limit value:
Press the LIMIT and SET/RES buttons.


Stopwatch
bmw e36 obc manual

The stopwatch function is only available on cars without independent ventilation control. It runs for 99 hours, 59 minutes. The time appears in the display: at first in seconds and tenth of a second, after one minute in minutes and seconds, and after one hour in hours and minutes.
Start
Press the keys as illustrated above. The LED comes on and the cumulative time is shown in the display.
Stop:
With the time displayed, press SET/RES.
If any other information is displayed, press keys in the order illustrated.
Obtaining intermediate time value:
Press TIMER, the LED flashes and the intermediate time is displayed. The stopwatch continues to run.
Obtaining main stopwatch time display again:
Press TIMER again.
Note:
The stopwatch ceases to run in ignition key position 0, but runs again in ignition key position 1.


Independent ventilation control
bmw e36 obc manual

Input of switching times.
You can preselect two switch-on times for the independent ventilation control. The ventilation is switched off automatically after 30 minutes. When the TIMER button is pressed, the display shows the current operating condition of the independent ventilation control.
Input of first switch-on time:
Input is possible only if the digital clock is running and the ignition key is in position 1.
Press the keys in the order illustrated above (press TIMER twice).
Input of second switch-on time:
Press  the keys again as illustrated
Correcting the time input:
Press the keys in the order illustrated including the different input. After the input, the display shows * and the LED comes on as a sign that a switch on time has been preselected. The LED flashes while the heating or ventilation is actually in operation, and goes out when they are switched off.
To Check a previous switch-on time input (LED is on):
– Press TIMER twice for the first time input.
– Press TIMER three times for the second time input.

bmw e36 obc manual

Direct switch-on
This is only possible in ignition key position 1. Press the keys in the order illustrated above.
Direct switch-off
In ignition key position 1, press the keys in the order illustrated. In ignition key position 0, press SET/RES only.


Immobilizing device
bmw e36 obc manual

The engine compartment lid, radio and any attempts to start the engine are monitored. The device is activated with a code number. Starting the engine, removing the radio or opening the engine compartment are then impossible unless the code number is input correctly. For this reason, always remember the code number!
Activating in ignition key position 1:
Press keys in the order illustrated above. then turn ignition key to position 0 and remove. Any code number from 0000 to 9999 can be input. (The same or a different code number must be input each time the device is activated.)
In ignition key position 0 or with the key removed, the LED will remain on for up to 36 hours. If the LED flashes for about 10 seconds, the engine compartment is not properly closed (or the radio has be removed).
De-activating in ignition key position 1 or 2:
The gong signal and the "____ CODE" display call for the driver to input the code number he has chosen.
– Input the code number at the numerical input keys.
– Start the engine or press the SET/RES key.
If attempts are made to start the engine without a code input, the gong will sound and the engine will not start.
The alarm will sound for 30 seconds after three incorrect code inputs or three attempts to start the engine without a code input.
If the code number has been forgotten, proceed as follows:
– Disconnect the battery, then reconnect it after app. 2 minutes.
– Turn the ignition key to position 1.
– The alarm will sound and a time display will appear and run down for 15 minutes.
– After 15 minutes, the engine can be started.
If the code number is remembered during this 15-minute period, it can be input at the keys in the order illustrated.


Remote control
bmw e36 obc manual

The flashing turn indicator lever can also be used to call up a selection of pre-programmed information via the on-board computer on the display.
Input:
– Press the turn indicator lever in until the display shows "PROG 1"
– Press the computer information buttons in the desired order. The number of functions programmed is displayed after each input.
– Press the SET/RES button.
If you wish all the information to be accessible:
– Press the turn indicator lever until "PROG 1" appears in the display.
– Press SET/RES.
Note the following in connection with average fuel consumptions 1 and 2 and switch-on times 1 and 2 for the independent ventilation control: to obtain only CONSUM 2 for example, but not CONSUM 1, press the CONSUM button and then the km/mls changeover button.
(Each time the changeover button is pressed, the display will alternate between average fuel consumptions 1 and 2). Adopt the same procedure for independent heater/ventilation control switch on time 1 and 2 if required.
To display:
Press  the turn indicator lever in briefly
The engine compartment lid, radio and any attempts to start the engine are monitored. The device is activated with a code number. Starting the engine, removing the radio or opening the engine compartment are then impossible unless the code number is input correctly. For this reason, always remember


BMW E36 Blog: The ultimate BMW BMW E36 information source.


Want to receive exciting tips & information about BMW E36 cars? Enter your Email:-


posted in Technical Info, Tips & Tricks, Uncategorized | 1 Comment

12th November 2007

BMW E36 OBC (On Board Computer) Manual – Part 1


It has been a while since I purchase my BMW E36 and since that time, I have been looking for the English manual for the car as it came with the German one. Unfortunately, I was unable to find the English version anywhere on the web. This pushed me to use Google translation tools which do not perform a good job in translating the German text into understandable English.

Today, while I’m searching the web, I have found an unclear version of the English manual which talks only about the on board computer (OBC). Only 7 pages manual. So, I took it and decided to publish its content on the blog hoping the you will find the information provided useful. Today, I’m posting part #1 of the manual and I will be posting the rest of it in the next few days. So, please stay tuned.

On-Board Computer Manual
The on-board computer can be used to call-up and display information which contributes towards safe, economical driving. System malfunctions are shown in clear text via the Check control. There is also a general warning light on the instrument panel.

The digital clock can be used to
– Display time and date.
– Program a reminder signal (Memo) every hour, for instance so that radio news bulletins are not missed.

Take a look at the image below:

bmw e36 obc manual

  1. Display
  2. Time of arrival
  3. Numerical input keys
  4. Information keys
  5. Light emitting diodes (LED)
  6. Display unit changeover key: The display unit changeover key enables information to be displayed either in metric or imperial units of measurement.
  7. SET/RES key (start/stop)

Available without previous input:

TEMP Outside temperature
RANGE Probable range
SPEED Average speed
CONSUM 2 average fuel consumptions

After manual input:

DIST Distance before destination is reached, with time of arrival
LIMIT Speed limit

The following systems are controlled by the on-board computer

TIMER -2 switch-on times for independent ventilation control.
-Direct operation of independent ventilation control
-Stopwatch
CODE Immobilizing device

The on-board computer can be operated from ignition key position 1 onwards. For reasons of driving safety, always input data to the computer before starting your journey or when the ca is at a standstill. The computer calculates and memorizes data from the start of the journey onwards.

Note:
Check Control warnings displace the computer displays.
Apart from priority 1 messages, you can clear displays by pressing the CHECK button. If the “PPPP” fault display appears, consult a BMW service station.

Outside temperature

bmw e36 obc manual

To display: Press the TEMP button.
If the outside temperature falls below +3 C, a gong signal is heard as a warning; the temperature is displayed automatically and flashes for 8 seconds.
The warning is repeated if the temperature rises to at least +6 C and then drops again to +3 C.

Important:
Whether or not a temperature warning is given, remember that ice can still form on the road at above +3 C in certain circumstances, for instance on bridges and in shadow.

Average speed

bmw e36 obc manual

To start computing, press the buttons in the order illustrated above. To call up, press the SPEED key.

Probable range

bmw e36 obc manual

This display indicates how far the car can probably be driven on the fuel remaining in the tank.
The value takes into account the way in which the car has so far been driven.

To display, press the RANGE button.

A plus sign (+) in front of the displayed value means that it is still undergoing a correction process (measuring tolerance).

If the three display segments flash, the range is below 15 km and the car should be refueled as soon as possible.
The on-board computer registers fuel added to the tank only.
– If the quantity of fuel exceeds 4 liters and
– When the engine has been stopped.

Average fuel consumption

bmw e36 obc manual

Average fuel consumption can be computer for two distances in parallel, for instance a complete journey and one section of the journey.
To start computing for distance 1, press the buttons in the order illustrated above.
To start computer for distance 2, press the buttons again in the order illustrated above.
To display, press the CONSUM button. Each time this button is pressed, the display alternates between the average consumptions for distances 1 and 2. There is also an indication of whether distance 1 or 2 is being displayed.

Distance from destination

bmw e36 obc manual

Shows how far the car is from the destination, provided the total distance was input before the journey started.
To input distance, press the keys in the order illustrated above.
To display, press the DIST button. The probable time of arrival, which is recomputed continually as driving conditions change, is also displayed.
If the car has completed the full distance input at the start of the journey, the distance value is preceded by a minus sign.

Display units changeover

Press km/mls changeover key.
– Once, To alter the distance display or twice
– Or twice to alter the arrival time display also.

BMW E36 Blog: The ultimate BMW BMW E36 information source.


Want to receive exciting tips & information about BMW E36 cars? Enter your Email:-


posted in Driving Tips, Technical Info, Uncategorized | 4 Comments