BMW E36 Blog

BMW Options List

17th December 2007

BMW Options List


If you’re reading my blog frequently, you may know that I have discovered recently that my car has heated mirrors LOOOL! 😆 . I’m sure that some of the readers here knew that a car with heated seats should have heated mirrors as well, but still, I think many of you didn’t. The problem is that there are some options that you may not see or even know by just looking at the car’s interior or exterior. This made me think about a better way to determine what are the options installed in my car. To be honest, this information is really hard to get and I spent some time looking until I found the list of BMW options. This list has the options codes and their names. Still, you will need one more thing to determine what the options are for your car. Well, this is no brainer, you should find the list of options codes for your car. I heared from some guys that you should find the list of options codes on the back seat of your car, but I didn’t verify this information yet. I will look at it while I’m going home today and see if I can get the list of options for my car.

This is the complete list of BMW options with codes. Please feel free to download it and keep it for your reference.

BMW Options List


BMW E36 Blog: The ultimate BMW E36 information source.

Want to receive exciting tips & information about BMW E36 cars? Enter your Email:-


posted in Technical Info, Tips & Tricks | 2 Comments

12th December 2007

Fixing E36 Heated Mirrors . . . DIY!


If you read my previous post about BMW E36 Heated Mirrors, you should know that one of my heated mirrors is not working. Today, I’ve decided to look for a procedure on how to fix heated mirrors in BMW E36 cars. It seems the procedure is easy, but needs some attention to make sure that you will not end with a broken mirror instead of a working one. Anyway, I’m sure that many of you will find this post useful as it will save you around 300$ for replacing the mirrors. Finally, I just wanted to thank Kam for writing this priceless procedure.

Disclaimer: Use this info at your own risk!! I’m not responsible if this didn’t work for you :-).

I live in Ottawa Canada and here we have very cold winter with lots of freezing rain and snow. For a while I was under the impression that I don’t have heated mirrors because they were colder than ice. I called couple of BMW dealers in the city and they told me the same: “$300+ for both and they often burn out in couple of months any way!” I decided to keep the $300 and clean the mirrors manually . Everything was fine until last week which we got hit by heavy freezing rain and lots of snow. My car (parked outside) was turned into an ice cube! I had to use hair dryer to defrost the mirrors for 20 Min. Still I wasn’t pissed until my neighbor with his neon told me his car has heated mirrors and it’s awesome! That was it, I needed the heated mirrors…
Here are the steps…

1-Removing the mirror lens. (refer to Bentley manual and make sure car is in room temperature or above otherwise you are going to break some plastic parts)

2-Tools: These are the tools I used and you may not need all of them:
– 25 Watt Solder gun (Must)
– Rosin Core Solder wire (Must)
– Tweezers (Optional)
– Small flat head screwdriver (Must)
– Multi-meter (Must)
– 9 or 12V, 15W or higher DC power supply (Optional)
-Alligator clips (Optional)

3- Use the Alligator clips and connect the multi-meter to the lens power plugs. I found out the readings are very high (3.37 KOhms) which should be something close to 10-20 Ohms.

4- In order to access to the heating elements (similar to rear window defroster) I used the gaps under the housing clips.

5- Use the flat screw driver and shave off the resin very carefully (I did all 4 of them) you should be able to see the copper lines.

6- Use tweezers or flat screwdriver to short the copper lines. The multi-meter should read 10-20 Ohms if so (Bingo) go to the next step otherwise (F***) move to the next spot.

7- Make sure your Solder gun is very hot and keep it over the clips above the copper contacts. Be careful don’t melt anything. Attach the rosin core solder wire to the tip of the solder gun. The rosin solder wire instantly melts. Continue feeding the solder gun tip with rosin core solder wire. After a few seconds the melted solder will drop exactly over the copper contacts with out melting or damaging any thing. Thanks to gravity

8- Now readings on the multi-meter should be much lower like 11.5 Ohms in my case. Done, enjoy your heated mirror…

Before installing the mirror lens use the screwdriver and shake the solder and make sure it is secured completely. I used the DC power supply and tested the mirror lens and it instantly warmed up. Don’t keep it too long because it may burn your DC adaptor. I didn’t bother to cover the shaved spots with anything yet but you can find a heat resistance glue and cover the shaved spots.


Are you looking for more do it yourself procedures (DIY) ? I recommend the Bentley BMW 3 series service manual for you. I got it and I think it’s a gold mine for us -BMW E36 Owners-. If you didn’t grab your copy yet, get it right now! I’m sure you’ll find this book worth every penny you’ve paid for. Get the Bentley BMW 3 series service manual

BMW E36 Blog: The ultimate BMW E36 information source.


Want to receive exciting tips & information about BMW E36 cars? Enter your Email:-


posted in Do It Yourself, Electrical, Technical Info | 11 Comments

11th December 2007

BMW E36 Heated Mirrors


Hi, I’ve been reading about the heated mirrors in BMW E36 cars recently. It seems that heated mirrors come with the winter package, which means that if you have heated seats (like me :-p), it means that you should have heated mirrors as well. The only weird thing that I found out is that almost all the BMW E36 car owners with heated mirrors say that these mirrors stay hot all the time while the car is turned on. I heard one of them saying that it’s connected with the OBC, but I believe this is wishful thinking and that’s far from the truth, because the rest are saying that heated mirrors will feel hot all the time regardless of the exterior temperature. This behavior is really weird, because it means that if the heated mirrors are on all the time, then what is the possible use of that in summer? Also, why I can’t control them? I believe the best setup is to control them with the defrost button, but that’s my humble opinion, not the engineers of BMW. Now, the bad news for me is that I have heated mirrors in my car, but I’ve never seen them in action, so this must mean that I either have a fuse or 2 mirrors to be replaced. I hope that finding heated mirrors for my babe is going to be an easy task.

I suggest you go and check your mirrors to see if you have the heated version or not. If someone else can check this, please try to find out if the mirrors will be heating all the time regardless of the exterior temperature or not.


BMW E36 Blog: The ultimate BMW E36 information source.


Want to receive exciting tips & information about BMW E36 cars? Enter your Email:-


posted in Exterior, Technical Info, Tips & Tricks | 10 Comments

9th December 2007

BMW E36 LED Tail Lights


If you think your tail lights are so cool and you usually like to check them out every morning just to admire them once more before going to work, I’m sure that you’re going to change your opinion today. I’ve seen these tail lights for BMW E36 with LEDs and they’re awesome. I felt in love with them from the first sight. Take a look, I’m sure you will like them too.

Umnitza Crystal LED Tail Lights


Umnitza Crystal LED Tail Lights

BMW E36 Blog: The ultimate BMW BMW E36 information source.


Want to receive exciting tips & information about BMW E36 cars? Enter your Email:-


posted in Exterior, Tips & Tricks | 13 Comments

3rd December 2007

Changing BMW E36 Microfilter . . . DIY!


Hi, I’ve found this DIY (Do It Yourself) about how to replace your BMW E36 Microfilter and I thought I should share it with you guys. For those of you who may be unfamiliar with the microfilter. It’s the part which is responsible for cleaning (filtering) the air which is going inside the car from outside while your fan (or condition A/C) is running. I hope you find it useful. Finally, I just want to thank old skool the original author of this DIY.


Disclaimer: Use this info at your own risk!! I’m not responsible if this didn’t work for you :-).

IMPORTANT: This DIY is based on left hand drive cars. If you have a right hand drive E36, you’re supposed to access the filter from the right, not from the left

The first step is to remove the glovebox. Read here about Removing BMW E36 Glove box

After the glovebox is removed, you will want to remove the plastic air vents that feed the footwell in order to gain better access to the microfilter compartment.

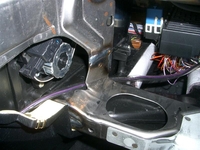
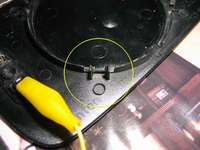
To do this you need to push down on the back of the plastic vents to release a vertical clip holding it up. You can see it in this picture:

Just forward of the purple wire in the clear plastic covering you see a vertical post near where the plastic is coated with insulation.

The second clip can’t be seen as it is on the underside of the vents inside the vent right at the center of the car. To remove this press up from the bottom until it pops out and then pull away from the center of the car to release the snap fitting of the vent and then wiggle it out and towards the front of the car to clear the metal frame that it is tightly fitted into.

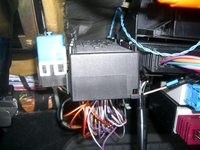
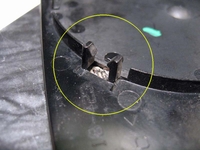
Now you have to remove this. There is a release clip at the top center. Pull left in the picture and then push up on the unit to remove it.

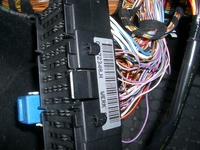
Here it is removed and you can see the release clip in the middle and the other two slide clips on either side.

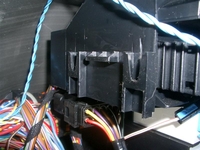
(Some people have another black tray attached to the top of this clip. You will have to remove the top tray first. In order to do this, you slide the top tray back as far as it will go and then lift up. You can see the 3-4 sets of grooves in this picture. Installation is the opposite of removal.)

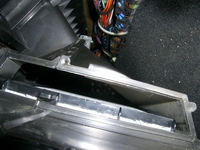
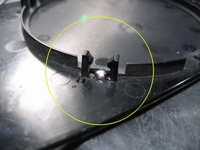
Here is the console it fits into. You can see how it attaches.

Now this is the access to the microfilter. Up is the front of the car, right is the floor, left is the hvac core.

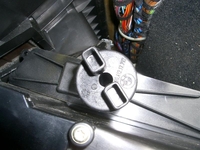
Twist this and pull it out to expose the microfilter.
Push the black tab shown on the filter towards the front of the car to release the foam seal. Then pull away from the center of the car to remove it. The frame is broken in three places and will make a bit of a mess…just keep pulling and working at it until it is removed.
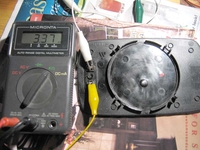
here it is. Yuck!

To insert the new one, simply break it in the three obvious place on the plastic frame so that you can carefully feed it in the opening and clear all the components under the dash. When it is in, just press it towards the front of the car to fit the foam seal. Reinstall the cover and twist in the opposite direction to secure it. Then simply reinstall all the pieces of the dash.


Are you looking for more do it yourself procedures (DIY) ? I recommend the Bentley BMW 3 series service manual for you. I got it and I think it’s a gold mine for us -BMW E36 Owners-. If you didn’t grab your copy yet, get it right now! I’m sure you’ll find this book worth every penny you’ve paid for. Get the Bentley BMW 3 series service manual

BMW E36 Blog: The ultimate BMW E36 information source.

Want to receive exciting tips & information about BMW E36 cars? Enter your Email:-


posted in Do It Yourself, Interior, Technical Info, Tips & Tricks | 8 Comments