Fixing E36 Heated Mirrors . . . DIY!
posted in Do It Yourself, Electrical, Technical Info |  (1 votes, average: 4.00 out of 5) (1 votes, average: 4.00 out of 5) |
|
If you read my previous post about BMW E36 Heated Mirrors, you should know that one of my heated mirrors is not working. Today, I’ve decided to look for a procedure on how to fix heated mirrors in BMW E36 cars. It seems the procedure is easy, but needs some attention to make sure that you will not end with a broken mirror instead of a working one. Anyway, I’m sure that many of you will find this post useful as it will save you around 300$ for replacing the mirrors. Finally, I just wanted to thank Kam for writing this priceless procedure.
Disclaimer: Use this info at your own risk!! I’m not responsible if this didn’t work for you :-).
I live in Ottawa Canada and here we have very cold winter with lots of freezing rain and snow. For a while I was under the impression that I don’t have heated mirrors because they were colder than ice. I called couple of BMW dealers in the city and they told me the same: “$300+ for both and they often burn out in couple of months any way!” I decided to keep the $300 and clean the mirrors manually . Everything was fine until last week which we got hit by heavy freezing rain and lots of snow. My car (parked outside) was turned into an ice cube! I had to use hair dryer to defrost the mirrors for 20 Min. Still I wasn’t pissed until my neighbor with his neon told me his car has heated mirrors and it’s awesome! That was it, I needed the heated mirrors…
Here are the steps…1-Removing the mirror lens. (refer to Bentley manual and make sure car is in room temperature or above otherwise you are going to break some plastic parts)
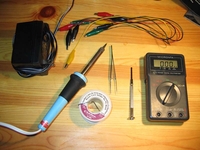
2-Tools: These are the tools I used and you may not need all of them:
– 25 Watt Solder gun (Must)
– Rosin Core Solder wire (Must)
– Tweezers (Optional)
– Small flat head screwdriver (Must)
– Multi-meter (Must)
– 9 or 12V, 15W or higher DC power supply (Optional)
-Alligator clips (Optional)
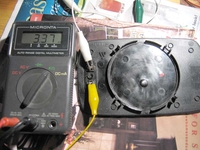
3- Use the Alligator clips and connect the multi-meter to the lens power plugs. I found out the readings are very high (3.37 KOhms) which should be something close to 10-20 Ohms.
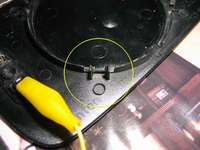
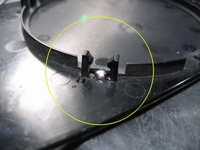
4- In order to access to the heating elements (similar to rear window defroster) I used the gaps under the housing clips.
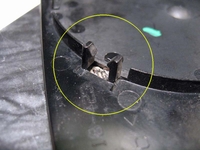
5- Use the flat screw driver and shave off the resin very carefully (I did all 4 of them) you should be able to see the copper lines.
6- Use tweezers or flat screwdriver to short the copper lines. The multi-meter should read 10-20 Ohms if so (Bingo) go to the next step otherwise (F***) move to the next spot.
7- Make sure your Solder gun is very hot and keep it over the clips above the copper contacts. Be careful don’t melt anything. Attach the rosin core solder wire to the tip of the solder gun. The rosin solder wire instantly melts. Continue feeding the solder gun tip with rosin core solder wire. After a few seconds the melted solder will drop exactly over the copper contacts with out melting or damaging any thing. Thanks to gravity
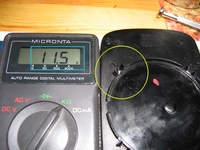
8- Now readings on the multi-meter should be much lower like 11.5 Ohms in my case. Done, enjoy your heated mirror…
Before installing the mirror lens use the screwdriver and shake the solder and make sure it is secured completely. I used the DC power supply and tested the mirror lens and it instantly warmed up. Don’t keep it too long because it may burn your DC adaptor. I didn’t bother to cover the shaved spots with anything yet but you can find a heat resistance glue and cover the shaved spots.
Are you looking for more do it yourself procedures (DIY) ? I recommend the Bentley BMW 3 series service manual for you. I got it and I think it’s a gold mine for us -BMW E36 Owners-. If you didn’t grab your copy yet, get it right now! I’m sure you’ll find this book worth every penny you’ve paid for. Get the Bentley BMW 3 series service manual
BMW E36 Blog: The ultimate BMW E36 information source.

Related Posts:-

Want to receive exciting tips & information about BMW E36 cars? Enter your Email:-

 (4.86 out of 5)


posted on December 18th, 2007 at 12:43 am
posted on December 18th, 2007 at 8:22 am
posted on December 18th, 2007 at 12:58 pm
posted on December 19th, 2007 at 10:51 pm
posted on December 20th, 2007 at 11:32 am
posted on January 2nd, 2008 at 9:17 am
posted on January 4th, 2008 at 3:31 am
posted on January 4th, 2008 at 9:36 am
posted on January 4th, 2008 at 7:29 pm
posted on January 18th, 2008 at 5:03 pm
posted on September 25th, 2011 at 4:04 pm