BMW E36 Blog

BMW M3 vs Chevrolet Corvette . . . Amazing!

29th April 2007

BMW M3 vs Chevrolet Corvette . . . Amazing!

Hi Friends,


   Last time, I posted a video of BMW M3 racing a Lamborghini Diablo and it was awesome. Today, I brought another video in which a BMW M3 is racing a Corvette !! Can you believe it guys? The video is great. In the first part, you notice that both cars are deadly even because they’re unable to change the distance between them. but in the second part, the lovely BMW M3 passes the Corvette. This is a really nice video which changes the way I looked to the M3’s. I mean, I always knew that they’re great cars, but I didn’t think they are that good. Man!!


Take a look . . . it’s really nice.


I hope you liked the video . . . if not, come on let’s see your videos 😉


Wait for more from … BMW E36 Blog.


Best regards,

Tony Sticks.

Want to receive exciting tips & information about BMW E36 cars? Enter your Email:-


posted in Performance, Videos | 4 Comments

22nd April 2007

What type of oil should I use for my BMW E36?

Hi Guys,


Oil types make me feel sick because I usually don’t understand them. What weight is better?! operating temperature! thick oils and how this will affect the performance and the age of my engine. Anyway, today I felt like reading about these stuff to make sure I won’t feel sick next time I hear someone talking about this. I think you should read this article because it will definitely add something to your knowledge that you just didn’t learn (well, or hear about before). The article was found here. Thanks Cary for the article (the author).


Disclaimer: Use this info at your own risk!! I’m not responsible for your mistakes man! 😀

1) New BMW’s require synthetic oil. As far as weight, only certain production dates of M3’s and M5’s require the use of Castrol TWS 10w-60.


2) The Factory BMW Synth 5w-30 is a version of Castrol TXT Softect sold overseas. A few important things about the BMW oil:

  1. It is a Group III hydrocracked oil which cannot be called synthetic in Europe.

  2. It is a heavy 30 weight (30 weight can run from 9.3-12.5cst@100c, the BMW oil is about 12.2cst).

  3. It is a ACEA A3 oil which means that it is approved for longer change intervals and has a HTHS (High Temperature High Shear) measured at 150c of greater than 3.5.

3) In the US, the only Group IV PAO Synthetics that are available are

  1. Mobil 1.

  2. Amsoil (but not the Xl-7500).

  3. Royal Purple.

  4. German Castrol 0w-30 (it has the red label and says on the back, “Made in Germany). Redline is a Group V PolyEster based oil. All other Castrol, Quaker State, Pennzoil, Valvoline “synthetics” are a Group III hydrocracked oil. It is debated how much better Group IV base oils are than group III, but generally they are considered better.

4) When looking for oil for any BMW that does not require Castrol TWS 10w-60, you want to purchase an oil that has either/both of the following ratings:

  1. ACEA A3.

  2. BMW LL-98 or LL-01.

5) Note that Mobil 1 0w-30, 5w-30, and 10w-30 are NOT ACEA A3 or BMW LL approved oils. This is because they all are thin 30 weight oils (approximately 9.8-10 CST@ 100c) and have HTHS of approximately 3.1. Mobil 1 0w-40 and 15w-50 are A3 rated and the Ow-40 is BMW LL-01 approved. For 99% of climates and users 0w-40 or 5w-40 is the appropriate grade. There are some 0w-30 and 5w-30 oils (like the BMW 5w-30) that are formulated on the heavier end of the 30 weight scale and are accordingly rated A3. These oils will work well also. LOOK FOR THAT ACEA A3 rating. If the oil doesn’t have it, pass on it.


6) Some people seem confused about how oil thickness is measured. The first number (0W, 5w, 10w, 15w, etc) is a measurement of how thick the oil is at temperatures of -35c- -20c (depends on the grade). The lower this first number the thinner the oil is at LOW temperatures. The second number (30, 40, 50) refers to oil thickness at 100c (operating temperature). 30 weight can be from 9.3-12.5 cst, 40 weight from 12.6-16.2 cst, 50 weight from 16.3-22cst (approximate). So you can have two oils, one called a 5w-30 (i.e. bmw oil) another 0w-40 (Mobil 1) that are very similar thicknesses at operating temperature. Compare this to Mobil 1 Xw-30 which is close to a 20 weight oil at 100c.


7) BMW’s recommended interval of 12,000-15,000 miles is too long. Used oil analysis has shown the BMW oil is generally depleted at 10,000 miles. Running it longer results in excess wear. It is highly recommended that you change your oil once between each BMW recommended interval (approx 7000-7500 miles). If you want to run your oil the BMW recommended interval, I would suggest that you use Mobil 1 0w-40 or Amsoil 5w-40 and change the oil filter at 7500 miles. I would encourage a full oil change at 7500 if you want your engine to last.


8) If you want to spend a few hours learning about oil, go to www.bobistheoilguy.com! But it’s like a different language…. so which one do you suggest if you were going to change your oil?


Unless you have an M3, in the following order:


  1. Mobil 1 0w-40.

  2. Mobil 1 0w-40, and

  3. Mobil 1 0w-40.


If you can’t find the 0w-40, the Mobil 1 SUV 5w-40 is a great oil. Can’t find either of these, then go to your dealer and get the BMW 5w-30.


The Mobil 1 0w-40 is a great oil, widely available (Walmart, Checker, Kragen, Autozone), and moderately priced. It is factory fill in Mercedes AMG, Porsche, and Austin Martin.

Wait for more from . . . BMW E36 Blog


Best regards,

Tony Sticks.

Want to receive exciting tips & information about BMW E36 cars? Enter your Email:-


posted in Engine, Performance, Technical Info | 56 Comments

10th April 2007

How to Install HID inside your BMW E36 – DIY

Hi Friends,


I started to think recently about upgrading my car’s lights. So the obvious choice that came right to my mind is the HID lights installation. As usual, I started by looking at the articles which explain the process and how much it will cost (money $$$ and effort). I found a very good article which explains the process in too much details and it really made me feel like I will start on the project right away. It turned out to be very easy compared to what I had in mind. If you’re looking for a good HID kit, don’t go with the XenTec HID conversion kit H1 10000K Single Beam Xenon (sky blue). You can read all about it in my Xentec HID Review. Anyway, the article is below and I think it’s really great if you’re interested in doing the upgrade or at least to understand the process.


Disclaimer: Use this info at your own risk!! I’m not responsible for your mistakes man! 😀


The next logical step after installing European Ellipsoids is to add the latest in HID Xenon technology. Follow along as we install those Oh-so-blue eyes on BMW E36 .If you are buying Euros and HIDs together, you will want to study both articles to see where you can save some steps. Basically, if you are adding HIDs, do NOT cut off the low beam connector for your US lights. Go ahead and cut off the high beam, etc. But the low beam connector will plug into the ballast for the new HIDs installed in the low beam projector housing. If you have previously installed Euro’s and did cut off the connector for the low beams, go find it. You’ll need it again. Alternately, I suppose you could cut off the connector on the ballast and splice it in. But this way is cleaner. So now, sit back, relax, make some popcorn and enjoy the show.


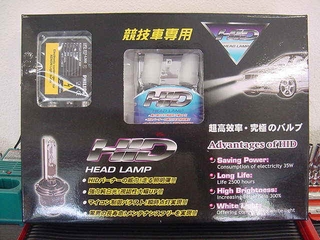
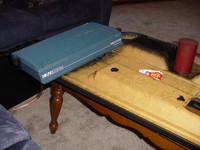
Here is the kit I used. It has Philips ballasts, made in Germany. Everything else is unrecognizable. There is no country of origin marked :D. Not in English, anyway. But the construction quality and materials seem very good. Maybe some of our Chinese/Japanese (???) speaking readers can tell us what the box says?


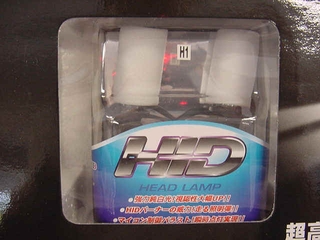
Euro Ellipsoids use an H1 bulb. Therefore, I bought an H1 kit.


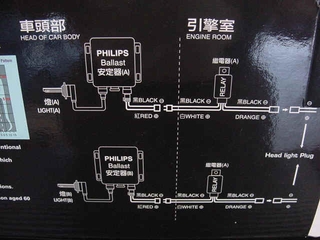
Study this schematic carefully. There isn’t another one. Then again, there isn’t more than one way to put the whole thing together……


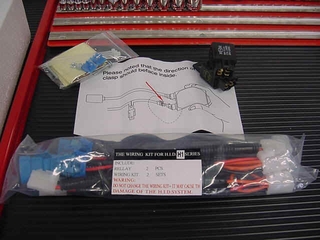
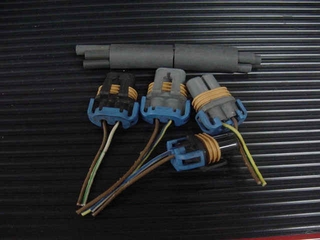
The installation kit consists of a wire splice which, I never found a use for, the cable harnesses, two relays, some tie wraps (useful) and some lame bolts to hold the relays. Pitch the bolts. There is also some double sided tape (Good stuff, too!) to hold the ballasts wherever you place them.


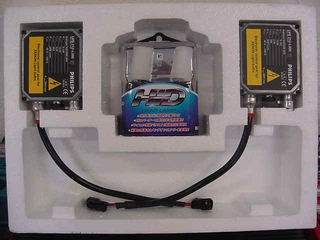
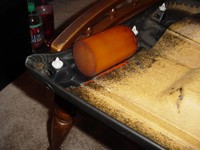
Here are the ballasts and the bulbs. Don’t touch the bulbs with your fingers. Damn it, I told you not to do that! Now you’ll have to clean them real well with alcohol or they’ll burn right up. And they AREN’T cheap, bucko.


Here’s that schematic again. Uhhh, yeah.


Okey, dokey. Get the Euro’s out of the car. You stuck ’em in there, you know how to get them out.


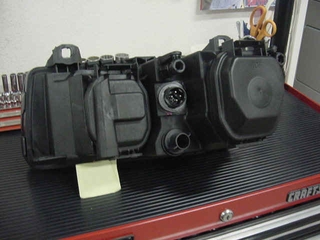
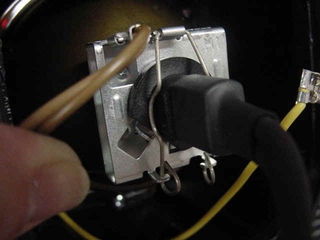
Open the low beam projector housing.


Undo the little spring clip that holds the bulb in place. Note the orientation of the bulb base, as in there’s a flat spot on the side.


I’ll go slow for you, raise the clip….


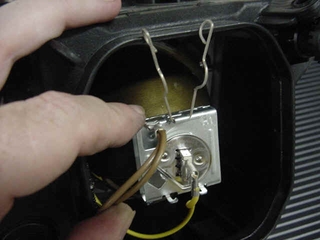
Pull the bulb straight out….


And disconnect the connector.


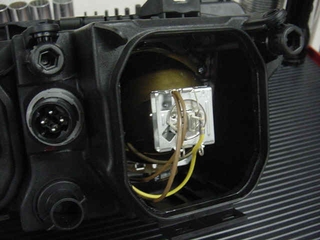
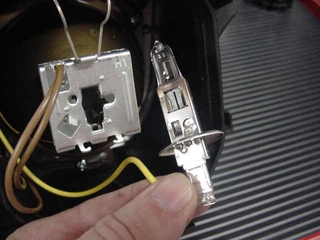
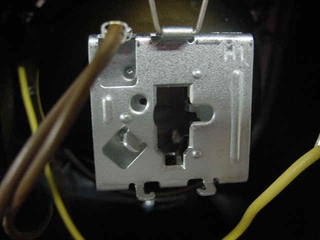
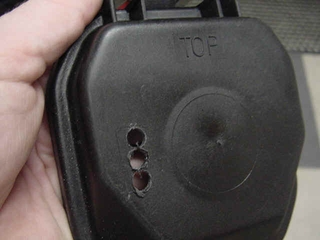
Stare intently at the empty base, Notice the hole, notice the slot, notice the locating tab?


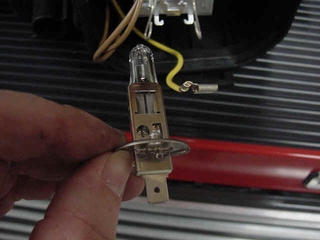
Now look at the new H1 bulb. Don’t touch the glass!!!! See the two nipples? Yes, I said nipples.


See the flat spot? Think intently. Try and imagine sticking the bulb into the housing so that the nipples and the flat spot line up and you get the bulb in the housing. Good. Lets move on.


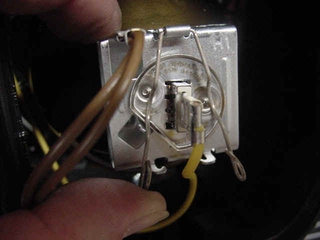
Hold the bulb in firmly and reattach the retaining clip.


We will not be using the bulb power lead from the original Halogen bulb. Tape it off and….


Put a loop in it and tie wrap it to the ground leads. We do need the ground leads. Leave them alone.


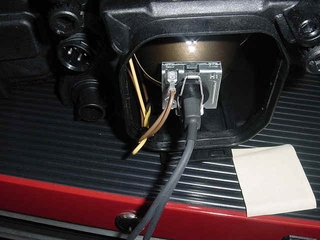
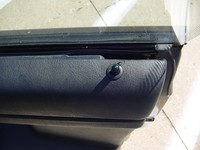
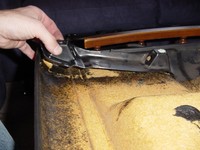
We need a way to get the new leads out of the access door so they can plug into the harness from the ballasts. I drilled some holes in a convenient spot. Dead center would work well too.


Then, using a utility knife, I trimmed the edges of the holes to make a nice access area.


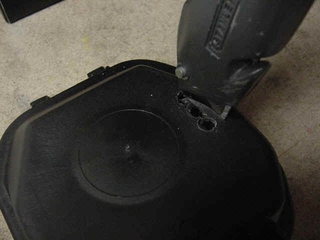
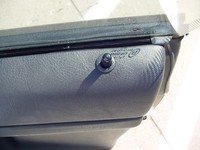
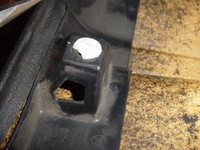
I trimmed a little area to the side so the tabs on the connectors would fit through too. This is not a big hole. The close-up distorts it. Keep it small so water doesn’t enter.


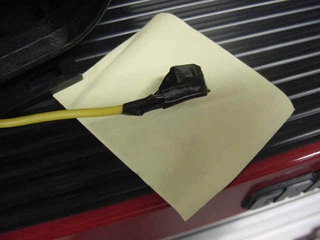
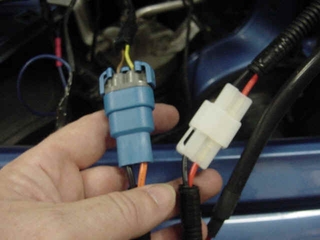
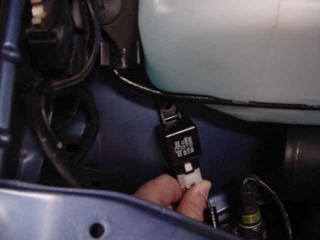
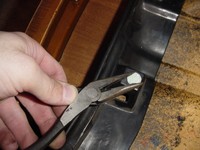
Like I said before, if you had previously installed Euro’s I hope you saved the low beam connectors. They are the ones with a yellow stripe on the power lead.


Crimp the connector back on with butt connectors and re-tape the harness like the factory. Plug the whole thing together.


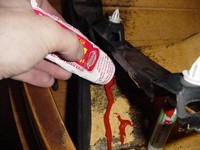
Clean the back of the ballast with alcohol to remove oils. Install double sided tape. Clean the area where you will attach the ballast.


Before you install the ballasts, lay everything out and make sure your harnesses aren’t tangled and will install cleanly.


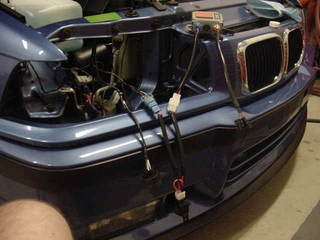
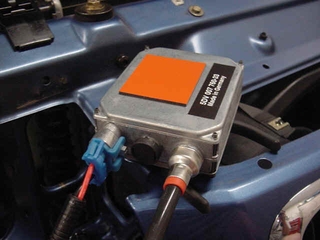
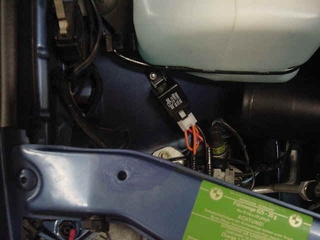
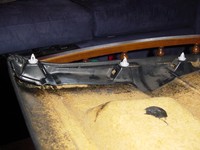
Against my better judgment, I installed the ballasts inside the front bumper beam. I hope they survive any front end taps. But I couldn’t find a good alternate spot.


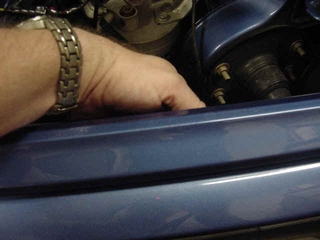
Locate good spots to install your relays. The strut towers work well. Locate and drill them with a small 1/16″ bit, maybe 3/32″.


The bolts and nuts supplied with the kit are worse than useless. Toss them right away. They are the only bad part of the kit. I used some 1/2″ x #8 sheetmetal screws and washers. Much better.


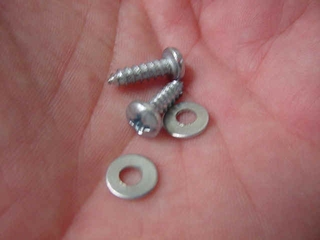
See? Isn’t that nicer than trying to figure out how to install a nut and lock washer from underneath? You betcha!


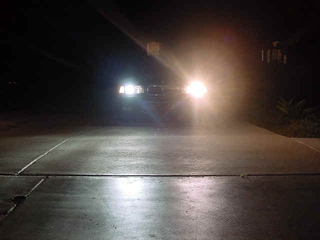
Test each side independently as you complete it. The one on the passenger’s side is the new HID. The one on the driver’s side is the regular Euro Halogen bulb, tilted slightly up hill. Lots-o-glare and much yellower than the bluish HID.


After you finish you will want to go find a nice dark area to realign the lights.


Wrap each ballast to lamp connector with tape or heat shrink to protect from moisture and arcing.


I also found that the low beam fuses have to be increased from 7.5 amp to 15 amp. The steady state draw is right at 10 amp. A 10 amp fuse won’t hold forever on my car. YMMV.


Update I: Many people report a problem with the Check Control circuit reporting low beam failure intermittently. It happened to me and the passenger side low beam lamp went out!


I figured “Here we go, impedance difference being found by the computer.” But as I was starting to look at it, I found that I could hear what at first sounded like relay chatter. Well, that’s what my mind wanted to hear, thinking impedance problem. But I found that it was really the connectors between the ballast and the bulb were arcing to each other and the nearby chassis! I pulled the headlight housings and wrapped those connectors individually with electrical tape 1/2″ up onto the wire and the problem is solved!


Update II: Further investigation reveals that many people with any variation of kits have the OBC failure issue. One car will do it and the next won’t with the same kit. So obviously the problem is borderline. Also, some kits have 60 ohm resistances in their coils and some have 100 ohm. This may have an impact on the problem or not. While not a cure for the problem, the low beam OBC monitoring circuit can be bypassed. This will stop the warning from coming on but also disable any warning of actual failures. If you would like to do this modification, Rich Pinto has a writeup to cover disabling the circuit. It can be found at this link.


Update III: And for yet another method to install HIDs and avoid some of the pitfalls, follow the Xenon link on http://www.ecubed.com/bmw


Wait for more from . . . BMW E36 Blog


Best regards,

Tony Sticks.

Want to receive exciting tips & information about BMW E36 cars? Enter your Email:-


posted in Electrical, Tips & Tricks | 6 Comments

31st March 2007

BMW On Board Computer (OBC) secrets!

Hi Friends,


I’m really excited about this new article and I think you will be excited too. I have found an article which describes the secrets hidden inside BMW E36 on board computer (OBC). It’s really fascinating me that the Germans in 1993 or so were having such things. All I can say is WOW!. OK, enough talking about the Germans, so Mr. OBC here turned to be not as simple as I really thought at first. It has many information that is hidden and can be displayed with tiny effort. I’m almost sure that you’re going to love the article below. I just wanted to say that you should make sure to try the Instrument Panel Tests. It’s really cool to watch your car checking itself.


Note: I did try almost all what’s written in here and it’s working great.


Disclaimer: Use this info at your own risk!! I’m not responsible for your mistakes man! 😀


There are many interesting functions available on the E36 OBC (On Board Computer) that are not documented in the owner’s manual, including changing the language of the display. The procedures described here work on my ’97 328iC, which has the upgraded OBC – they may work on other models of similar vintage.


Contents:

  • Programming the Display Order

  • Accessing Data

  • Unlock the Display

  • Test Codes

  • Setting the Country Code

  • Instrument Panel Tests


Programming the OBC to Display Contents in a Desired Order:


When you repeatedly press in on the turn signal stalk, the OBC display cycles through the various information types that it has in memory. The default sequence is: CONSUM1, CONSUM2, EXT. TEMP, SPEED, LIMIT, DIST and TIMER. If you want to change the display order, use the following procedure:
Press-in and hold the turn stalk for about 5 seconds. The OBC display will change to Prog 1. Press the button corresponding to the first function you would like to have displayed in the sequence. For example, if you would like the outside temperature to be displayed first, press the TEMP button. The display will then change to Prog2. Continue pressing the OBC buttons in the order you want, up through nine entries. You don’t have to enter all nine – if you would like the display to cycle only between TEMP and RANGE, simply enter those two items as Prog 1 and Prog 2. When finished, press the SET/RES button to store the sequence in memory.

To revert to the default order, simply press SET/RES as soon as Prog 1 is displayed.


Accessing Data in the OBC:

The OBC contains a lot of data, and displays the data in a manner determined by the country code that is stored in it. The technique to access this data is as follows:
Press the 1000 and 10 keys simultaneously. You should see Test-Nr.: appear in the display.
The table below lists the available test codes that are available. Enter a test code number, using the number keys, followed by the SET/RES key. However, to access codes other than 1, 10, 14, 19, and 21,
you have to first unlock the OBC, using the procedure described below.
Read the results.
For test numbers 10 and 11, enter a new value (if desired) and press SET/RES.
Return to the normal display functions by pressing CHECK or any other key.
 
Unlock the Display:

Most of the test sequences require you to first unlock the display before. Enter test code 19 using the above procedure. The display should read LOCK:ON. Then enter an unlocking code consisting of the sum of the current month plus date (for example, if today is July 11, enter 18). Then press SET/RES, and the OBC is now unlocked.
 

Test Codes:

Following is a listing of the available tests, along with with my notes as to what I think each test means. Note that the display uses European conventions for decimals (i.e., the number 61,7 is 61.7f or us Americans). You will see that I don’t have good explanations for several of these test codes


Test Code No.

Display

Notes

Display Must Be Unlocked First?

01

All LED display elements are lit

Verify that the display is working properly

No

02

VBR: n,n l/100km

n,n = instantaneous fuel usage in liters/100 km

Yes

03

VBR: n,n l/h

n,n = instantaneous fuel usage in liters per hour

Yes

04

RW-VBR: n,n l/100

n,n = average fuel usage in liter/100 km.

Yes

05

RW: nnn km

nnn = range in km

Yes

06

Not used

Yes

07

TMTL: nn,n l

nn,n = fuel remaining (in liters)

Yes

08

V: n km/h

n = instantaneous speed in km/h

Yes

09

UB: nn,nn V

nn,nn = system voltage (should be
around 13,80)

Yes

10

LAND: n xxx *

Country code — for US drivers
should be set to 2 USA — see description below

No

11

EINHEIT n: xx *

?? There are two EINHEIT displays: the values for xx in EINHEIT 1 can range between B0 and BF, and for EINHEIT 2 range between 0F and FF (mine is set to B3 and FF, respectively). Press the 1000 or 100 key to switch between EINHEIT 1 and EINHEIT 2.

Yes

12

VANK nn km/h

nn = average speed

Yes

13

ANK: nn:nn

nn:nn = ETA (will display
–:–
if the OBC’s distance function is not in use)

Yes

14

ROM: dd.mm.yy

dd.mm.yyyy = Software version date. Mine is 25.06.1991

No

15

DIAG: nn nn nnn xx

Diagnosis code? Mine is 01 05 255 FA

Yes

16

PORT: nn nnnnnnnn

Port codes? Press 1000
or 100 key to cycle port numbers. For example, PORT 01 is 10101000

Yes

17

PROM: nn nn

?? Mine reads 00 12

Yes

18

HORN: xxxx

DTON or DTOFF?
(Single tone horn versus dual tone)

Yes

19

LOCK: xx

xx = ON or OFF.
See description above for method.

No

20

KVBR: nnnn

nnnn = Fuel rate calibration factor. Mine is set to 1000

Yes

21

RESET?

Reset all defect codes? Also erases all stored values in the OBC (i.e, fuel consumption, avg. speed, timer, etc) and clock.

Yes


Note: #20 The factor is used to correct the OBC Avg Fuel Consumption figure to reality. If your OBC is off a bit, fill it UP totally and then run the tank down and refill. Then calculate your Actual MPG. Now enter test #20 get the old Correction Factor. NEW CF = OLD CF *(Actual MPG/OBC MPG)

Setting the Country Code:

If your OBC suddenly starts displaying every thing in German, and you would like to put it back to English, use test sequence number 10. Once you’re into test number 10, press the 1 key several times, and you’ll see the display cycle through various country options. For example, 0 is for Germany (the display reads LAND:0 D * – I assume D stands for Deutschland). As you cycle through the options, you’ll see choices for the Great Britain, USA, France, Canada, etc. Once the display is on the country you want, press the SET/RES key to store your choice into memory — for US drivers the display should be set to LAND: 2 USA * . Then press the CHECK key, and the display will reflect the units of the country you’ve chosen.

Instrument Panel Tests:

With the engine off, press and hold the trip mileage reset button, and then turn the key to accessory position 2 (OBC and radio come on). The LED display on the instrument panel (which normally is the odometer) will change to tESt01 and then will begin to cycle through several displays. Release the button. The display will continue to cycle through several displays. Here’s the data my car displays:


Display

Display Sequence

Notes


363758


1

BMW Part No.


0000


2

Code No.?


7504


3

K No.?


nnnnn


4


Last 5 digits of VIN


230


5

Software Version


62


6

Revision Index Hardware No.


Finally, all LED elements will light, and all gauges will cycle once.
You can press the mileage-reset button again to access more tests. Tests 2 through4 are always unlocked and hence available. Tests 5 through 14 are normally locked — to access these you must first unlock the display-using test 15.Otherwise the display simply shows: ——–.


Display

Test Sequence

Notes

n

02

Engine type: n = 2 for 4-cylinder engine, 3 for 6-cylinder, and 4 for 8-cylinder

nnnnnn

03

km traveled since last oil service reset.

nnnn

04

Age of car, in days

For tests 5 – 13, display must first be unlocked using sequence 15.

n

05

SI evaluation factor: n = 0 or 1 (over-rev), t= 0 or 1 (engine temp over heat)


06

Fuel level and coolant temp. Displays hexadec codes relating to gauge position:

Fuel Gauge Hex value:
A (empty) —-> 0d
End of Reserve —-> 37
B ——> 54
C ——–> 90
D ———> c4
E (full) ——> f0

Engine Temp Hex value:
A ——-> ce
B ——–> 6d
C ——–> 5c
D (center) ——> 4f-23
E ——–> 1e
F ———> 18


07

Current engine RPM


08

Current road speed in km/h

nnnnnn A

09

Distance – used to compare odometer mileage in the EPROM vs. the coding plug. If the two values don’t agree (for example, if one of these elements was replaced), the manipulation dot will illuminate. This function will synchronize the two readings to the highest value. Press and hold the reset button for 4 seconds, and the lower mileage reading will be overwritten by the higher, and the manipulation dot is cancelled.

bbbbbb

10

Status bits – input signal (0=low
or 1= high):
1: seat belt: fastened =0
2: ignition lock: key inserted=0
3: door contact: door open = 0
4: clock button pressed = 0
5: SI reset = 0
6: EGS transmission failure = 0

bbbbbb

11

Status bits – output signals:
1: Gond output
2: Brake warning lamp
3: Low fuel warning lamp
4: EGA lamp
5: Seat belt lamp
6: manipulation dot

——

12

Not used

nn

13

Country code of cluster (USA = 02)


14

Software reset

L On/Off

15

Lock Status (on or off). Press and hold the reset button for about five seconds until the display reads "OFF". Now you can access test sequences 5 through 14.


Wait for more from . . . BMW E36 Blog


Best regards,

Tony Sticks.

Want to receive exciting tips & information about BMW E36 cars? Enter your Email:-


posted in Interior, Technical Info, Tips & Tricks | 134 Comments

28th March 2007

Fixing BMW E36 door panel!

Hi Friends,


The door panels in BMW E36 and especially the coupe type is a very common problem that every owner will sooner or later face. As you might have guessed I’m facing this problem right now with my babe :-(. So it’s time to fix it, but I realized that I don’t have any knowledge about the issue, so how am I supposed to fix it. Well, as usual, I will go out and dig to find some people who faced this problem before me and successfully solved it. I’ve found this post which describes the process in detail and I thought I should share it with you guys. Maybe you’d like to do the same to your cars.


Note: don’t forget to buy some clips before starting the surgery, otherwise you will fail to do the job successfully. Good luck!


Disclaimer: Use this procedure at your own risk!! I’m not responsible for your mistakes man! 😀


This is a simple way to fix you sagging or lose door card. I spent about 10 min doing everything, the only catch is that you will need to let the
adhesive cure or dry.


Removal: The panel is fastened by clips and screws, there are 2 screws tucked behind the handle on the arm rest, simply pop the covers off and unscrew them, after that just pull the door card off and unplug the speakers, the speaker wires pull right out, don’t be to
aggressive though as you may damage them.


Things you’ll need once the door panel is off:

Pliers, and RTV silicone.


This is what it looked like before I took it off the car


This is what the repair did


Once I examined the door I found what the cause was. There is a plastic molding holding the door clips that was glued to the door card and had separated itself due to many opening and closings.


Some of the clips were broken as well. I recommend purchasing new ones from the dealer, don’t be a cheap wad. You should have these clips before the repair so that you can do everything at once. To remove the clips simply wist and pull them with pliers, they are notched and are designed to be done that way.


Remove the clips before you decide to apply the adhesive as this may cause some issues later on in the repair. To put new clips in, just twist them in with your fingers, it doesn’t take much effort.


Next you simply apply the adhesive thoroughly. Cleaning shouldn’t really be an issue, but if you decide to clean the area, use a mild soap and warm water. Push down on the plastic to spread the silicone around, you don’t need to smooth it, let the plastic do the work for you, plus you don’t get dirty.


That’s pretty much it for the repair, the next thing you’ll want to do is apply pressure. I chose to use a piece of cylinder poly and laid my amp on it. You’ll want to have adequate pressure to ensure a tight bond. When you add the weight, have the door panel somewhere that will be out of ways harm. I chose the coffee table….


Let the RTV dry before you mount it back on the car. I let mine sit over night just to be safe. Simply reverse the removal process to re-attach the door panel…and your finished


Hope this helps, it’s super easy and cheap, it’s not the most interesting thing in the world but I needed it fixed so I’m sure someone else does to. If you guys think I left something out then let me know but I think I covered everything.


Are you looking for more do it yourself procedures (DIY) ? I recommend the Bentley BMW 3 series service manual for you. I got it and I think it’s a gold mine for us -BMW E36 Owners-. If you didn’t grab your copy yet, get it right now! I’m sure you’ll find this book worth every penny you’ve paid for. Get the Bentley BMW 3 series service manual


Wait for more from . . . BMW E36 Blog


Best regards,

Tony Sticks.

Want to receive exciting tips & information about BMW E36 cars? Enter your Email:-


posted in Do It Yourself, Interior, Technical Info, Tips & Tricks | 14 Comments