BMW E36 Blog

Installing immobiliser for your BMW E36 . . . DIY!

10th September 2007

Installing immobiliser for your BMW E36 . . . DIY!


For those of you who don’t know what an immobiliser is, it’s simply an electronic device that is designed to prevent cars from being hot wired and stolen easily. If a car has an immobiliser installed, this means that the thief will need hours and hours + very good knowledge about cars to be able to get that car to work, or he may simply choose to knock on your door and ask you to give him a hand to fix your car LOOOL 🙂 as he may think it’s not working and needs some fixing. For those of you who are looking to protect their cars from being stolen and care about their car safety, the answer is easy, install a car immobiliser.

I have found this post here which talks about the process of installing an immobiliser for your BMW E36, so I thought I’d post it here in order  for you guys to follow and protect your car. If you’re interested in getting a car immobiliser, you can take a look at this immobiliser on eBay.

For those of you who like to fix their BMW car(s) by themselves, I recommend you to get the Bentley BMW 3 series service manual which is one of the best books I’ve ever read. I got it and recommend you to get one for you as it will save you too much time and money while fixing your car.


Disclaimer: Use this info at your own risk!! I’m not responsible if this didn’t work for you :-).

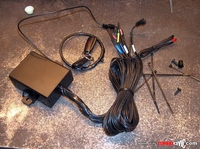
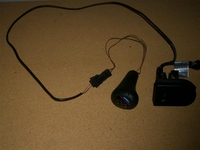
So you want to install immobiliser like this one? if you know how to solder wires then i think you will qualify

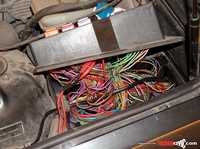
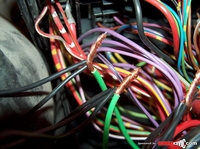
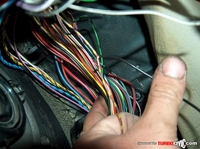
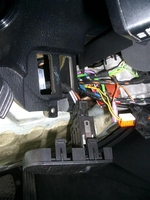
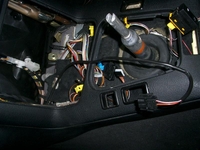
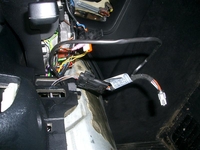
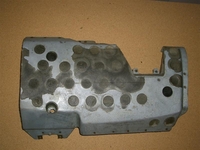
Step 1: Open up fuse box, you will want to make thieves life as hard as possible. You need torx screwdriver. Unscrew two front screws, be careful, apply pressure, do not break torx pattern on heads. Also open drivers side under dash to get access to wires and screws that hold fuse box in place. Unscrew these 4 screws to get fuse box loose

Now you can get access to fuse box rear screws. unscrew them carefully. open the box

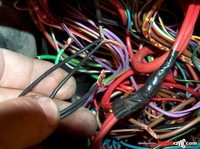
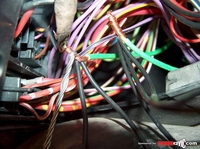
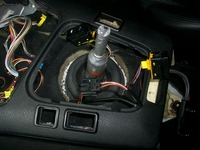
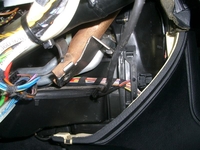
Step 2: Locate circuits that you will immobilise. For example, green/purple wire coming from fuel pump fuse (17)is ideal. Measure voltage on wire( test light or tester one lead grounded):
Ignition off – no voltage
Ignition on – no voltage
Crank and run – +12

When car running, cut the wire- if engine stops( after couple seconds ), you have found right one. You can connect it temporarily together to locate another circuit. Connect it to immobiliser as on its wiring diagram

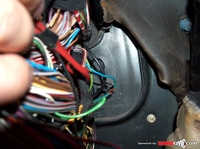
Second circuit can be ignition for ECU. It is green wire going from connection point to engine harness connector outside fuse box. It has power when ignition is on. If you cut it engine will stall immediately, remember that there are couple wires in that connector cut the right one, if you miss, connect back and be more careful next time

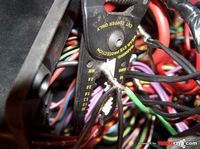
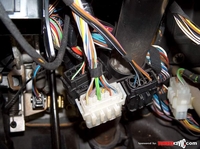
Step 3: Connect it to immobiliser wiring ( connect now fuel pump wire too )

remember power comes from ignition lock and goes to engine harness: twin wires for immobilising, third ignition sense for immobiliser

Step 4: Power up immobiliser (red permanent power, brown ground)

Step 5: Solder all wires

Step 6: Cut sharp edges

Step 7: Isolate all connections

Step 8: Locate drivers side door switch wire near drivers side speaker (brown/gray/yellow).

Never connect immobiliser circuits on steering column. It is too easy to reconnect.

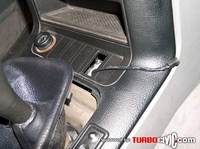
Step 9: Install LED and antenna into center console. antenna can be located anywhere where you want, it does not work through metal.

Step 10: Install led and antenna into center console. Antenna can be located anywhere where you want, it does not work through metal

Step 11: You’re done! 🙂

Wiring Diagram:


Are you looking for more do it yourself procedures (DIY) ? I recommend the Bentley BMW 3 series service manual for you. I got it and I think it’s a gold mine for us -BMW E36 Owners-. If you didn’t grab your copy yet, get it right now! I’m sure you’ll find this book worth every penny you’ve paid for. Get the Bentley BMW 3 series service manual

BMW E36 Blog: The ultimate BMW E36 information source.


Want to receive exciting tips & information about BMW E36 cars? Enter your Email:-


posted in Do It Yourself, Electrical, Technical Info, Tips & Tricks | Comments Off on Installing immobiliser for your BMW E36 . . . DIY!

9th September 2007

New BMW Wallpapers from Forza Motorsport 2 game!


If you’ve been reading this blog for a while, you must have come to the conclusion that I have a weakness towards the BMW cars the were designed in the Forza Motorsport game. Every time I see some photos (wallpapers) of E36 cars the were designed in that game, I find myself posting them on the blog. I hope you will like these new photos that will definitely make your desktop look sweet. If you want more wallpapers of this great game mixed with BMW E36 passion, you can see my previous posts here and here.

The only thing I hate about Forza Motorsport game is that it can’t run on the Sony Play Station II which I have. This is pushing me to get the Microsoft XBOX 360. I hope I will get it to be able to play this game myself.

Enjoy this guys and let me know how they will look on your monitor 🙂


BMW E36 Blog: The ultimate BMW E36 information source.


Want to receive exciting tips & information about BMW E36 cars? Enter your Email:-


posted in fun, Photos, Uncategorized | Comments Off on New BMW Wallpapers from Forza Motorsport 2 game!

9th September 2007

BMW E36 328is in a chase seen … Shoot Em’ Up


Hello, let me start this post by welcoming our new friend Jim K who posted his information on the Welcome BMW E36 blog readers!. We have reached to 10 members until now and I’m still looking for more, so if you didn’t read this post yet, please read it and let’s here from you. We would love to know more about you and your ride so, please write your information in the comment box below that post.

Now for this new trailer of a movie called Shoot Em’ Up. The movie features a BMW E36 328is in a fast chase and I think it’s really cool. Shoot Em’ Up starring: Clive Owen, Paul Giamatti and the pretty actress Monica Bellucci.

Enjoy…


I hope you liked the video . . . if not, come on let’s see your videos 😉

BMW E36 Blog: The ultimate BMW E36 information source.

Want to receive exciting tips & information about BMW E36 cars? Enter your Email:-


posted in Videos | Comments Off on BMW E36 328is in a chase seen … Shoot Em’ Up

5th September 2007

A new poll on BMW E36 blog!


In the last poll we conducted on BMW E36 blog, the question was "What is the type of posts you love most here on BMW E36 blog?". I was shocked to know that you guys only love technical information/DIY procedures. I didn’t expect the result to be so much clear about what you prefer. The final result of that poll is show here:

Poll 2

After seeing this result, I decided to increase the DIY (Do It Yourself!) procedures that I post to the blog. I hope you’ve noticed this and liked it.

As usual, a new poll is started and the question of this new poll is "Would you like to participate in BMW E36 Blog by posting your own articles?". I hope you don’t feel afraid of this question. I know that it might look scary and tricky, but I assure you it is NOT. So, for all of you who are thinking man … Tony needs someone else to write on the blog. I say, no … not at all. I’m not looking for someone else to write, but I’m trying increase the activity on this blog. So, I thought that some of you might have something to say instead of just reading. The idea is to enable everyone of you to post whatever he likes and make him feel like he’s part of this blog, not just a subscriber. So, my question is if you had a chance to write on this blog, would you do it? Please vote on the poll to the right.

BMW E36 Blog: The ultimate BMW E36 information source.


Want to receive exciting tips & information about BMW E36 cars? Enter your Email:-


posted in Uncategorized | 1 Comment

4th September 2007

Installing lighted shift knob for your BMW . . . DIY!


I always wanted to illuminate my BMW shift knob and I didn’t realize that it’s a straight forward job. I recall that I had to cut into my shift knob to do this to my BMW E30 before and the job was very hard to do and it didn’t look like I was expecting. Of course, that’s before I find out that there’s an illuminated shift knob that is ready to be installed. So, by getting this illuminated shift knob, the task became very easy. Take a look at the DIY below. It’s a straight forward task to do. I hope you like it

For those of you who like to fix their BMW car(s) by themselves, I recommend you to get the Bentley BMW 3 series service manual which is one of the best books I’ve ever read. I got it and recommend you to get one for you as it will save you too much time and money while fixing your car.

Disclaimer: Use this info at your own risk!! I’m not responsible if this didn’t work for you :-).

I have seen a lot of threads about lighted shift knobs and many suggestions on how to install it. What follows is the factory
intended retrofit option. (Although I am technically removing the wiring, it is the same for installation.)

Unscrew the Phillips head screw holding the dimmer console in place. The dimmer console is located to the left of the steering wheel. This console then easily pops out of the dash.

What you see connected to the back of it is the factory retro-fit wiring harness.

You want this wire to terminate in the shift console to be connected to your shift knob.

I ran this wire under the carpet with the other wires. This is what it would look like before tucking it under the carpet:

With a little slack the wires pull part way out of the dash back at the dimmer console:

Plugged into the back of the add on wiring harness is the standard wiring harness for the interior lights.

I ran the wires through the dash behind this:

You have to take off the under dash, driver’s side knee panel to get to this. It removes with a wratchet extension and an M10 socket.

With this piece removed you can see I ran the wire behind the factory wire strap to hold it in place. This opens simply by pulling out from the top.

In total it would look like this:

I think the entire deal, knob and wiring harness came shipped from pacific for under $100.

To gain access to the shifter area do the following:

Pull the shift knob up. This takes some force, don’t be worried but don’t hit yourself in the head either. The shift boot removes easily by pulling up on the sides at the corners. To remove the sunglass console you first have to remove the check computer (OBC). To do this reach your hand into the sunglass console and find the hole in the middle in the top. Press up to release the catch on the OBC and push it forward from the back. Then slide the sunglass console up and then rotate it out.

The driver’s side knee panel has three screws. One on either side of the steering wheel and one in the footwell on the center console side. This panel slides out with a little effort. Then you have to remove 3 bolts with a 10mm socket on the metal heat guard as described above. To remove the OBC refer to the cubby removal DIY in my sig. Here is the final install picture:

This is a screenshot of how it should look like when it’s done

You can get the illuminated shift knob from here. Just look for part #25 11 2 231 561 or #25 11 2 231 551


Are you looking for more do it yourself procedures (DIY) ? I recommend the Bentley BMW 3 series service manual for you. I got it and I think it’s a gold mine for us -BMW E36 Owners-. If you didn’t grab your copy yet, get it right now! I’m sure you’ll find this book worth every penny you’ve paid for. Get the Bentley BMW 3 series service manual

BMW E36 Blog: The ultimate BMW E36 information source.


Want to receive exciting tips & information about BMW E36 cars? Enter your Email:-


posted in Do It Yourself, Electrical, Interior, Technical Info, Tips & Tricks | 2 Comments