BMW E36 Blog

BMW E36 Parking Distance Control (Parking Sensors)

4th February 2008

BMW E36 Parking Distance Control (Parking Sensors)


The guys at BMW have never stopped amazing me. I used to have a BMW E30 before and every now and then, I was discovering some facts that made me say Wow! The BMW E36 is no difference. I’m feeling that every now and then, I discover something that makes me say wow too!. Today, I’ve discovered that the BMW E36 cars have come with an optional Parking Distance Control (Parking Sensors). It’s a rare option but what’s important is that it exists. Take a look at these photos which show how this toy is supposed to look on your BMW E36:


I think this option has came to life in 1995. Imagine that you’re parking your car and being able to know exactly when to stop. Before anyone asks, I’m very very good at parking, but I think that this option is really cool and makes you enjoy your car even more!

You can see the full diagram for such a system here in case you’d like to install one. I’m not sure whether it’s available but I think you can find it if you tried.

The one thing that I want you to notice is how creative BMW guys were in 1995. I’m not saying that they’re always that ones who invent new options and features, but they’re definitely one of the most important leaders in the car market. They just put the standards.

BMW E36 Blog: The ultimate E36 information source.


Want to receive exciting tips & information about BMW E36 cars? Enter your Email:-


posted in Electrical, Technical Info, Tips & Tricks | 18 Comments

30th January 2008

BMW E36 Rough Idle Problems


Rough idle problems are really common on BMW E36 cars and there are a lot of problems that may cause this to appear. First I will show you a video of such a rough idle and then list the possible problems that may cause that.

Take a look:-

The possible reasons for such a problem are:

1. Oxygen Sensor is gone: You can run a diagnosis to see if this is the problem. If you find out that it’s the problem, you should replace it. Read Everything you need to know about Oxygen Sensor! for more information about oxygen sensors.

2. Idle Control Valve: Dirty idle control valve is a very common problem in BMW E36 cars that may cause rough idle. You can use this DIY (Do It Yourself) to learn about Cleaning E36 ICV (Idle Control Valve)

3. Plugs and Distributor: You may need to replace these to solve your problem. I however don’t have a way to check them before replacement.

4. The Throttle Position Sensor (TBS) and/or connections may be bad: You can simply disconnect it and see if your problem is solved or not.


BMW E36 Blog: The Ultimate E36 Information Source.

Want to receive exciting tips & information about BMW E36 cars? Enter your Email:-


posted in Electrical, Engine, Technical Info, Tips & Tricks | 1 Comment

23rd January 2008

Upgrade BMW E36 Lights To HID Xenon Fast and Cheap


Do you want to upgrade your BMW E36 lighting to HID Xenon fast and cheap? I’m sure that almost everyone wants to do that. The HID lights are way much better than the usual lights besides, they give the car a very cool look as well. So, in one shot, you can upgrade your lighting to make your night driving as easy as daily driving. At the same time, you are doing an upgrade for the car looks as well.

The idea for today’s post is not mine. Chris who’s a reader of BMW E36 Blog contributed with a video showing a BMW car with HID 10000K kit installed (thanks Chris).

Take a look.

So, what do you think? Is that awesome or what?

Alright, now how you can do this? I’ve posted a DIY (Do It Yourself) before about how to install HID in your BMW E36. Take a look at it. the procedure is really simple and you can use the XenTec HID conversion kit H1 10000K Single Beam Xenon (sky blue) to do the upgrade. It’s really worth every penny you will pay for. Have fun!


BMW E36 Blog: The ultimate BMW E36 M3 information source.

Want to receive exciting tips & information about BMW E36 cars? Enter your Email:-


posted in Electrical, Technical Info, Tips & Tricks, Videos | 1 Comment

17th January 2008

Fixing BMW E36 Blower Fan Speed . . . DIY!


It has been two weeks since my blower fan stopped working correctly on the low speed options (1, 2 and 3 ). It only works on high speed (Option 4). At first, I thought that the problem was in the fan speed switch because I’ve seen this problem before and when I told my electrician about it, he disassembled the switch and tried to clean it. Of course this solution didn’t work. So, I’ve decided to dig for the solution myself and I found that this is a pretty common problem among E36 cars. The problem is that speed 1, 2 and 3 are controlled by something called (Final Stage Unit on digital climate control units, Blower Resistor Pack on analog climate control units). The 4th speed is actually uncontrolled, so, it simply bypasses the final stage or resistor pack units. That explains why the fan works on the 4th speed and not the other lower speed options. Anyway, I tried to find a DIY (Do It Yourself) procedure on how to fix this problem and I found one that was written by "Deem3" on bimmerforums (thank you Deem3 for the great write-up). Now take a look below. It’s a really simple procedure. I will be trying it this weekend to see how it goes. I will post more details about this job soon (hopefully) 🙂 .

Disclaimer: Use this info at your own risk!! I’m not responsible if this didn’t work for you :-).

Symptoms (2 cases):
– Digital Climate Control: All the lights on your digital climate control are working and the buttons respond but the blower doesn’t blow any air.
– Analog Climate Control: The blower doesn’t work except on the highest speed (4th position)

Tools:
– Phillips screw driver
– Torx 20 driver
– 10mm socket, rachet and extension

Parts:
– 64.11.6.929.540 New
– 64.11-8 380 580 Old
Note: if you have analog climate control (with the knobs), the part numbers here maybe incorrect.

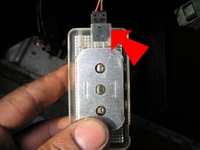
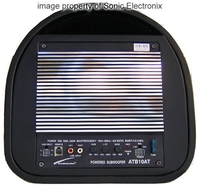
If you have digital climate control we need to buy a final stage unit. Costs about $100 at the dealer if you have the discount, otherwise it’ll be about $125. Apparently there are two part numbers for this part they both look the same but I’m guessing the new one has been improved. Anyway you only need the new part the old one is the one you’re replacing. Here’s what it looks like:

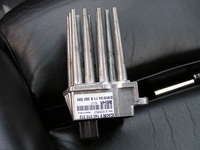
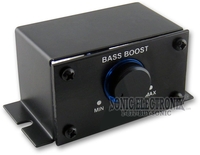
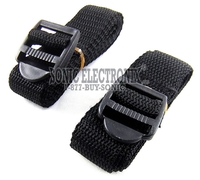
If you have analog climate control (with the knobs), what you’ll need to replace is the fan blower resistor pack. Take a look:

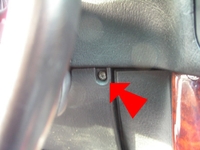
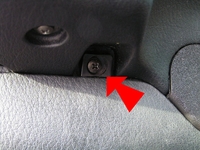
To replace it, we need to take off the driver’s side knee bolster. This only requires you to remove two screws,one on the right side of the bolster and one on the left. Using the phillips screwdriver remove the following screws:

Now remove the speaker and footwell light.

Using the 10mm socket remove the 3 bolts holding the metal shield. And using the phillips screwdriver remove the obd2 port.

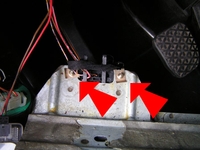
Now you should be able to see the footwell air duct. Remove it by pulling it.

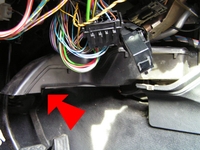
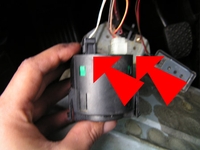
With everything out of the way you should now be able to see the defective final stage unit. Remove it using the torx-20 screw driver.

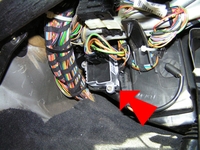
Replace it with the new part and before you put everything back turn on your car and test the blower. If everything is ok proceed to put everything back, and enjoy the benefits of having a blower in your car again.


Are you looking for more do it yourself procedures (DIY) ? I recommend the Bentley BMW 3 series service manual for you. I got it and I think it’s a gold mine for us -BMW E36 Owners-. If you didn’t grab your copy yet, get it right now! I’m sure you’ll find this book worth every penny you’ve paid for. Get the Bentley BMW 3 series service manual

BMW E36 Blog: The ultimate BMW E36 information source.


Want to receive exciting tips & information about BMW E36 cars? Enter your Email:-


posted in Do It Yourself, Electrical, Technical Info | 5 Comments

9th January 2008

Upgrade Your Car Audio System Easily


I used to have a BMW E30 with a sound system before I got my BMW E36 318is car. The sound system had a Sony Xplod head unit, Kenwood Speakers, Kenwood subwoofer and Boschmann Amplifier. I really miss that sound system sometimes. It had a magnificent sound with a deep bass that I used to really enjoy. Since I had my new E36, I don’t enjoy my music like I used to simply because I don’t have high quality sound system. I wrote previously about installing Pioneer speakers inside my car without cutting through metal. This gave my audio system a push, but I still don’t like the sound that much. The only logical choice for me was to install a new amplifier and subwoofers to gain the quality I used to have, but since I love my new car and I don’t want to cut through metal, I decided not to get those big subwoofers. I also hate to fill my trunk with a sound box too, so I throw both solutions out of the window. Yesterday, I was looking for some audio upgrades and I’ve found this Audiobahn Enclosures (Subwoofer + Amplifier). Take a look:


These cuties have:
1. Small Space: So, I don’t have to cut through metal anymore and I don’t need to put it in my trunk either. I will just put it on the rear seat which I don’t use that often.
2. Integrated 120Watts Amplifier: Cool!
3. Nice looking box: OK, I hate the chrome a little bit, but what can I say, life is not perfect!
4. The kit costs $157

Take a look at the kit:


It has:
Subwoofer, 120W Amplifier, Bass Control Knob, RCA Inputs. Everything you need to install them!

I think this choice is awesome! You upgrade your audio system with bass and without the headache. I hope you like it, I think it’s brilliant.


BMW E36 Blog: The ultimate BMW E36 M3 information source.


Want to receive exciting tips & information about BMW E36 cars? Enter your Email:-


posted in Audio, Tips & Tricks | 1 Comment