BMW E36 Blog

Turn BMW E36 Airbag light off

30th October 2007

Turn BMW E36 Airbag light off


Yesterday, I’ve taken my car to run a full-diagnosis for it. The diagnosis came back to me with two problems. First, the knock sensor which apparently needs to be replaced, but it seems like a hard job and I need to do some research before jumping into it. The second problem was with my airbag sensor. Actually, the right sensor was not running correctly and that what was causing the airbag light to keep flashing in my dashboard. So, if your airbag light keeps flashing for like 5 minutes after starting the car and then goes away, it’s more likely to have one of the sensors damaged and needs to be replaced. Of course, this doesn’t mean that this is the only reason that can cause the airbag light to keep flashing, but I guess this is one of the most common causes. Just run a diagnosis for your car and replace it if it was reported. After all, your safety is the most important thing, right?

BMW E36 Blog: The ultimate BMW E36 information source.


Want to receive exciting tips & information about BMW E36 cars? Enter your Email:-


posted in Electrical, Interior, Technical Info | 3 Comments

23rd September 2007

Footwell light for your BMW E36 . . . DIY!


First of all, I want to start this post by welcoming our new friend Sean C who filled his information recently in the Welcome BMW E36 blog readers! post. For those of you who didn’t read that post yet, please do and let us hear from you. Simply, just fill your information in the comments box at the bottom of that post and you’re done. Very easy isn’t it?

I think everyone of you guys will love today’s post as it will show you how easy it’s to install foot well lights inside your BMW. I know that many of you will try to do it because it looks great on your car. If you’re anxious to see the end result of this procedure, simply skip to the end of this post to see a photo of the car at night while the foot well lights are on. I hope you like this DIY and thanks for Jarozila who created the original write-up.

For those of you who like to fix their BMW car(s) by themselves, I recommend you to get the Bentley BMW 3 series service manual which is one of the best books I’ve ever read. I got it and recommend you to get one for yourself as it will save you too much time and money while fixing your car.


Disclaimer: Use this info at your own risk!! I’m not responsible if this didn’t work for you :-).

The BMW parts I used were:

63 31 8 360 588 Lamp (2x)
61 13 8 377 072 Socket Housing (3-pin connector) (2x)
61 13 0 005 197 Bushing Contact (4x)

If you take out your dome light and take a look at the wires you will see a Brown/Red wire (power) and a Brown wire (ground). These are the wires to use if you want the new foot well lights to work with the dome light switch settings.

Using these wires the foot well lights can be set to come on with the dome light when you open the door and they fade out, or you can turn them on with the dome light.

I did not want to run wires from the dome light down the side pillar, so I thought I have to be able to find the wires when I remove the glove box. I found a Brown/Red and a Brown wire and I exposed the core to see if these would work – THEY DID.

It was then just a matter of connecting a few wires into these two cables, making holes in the panel under the glove box and steering wheel, and connecting the lights.

I really like how it looks and it will make it so much easier to find things if they drop on the floor. Was also easier to vacuum with the lights on.

This is where I found the red/brown and brown wires that looked like they went up the back and into the side pillar going up to the dome light.

This is a picture from underneath to show the new wires I connected. I also put in two wires to run over to the driver’s side. The two black wires go the the foot well light, the red & brown wires go over to the driver’s side.

This is the light inserted in the hole I cut on the passenger side.

Foot well lights off during the day with my car in an open car port.

Foot well lights on also during the day in the car port.

Here’s a picture of how it looks at night


Are you looking for more do it yourself procedures (DIY) ? I recommend the Bentley BMW 3 series service manual for you. I got it and I think it’s a gold mine for us -BMW E36 Owners-. If you didn’t grab your copy yet, get it right now! I’m sure you’ll find this book worth every penny you’ve paid for. Get the Bentley BMW 3 series service manual

BMW E36 Blog: The ultimate BMW E36 information source.

Want to receive exciting tips & information about BMW E36 cars? Enter your Email:-


posted in Do It Yourself, Electrical, Interior, Technical Info, Tips & Tricks | 12 Comments

4th September 2007

Installing lighted shift knob for your BMW . . . DIY!


I always wanted to illuminate my BMW shift knob and I didn’t realize that it’s a straight forward job. I recall that I had to cut into my shift knob to do this to my BMW E30 before and the job was very hard to do and it didn’t look like I was expecting. Of course, that’s before I find out that there’s an illuminated shift knob that is ready to be installed. So, by getting this illuminated shift knob, the task became very easy. Take a look at the DIY below. It’s a straight forward task to do. I hope you like it

For those of you who like to fix their BMW car(s) by themselves, I recommend you to get the Bentley BMW 3 series service manual which is one of the best books I’ve ever read. I got it and recommend you to get one for you as it will save you too much time and money while fixing your car.

Disclaimer: Use this info at your own risk!! I’m not responsible if this didn’t work for you :-).

I have seen a lot of threads about lighted shift knobs and many suggestions on how to install it. What follows is the factory
intended retrofit option. (Although I am technically removing the wiring, it is the same for installation.)

Unscrew the Phillips head screw holding the dimmer console in place. The dimmer console is located to the left of the steering wheel. This console then easily pops out of the dash.

What you see connected to the back of it is the factory retro-fit wiring harness.

You want this wire to terminate in the shift console to be connected to your shift knob.

I ran this wire under the carpet with the other wires. This is what it would look like before tucking it under the carpet:

With a little slack the wires pull part way out of the dash back at the dimmer console:

Plugged into the back of the add on wiring harness is the standard wiring harness for the interior lights.

I ran the wires through the dash behind this:

You have to take off the under dash, driver’s side knee panel to get to this. It removes with a wratchet extension and an M10 socket.

With this piece removed you can see I ran the wire behind the factory wire strap to hold it in place. This opens simply by pulling out from the top.

In total it would look like this:

I think the entire deal, knob and wiring harness came shipped from pacific for under $100.

To gain access to the shifter area do the following:

Pull the shift knob up. This takes some force, don’t be worried but don’t hit yourself in the head either. The shift boot removes easily by pulling up on the sides at the corners. To remove the sunglass console you first have to remove the check computer (OBC). To do this reach your hand into the sunglass console and find the hole in the middle in the top. Press up to release the catch on the OBC and push it forward from the back. Then slide the sunglass console up and then rotate it out.

The driver’s side knee panel has three screws. One on either side of the steering wheel and one in the footwell on the center console side. This panel slides out with a little effort. Then you have to remove 3 bolts with a 10mm socket on the metal heat guard as described above. To remove the OBC refer to the cubby removal DIY in my sig. Here is the final install picture:

This is a screenshot of how it should look like when it’s done

You can get the illuminated shift knob from here. Just look for part #25 11 2 231 561 or #25 11 2 231 551


Are you looking for more do it yourself procedures (DIY) ? I recommend the Bentley BMW 3 series service manual for you. I got it and I think it’s a gold mine for us -BMW E36 Owners-. If you didn’t grab your copy yet, get it right now! I’m sure you’ll find this book worth every penny you’ve paid for. Get the Bentley BMW 3 series service manual

BMW E36 Blog: The ultimate BMW E36 information source.


Want to receive exciting tips & information about BMW E36 cars? Enter your Email:-


posted in Do It Yourself, Electrical, Interior, Technical Info, Tips & Tricks | 2 Comments

19th August 2007

Fixing your BMW OBC (On Board Computer) lights . . . DIY!

If you have a BMW with OBC (On Board Computer). It’s most likely that you will face a problem in its back lights sooner or later. Luckily I didn’t face this problem with my car yet, but my brothers car has this problem and his car’s OBC looks really disgusting. The problem begins when one of the back lights of the OBC decides to die and your OBC which you love to play with from time to time starts to look like a guy with black eye. At that time, you know that you have to do something about it and I know. You will be thinking … man, I shouldn’t mess with this OBC because it looks really complicated and I may end up breaking something. Guess what? you are wrong! Fixing the OBC back lights is a very simple task and it’s the subject of today’s post. I hope you enjoy this post and find it useful for your car. By the way, I want to thank Eduardo Cesconetto the original author of this great post.


For those of you who like to fix their BMW car(s) by themselves, I recommend you to get the Bentley BMW 3 series service manual which is one of the best books I’ve ever read. I got it and recommend you to get one for you as it will save you too much time and effort while fixing your car.


Disclaimer: Use this info at your own risk!! I’m not responsible if this didn’t work for you.

My OBC had only one light working, the one in the left corner, and so it was a pain to look at it, and it looked like the LCD was burned, but it comes out is just a matter of replacing some light bulbs. You can get the bulbs at the dealership for $2.50 each, and just ask for the light bulb for the OBC of your year/model car.


Here is my OBC:


The first thing to do is to carefully place a flat head screwdriver in one of the sides in the crack between the OBC and the bezel, carefully to not scratch anything, then apply a mild pressure pushing the handle of the screw driver outwards, the OBC will pop out a little bit.


Repeat the same procedure in the other side.


Under the OBC and in the top of the sunglass compartment (or whatever you want to call it) there is a hole as shown on this picture:


Put your middle finger in that hole and find the back of the OBC, then push it out slowly but firmly


That will give you enough space to pull the OBC out, slowly so you don’t pull the harness of the OBC


On the top side of the OBC, you will see the 4 light bulbs:


A bit closer…


Using the same flat head screwdriver, rotate the bulb counter-clockwise 1/4 turn to release the bulb


Install the new bulbs and follow the guide backwards to put the OBC back in place.


I suggest you replace all the 4 bulbs at once, otherwise you can end up with uneven light across the display


Are you looking for more do it yourself procedures (DIY) ? I recommend the Bentley BMW 3 series service manual for you. I got it and I think it’s a gold mine for us -BMW E36 Owners-. If you didn’t grab your copy yet, get it right now! I’m sure you’ll find this book worth every penny you’ve paid for. Get the Bentley BMW 3 series service manual


BMW E36 Blog: The ultimate BMW E36 information source.


Want to receive exciting tips & information about BMW E36 cars? Enter your Email:-


posted in Do It Yourself, Interior, Technical Info, Tips & Tricks | 14 Comments

7th August 2007

Installing Silver Gauge Cluster Rings for your BMW . . . DIY!

Let me start this post by welcoming our new friend Denise Wright. As you may know I’ve been trying to make a group of BMW E36 enthusiasts from the readers of this blog. I have posted a previous topic Welcome BMW E36 blog readers! in which I asked everyone who reads this blog to write a little bit about him/her self. So if you didn’t read this post yet please do and lets hear from you. I feel really happy when I hear from you guys.


OK, now for the post of today that I know most of you will like very much. This is a DIY (do it yourself) post which will teach you how to install those cute silver gauge cluster rings on your BMW. I really love the way the gauges look after the installation. I also love this DIY as it’s very simple and can be done by almost anyone who doesn’t have any experience in cars. Let not forget to thank Komodo who wrote this great DIY.


Enjoy the post and lets see how things go with you.


Disclaimer: Use this info at your own risk!! I’m not responsible if this didn’t work for you.

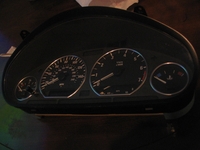
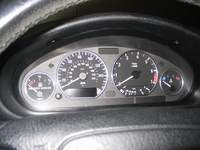
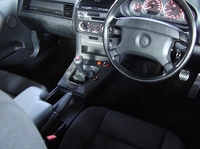
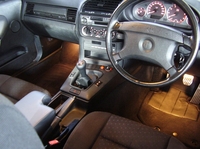
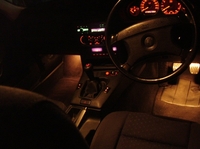
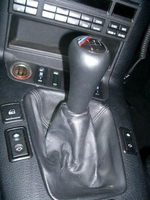
This is a DIY for installing those silver gauge rings you can find all the time on
eBay for about $30-35. Here is an after stock photo of how this mod changes your car. It’s a simple mod, but makes a big difference.


Tools needed:

– T10 Torque Screwdriver with a long thin handle (one screw is pretty deep inside)

– Phillips head screw driver


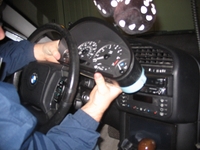
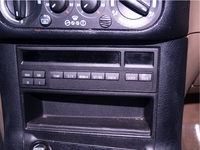
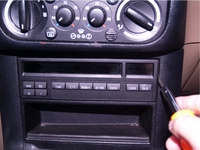
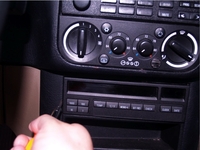
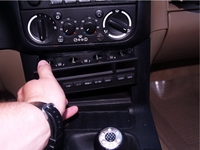
1) Unscrew the gauge cluster. There are two screws and some friction holding your cluster in. One screw is on each side of the top, as shown in this picture:


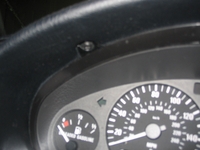
Unscrew those screws and push on the bottom of the glass to loosen the unit. Mine was stuck in there pretty good, so it took a good amount of pressure and jiggling to break it free.


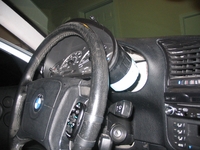
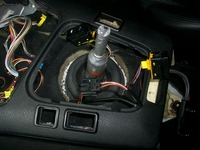
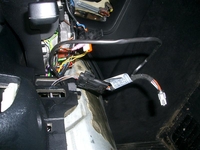
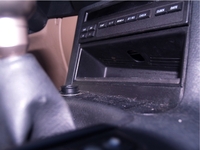
2) It should now slide forward and up to the steering wheel.


IMPORTANT: At this point you’re about to begin messing with electrical parts, so please stop and disconnect your battery before continuing. Leaving it plugged in might make you physically unable to finish this DIY.


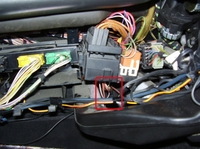
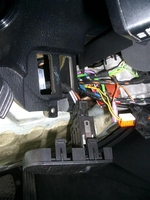
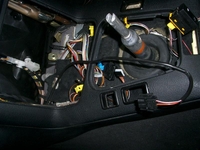
When you reach behind the unit, you’ll feel three wire bundles connecting it to the car. Two are on the right (one big vertical one, and one small horizontal one just below it), and one big vertical plug is on the left.


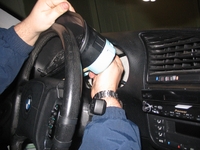
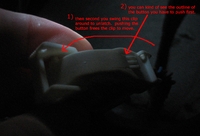
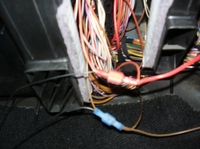
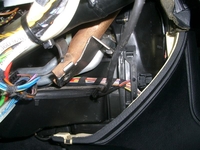
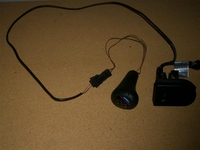
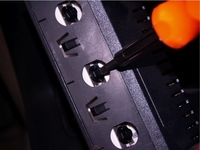
This is probably the trickiest part of the whole installation. You must reach behind the unit (probably blindly) and unplug them, however they are not a normal plug. There’s a little button you must push in the middle of the latch, then slide the clip up until the connection comes lose. Here’s a picture to try and explain it better:


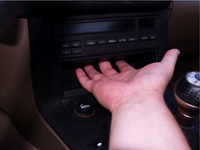
Then after it’s free just slide it out beside the wheel (again, might require a bit of creative shaking and squeezing, but it’s easily possible.


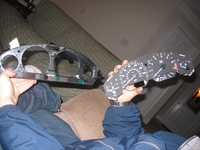
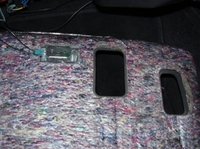
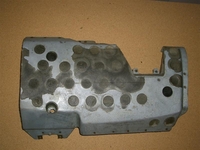
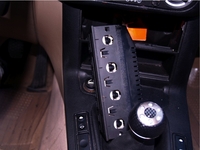
3) Now you should have the unit out of the car. Bring it inside or somewhere with good light and go get your T10 torque screw driver. There’s 5 screws, as shown by this image of the back of the cluster. Two up top, one on each side, and one deep screw in the very middle.


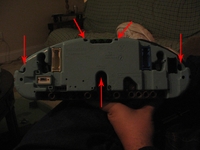
Unscrew them all, pull gently, and the unit should split open:


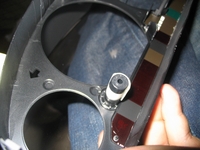
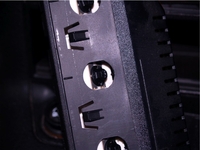
4) Now look at the faceplate half of the unit (the top half in the picture above). There are three unique, German engineered, “finger screws” holding the faceplate against the glass. It’s the round black circle knobs on each side, and one in the top middle. To unscrew these, simple twist the white part the direction they will move to free the face plate. Here’s a close up of one of the finger screws:


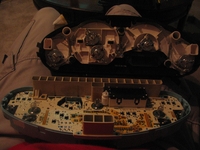
5) After all of them are turned to the unlocked/open position, gently pull the faceplate up and it should separate:


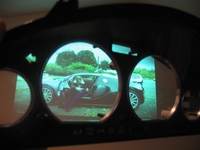
Now simply take your rings and pop them on to the left part of the above picture. Mine were very tight and clipped on, the friction plenty to hold them on through anything, however I know some of the rings are a lot looser and might require some creative glueing to get them to stay.


Here’s a picture of the rings on just that piece. Notice the Bugatti Veyron Top Gear on the projector in the background. This is a must for this DIY. If you don’t watch Top Gear while installing the rings, they won’t work.


6) Now the reverse install. Put the faceplate back in the glass (re-screwing the three thumb screws all the way to ensure nothing moves), then using the torque screws, reattach the back half of the gauge cluster.


Take it back to your car then, slide it beside the steering wheel, push it firmly into it’s hole, and screw the top two screws in.


Congratulations, you now have silver gauge rings installed in your car.


Are you looking for more do it yourself procedures (DIY) ? I recommend the Bentley BMW 3 series service manual for you. I got it and I think it’s a gold mine for us -BMW E36 Owners-. If you didn’t grab your copy yet, get it right now! I’m sure you’ll find this book worth every penny you’ve paid for. Get the Bentley BMW 3 series service manual


BMW E36 Blog: The ultimate BMW E36 information source.


Want to receive exciting tips & information about BMW E36 cars? Enter your Email:-


posted in Do It Yourself, Interior, Technical Info | 8 Comments