BMW E36 Blog

Miss March 2008 . . . Cabrio!

12th March 2008

Miss March 2008 . . . Cabrio!


It’s time for our monthly model post. In this post, I’ve chosen this cutie to be miss March 2008 and I think it’s a very cool car. But I have mixed feelings about the rims. At first, I thought they’re really special for it and then I said, there are other models that will look better on it, then again, I thought they’re cute. I’m not sure about them honestly. What do you think? Do you think these rims look cool or not?


BMW E36 Blog: The ultimate BMW E36 M3 information source.


Want to receive exciting tips & information about BMW E36 cars? Enter your Email:-


posted in Models, Photos, Uncategorized | 1 Comment

9th March 2008

A Comparison Between BMW M3, Porsche 911 GT3 And Nissan GTR


I’ve found a test that’s conducted by AutoCar Magazine between the BMW M3, Porsche 911 GT3 and the new Nissan GTR. I have to admit that I didn’t like the review and I think it’s unfair to conclude that a specific car is "better" than the rest based only on the opinion of the reviewer alone. Add to this that you get a feeling that this whole review was designed just to reach to the conclusion that the Nissan is the best of the three. I totally disagree with that. I don’t know about you guys. Please take a look at it and let me know what you all think.

Enjoy :-


BMW E36 Blog: The Ultimate E36 Information Source.

Want to receive exciting tips & information about BMW E36 cars? Enter your Email:-


posted in Super Cars, Uncategorized, Videos | 11 Comments

6th March 2008

BMW E36 With Double Exhaust


Unfortunately this BMW E36 is not highly modified for best performance and some how it needed another exhaust to help the engine breath better. It’s just a fake exhaust that the owner of the car thought it’s going to look cool on the car. The bad news is that it’s not even close to cool. At least in my opinion because I’ve read some replies about this image which agreed that it’s a cool thing, so there are people out there who think this will be a nice thing to do for a BMW E36. Me on the other hand, I really hate it and it makes the BMW E36 look ugly and a little bit silly. Anyway, I thought I would post about it here and see what you think of it. Important, if you have a bad heart or blood pressure problems, stop here and leave this page immediately 😆 . Have fun!


bmw e36 with double exhaust

bmw e36 with double exhaust

bmw e36 with double exhaust

bmw e36 with double exhaust

BMW E36 Blog: The ultimate E36 information source.


Want to receive exciting tips & information about BMW E36 cars? Enter your Email:-


posted in Exterior, Photos, Tips & Tricks, Uncategorized | 1 Comment

4th March 2008

BMW E36 vs BMW E46 . . . Which One Do You Prefer?


These are some photos that I’ve found for a BMW E36 and a BMW E46 together. The photos look really great and invite you to make a comparison between both cars. Of course, the color of the E36 is not my favorite and I absolutely love the E46 color very much (I think it’s Montego blue). This is to make things even worse. If it was up to me with those cars, I would change the E36 color to Montego blue and I’m 100% confident it is going to be a very clear choice that the E36 will look much better and sexier than the E46. What do you think guys? do you think the E36 is better looking than the E46 or not?

Enjoy:-


BMW E36 Blog: The ultimate BMW E36 M3 information source.


Want to receive exciting tips & information about BMW E36 cars? Enter your Email:-


posted in Photos, Uncategorized | 4 Comments

29th February 2008

Fixing BMW E36 Light Switch Illumination . . . DIY!


As I promised in my previous post, Top Gear BMW M5 Review, I prepared a DIY (Do It Yourself) to show you how to fix your BMW E36 light switch illumination. This is a very very common problem in BMW E36 cars and it always goes unnoticed. Having illumination in the BMW E36 light switch looks great and if you can’t see that illumination in your dashboard, this means that this DIY is for YOU. I hope you enjoy it and find the information provided below useful.

Disclaimer: Use this info at your own risk!! I’m not responsible if this didn’t work for you :-).

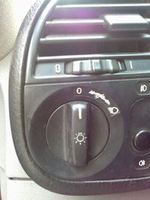
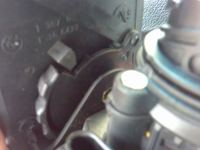
The illumination of your light switch can be fixed easily and it costs nothing. Well, only a dollar to buy the correct light bulb to use for replacement. To start, take a look at this:

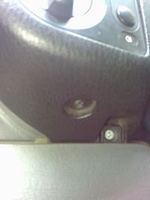
Now, at the bottom of this is a screw that you will need to remove. After that, you can remove the light switch and the air vent easily. Take a look at the screw here:

After you remove that screw, you will need to use a flat screw driver to push the whole light switch + air vent out. Be careful with this to avoid breaking anything. The whole part should be removed by pulling a little bit. You can pull it by hand by grabbing the light switch and the air vent opening. Just apply a little effort and it should come lose. After you remove the switch and the air vent, you will not be able to remove it totally out of its place. That’s because it’s connected by two wires that will need to be disconnected first. Take a look at the connectors that need to be removed:

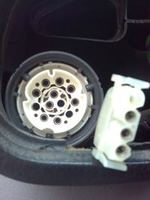
To remove the light connecter you should turn it anti-clockwise (from your point of view). Be careful with this, the wires are very short and you will need to use your fingers to turn the connector. It’s a little bit tight place to work with. After you finish it, you will have the whole part (light switch + air vent) out like this:

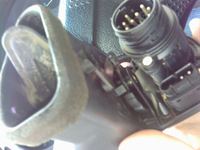
This is where you will find the pin that is holding the light bulb that needs to be replaced. Take a look:

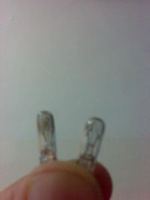
You will need to use a flat screw driver to remove the pin out of its place. Pay attention not to break anything ok? After you remove the pin, it should look something like this:

This is the light bulb that needs to be replaced. I brought another type of bulb by mistake thinking that these small bulbs are all of standard size. It turned out that I was wrong, so I had to go and get a different one. Take a look:

After you replace the bulb, put everything back the way your removed them. It’s going to be a little bit hard to reconnect the wires to the light switch, but don’t worry, you will be able to do it with a little patience and concentration.

After you connect the wires, you should try to place the air vent + the light switch back and you will notice that it’s not fitting exactly. That’s because you will need to make sure the opening of the air vent will slide in its place correctly. Just keep moving it a little bit up and down while pushing it gently. It will slide in and everything should look good now. Now turn your lights on and see if it’s working. If you’ve successfully accomplished the task, your light switch should look like this at night 😆

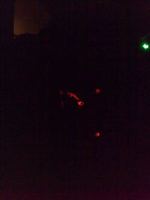
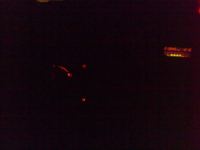
So, what do you think? Isn’t that a cool fix or what?


Are you looking for more do it yourself procedures (DIY) ? I recommend the Bentley BMW 3 series service manual for you. I got it and I think it’s a gold mine for us -BMW E36 Owners-. If you didn’t grab your copy yet, get it right now! I’m sure you’ll find this book worth every penny you’ve paid for. Get the Bentley BMW 3 series service manual

BMW E36 Blog: The ultimate BMW E36 information source.


Want to receive exciting tips & information about BMW E36 cars? Enter your Email:-


posted in Do It Yourself, Electrical, Interior, Uncategorized | 20 Comments